X8
User guide – short version
5Tap Set.
6Press  to go back to the setup guide.
User guide in the phone
An extended User guide is available in your phone.
The extended User guide is also available at www.sonyericsson.com/support.
To access the User guide in your phone
1From the Home screen, drag  upwards.
2Find and tap User guide.
If the supplied memory card is not inserted into your phone, you can access the User guide by selecting the Online user guide option after you tap User guide in step 2.
User support application
The support application is your window to Sony Ericsson support. Watch how-to videos, get the latest support news, enter the support zone or get the latest software for your phone.
To open the user support application
•From the Home screen, flick through the horizontal list of widgets and tap Support  .
.
Experience more. Discover how.
Visit www.sonyericsson.com/support to get the most from your phone.
2
To set up Timescape™ to work with Twitter™
1 From the setup guide, tap Twitter. |
Important information
Please read the Important information leaflet before you use your mobile phone.
Some of the services and features described in this User guide are not supported in all countries/regions or by all networks and/or service providers in all areas. Without limitation, this applies to the GSM International Emergency Number 112. Please contact your network operator or service provider to determine availability of any specific service or feature and whether additional access or usage fees apply.
Assembly
To remove the battery cover
•Insert the tip of your finger or a thin object into the opening on the side of the phone, between the phone and the battery cover, and slowly lift up the cover.
Do not use sharp objects that may damage parts of the phone.
3
Getting to know your phone
To insert the SIM card and the memory card
 2
2 
 1
1 


•Slide in the SIM card and the memory card with the gold- coloured contacts facing down.
To insert the battery
•Insert the battery with the battery usage labels facing down and the connectors facing each other.
4
12 | Camera lens |
13 | Volume key |
To attach the battery cover
1 
 2
2
1Secure the left side of the battery cover by aligning it into the openings on the rear left of the phone.
2Press the right side of the battery cover down to lock the cover into place.
Turning the phone on and off
To turn on the phone
1Press and hold down the 
 key on the top of the phone.
2Press 
 to unlock the screen.
3Enter your SIM card PIN, when requested, and select OK.
4At first startup, follow the instructions in Setup guide.
Your PIN is supplied by your network operator. If you want to correct a mistake made while entering your SIM card PIN, press  .
.
5
Charging the battery
The phone battery is partly charged when you buy the
To turn off the phone
1Press and hold 
 until the options menu opens.
2In the options menu, tap Power off.
3Tap OK.
To activate the screen
•Press 

 .
.
Starting your phone for the first time
The first time you start your phone, a setup guide helps you enter essential phone settings and set up your email and online services accounts. This is also a good time to use Sony Ericsson Sync to synchronise your old contacts with your new phone or to import contacts from a SIM card. You can also access the setup guide later from the Settings menu.
To set the language
1Scroll through the available languages list.
2Tap the language you want to use in your phone. The language is marked.
3Tap Save.
If you choose the wrong language and cannot read the menu texts, go to www.sonyericsson.com/support for help.
Internet and messaging settings
To send text and multimedia messages and to access the Internet, you must have a 2G/3G mobile data connection
6
To charge the phone using a computer
1 Connect the phone to a USB port on a computer using |
and the correct settings. There are different ways to get these settings:
•For most mobile phone networks and operators, Internet and messaging settings come preinstalled on your phone. You can then start using the Internet and send messages right away.
•In some cases you will get the option to download Internet and messaging settings the first time you turn on your phone. It is also possible to download these settings later from the Settings menu.
•You can manually add and change Internet and network settings in your phone at any time. Contact your network operator for detailed information on your Internet and messaging settings.
To import contacts from the SIM card
When you copy contacts from a phone to a SIM card, the amount and the type of information you can transfer for each contact is limited. To get more help on how to copy contacts between two phones, go to www.sonyericsson.com/support from your computer.
1When you start your phone for the first time, the setup wizard prompts you to import your SIM contacts. Tap Import contacts.
2When you are asked to confirm if you want to import your contacts from the SIM card to the phone, tap Yes.
To set the time and date
1From the setup guide, tap Time & date.
2Unmark the Automatic checkbox, if it is marked.
3Tap Set date or Set time.
4 Tap  or to adjust the date or hour and minute.
7
Home screen
The Home screen is the starting point of your phone. You
While setting time, you can shift between 12-hour and 24-hour format. If you want to use AM and PM, you have to unmark Use 24-hour format.
To set up your phone to use Google™ services
1From the setup guide, tap Google account.
2Tap Next.
3Tap Sign in if you want to use an existing Google™ account, or Create if you want to create a new account. Follow the on-screen instructions to finish setting up your phone with a Google™ account.
To set up an email account
1From the setup guide, tap Email.
2Tap Email address, enter your email address and tap Next.
3Enter your password and tap Done.
4Tap Continue.
5If the phone cannot download your email account settings automatically, enter the account settings manually.
If you need to enter the settings manually, contact your email service provider for the correct email account settings. For example, you need to know if the account type is POP3 or IMAP.
To set up Timescape™ to work with Facebook™
1From the setup guide, tap Facebook.
2Tap Username, enter your Facebook™ username and tap Next.
3Enter your password and tap Done.
2 | Tap Username, enter your Twitter™ username and tap |
3 | Next. |
Enter your password and tap Done. |
To transfer contacts using Sony Ericsson Sync
Before you can transfer contacts to your new phone using this method, you need to set up a Sony Ericsson account and synchronise your old phone with this account. Go to www.sonyericsson.com/user for more information.
1From the setup guide, tap Sync.
2Tap Sony Ericsson Sync.
3Enter your username and password, then tap Log in.
4Tap Save. The phone will now synchronise contacts, calendar events and bookmarks with your
Sony Ericsson account.
5Press  to return to the setup guide.
To exit the setup guide
•When you are finished with the setup guide, tap Done.
To access the setup guide
1From the Home screen, drag  upwards.
2Find and tap Settings > Basic settings > Setup guide.
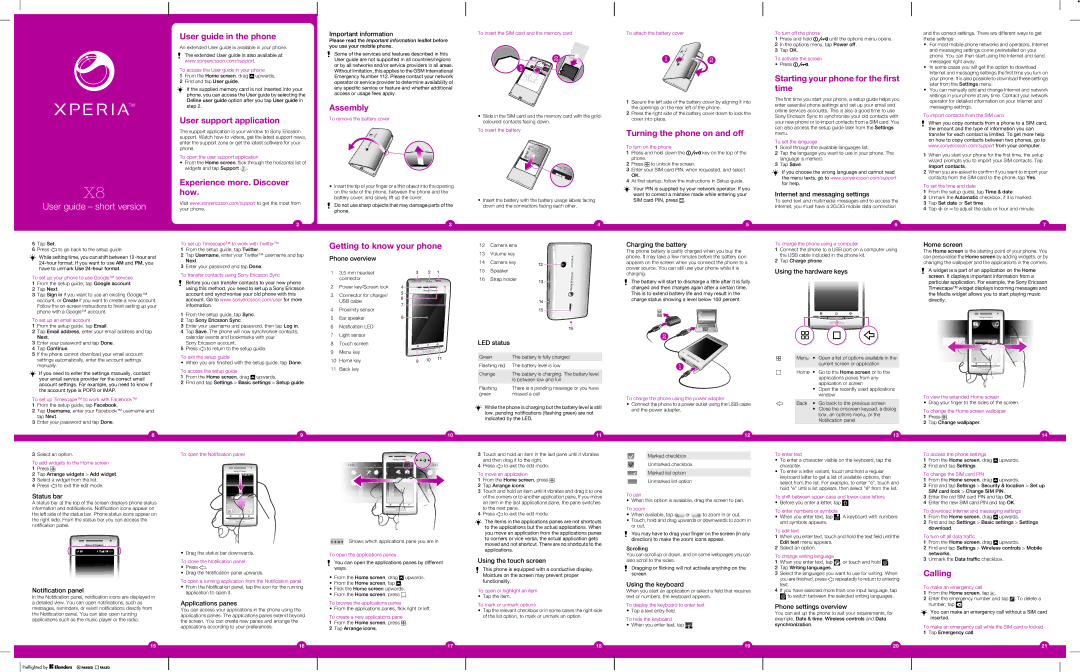
Phone overview
13.5 mm headset connector
2Power key/Screen lock
3Connector for charger/ USB cable
4Proximity sensor
5Ear speaker
6Notification LED
7Light sensor
8Touch screen
9Menu key
10Home key
11Back key
14 | Camera key | 12 | | | | |
15 | Speaker | | | | | |
| | | | | |
16 | Strap holder | 13 | | | | |
| | | | | | |
| | | 14 | | | | |
| | | | | | |
| | | 15 | | | | |
| | | | | | |
| | | | | |
| | | | | |
| | | 16 |
LED status | | | | | | |
| |
Green | The battery is fully charged |
Flashing red | The battery level is low |
| |
Orange | The battery is charging. The battery level |
| | is between low and full |
Flashing | There is a pending message or you have |
green | missed a call |
While the phone is charging but the battery level is still low, pending notifications (flashing green) are not indicated by the LED.
phone. It may take a few minutes before the battery icon appears on the screen when you connect the phone to a power source. You can still use your phone while it is charging.
The battery will start to discharge a little after it is fully charged and then charges again after a certain time. This is to extend battery life and may result in the charge status showing a level below 100 percent.
2
1
To charge the phone using the power adapter
•Connect the phone to a power outlet using the USB cable and the power adapter.
the USB cable included in the phone kit. |
2 Tap Charge phone. |
Using the hardware keys
Menu • Open a list of options available in the current screen or application
Home • Go to the Home screen or to the applications panes from any application or screen
•Open the recently used applications window
Back • Go back to the previous screen
•Close the onscreen keypad, a dialog box, an options menu, or the Notification panel
can personalise the Home screen by adding widgets, or by changing the wallpaper and the applications in the corners.
A widget is a part of an application on the Home screen. It displays important information from a particular application. For example, the Sony Ericsson Timescape™ widget displays incoming messages and the Media widget allows you to start playing music directly.
To view the extended Home screen
•Drag your finger to the sides of the screen.
To change the Home screen wallpaper
1Press 
 .
.
2Tap Change wallpaper.
8
3Select an option.
To add widgets to the Home screen
1Press 
 .
.
2Tap Arrange widgets > Add widget.
3Select a widget from the list.
4Press  to exit the edit mode.
Status bar
A status bar at the top of the screen displays phone status information and notifications. Notification icons appear on the left side of the status bar. Phone status icons appear on the right side. From the status bar you can access the notification panel.
 11:37
11:37
Notification panel
In the Notification panel, notification icons are displayed in a detailed view. You can open notifications, such as messages, reminders, or event notifications directly from the Notification panel. You can also open running applications such as the music player or the radio.
15
9
To open the Notification panel


 11:37
11:37
•Drag the status bar downwards.
To close the Notification panel
•Press  .
.
•Drag the Notification panel upwards.
To open a running application from the Notification panel
•From the Notification panel, tap the icon for the running application to open it.
Applications panes
You can access your applications in the phone using the applications panes. The applications panes extend beyond the screen. You can create new panes and arrange the applications according to your preferences.
16
10
Shows which applications pane you are in
To open the applications panes
You can open the applications panes by different ways.
•From the Home screen, drag  upwards.
•From the Home screen, tap  .
.
•Flick the Home screen upwards.
•From the Home screen, press 
 .
.
To browse the applications panes
•From the applications panes, flick right or left.
To create a new applications pane
1From the Home screen, press 

 .
.
2Tap Arrange icons.
17
11
3Touch and hold an item in the last pane until it vibrates and then drag it to the right.
4Press  to exit the edit mode.
To move an application
1From the Home screen, press 
 .
.
2Tap Arrange icons.
3Touch and hold an item until it vibrates and drag it to one of the corners or to another application pane. If you move an item in the last applications pane, the pane switches to the next pane.
4Press  to exit the edit mode.
The items in the applications panes are not shortcuts to the applications but the actual applications. When you move an application from the applications panes to corners or vice versa, the actual application gets moved and not shortcut. There are no shortcuts to the applications.
Using the touch screen
This phone is equipped with a conductive display. Moisture on the screen may prevent proper functionality.
To open or highlight an item
•Tap the item.
To mark or unmark options
•Tap the relevant checkbox or in some cases the right side of the list option, to mark or unmark an option.
18
12
Marked checkbox
Unmarked checkbox
Marked list option
Unmarked list option
To pan
•When this option is available, drag the screen to pan.
To zoom
•When available, tap  or
or  to zoom in or out.
•Touch, hold and drag upwards or downwards to zoom in or out.
You may have to drag your finger on the screen (in any direction) to make the zoom icons appear.
Scrolling
You can scroll up or down, and on some webpages you can also scroll to the sides.
Dragging or flicking will not activate anything on the screen.
Using the keyboard
When you start an application or select a field that requires text or numbers, the keyboard appears.
To display the keyboard to enter text
•Tap a text entry field.
To hide the keyboard
•When you enter text, tap  .
.
19
13
To enter text
•To enter a character visible on the keyboard, tap the character.
•To enter a letter variant, touch and hold a regular keyboard letter to get a list of available options, then select from the list. For example, to enter "é", touch and hold "e" until a list appears, then select "é" from the list.
To shift between upper-case and lower-case letters
•Before you enter a letter, tap  .
.
To enter numbers or symbols
•When you enter text, tap  . A keyboard with numbers and symbols appears.
To edit text
1When you enter text, touch and hold the text field until the Edit text menu appears.
2Select an option.
To change writing language
1 When you enter text, tap , or touch and hold .
2Tap Writing languages.
3Select the languages you want to use for writing. When
you are finished, press | repeatedly to return to entering |
text. | |
4If you have selected more than one input language, tap  to switch between the selected writing languages.
Phone settings overview
You can set up the phone to suit your requirements, for example, Date & time, Wireless controls and Data synchronization.
20
14
To access the phone settings
1From the Home screen, drag  upwards.
2Find and tap Settings.
To change the SIM card PIN
1From the Home screen, drag  upwards.
2Find and tap Settings > Security & location > Set up SIM card lock > Change SIM PIN.
3Enter the old SIM card PIN and tap OK.
4Enter the new SIM card PIN and tap OK.
To download Internet and messaging settings
1From the Home screen, drag  upwards.
2Find and tap Settings > Basic settings > Settings download.
To turn off all data traffic
1From the Home screen, drag  upwards.
2Find and tap Settings > Wireless controls > Mobile networks.
3Unmark the Data traffic checkbox.
Calling
To make an emergency call
1From the Home screen, tap  .
.
2Enter the emergency number and tap  . To delete a number, tap
  .
.
You can make an emergency call without a SIM card inserted.
To make an emergency call while the SIM card is locked 1 Tap Emergency call.
21