SPEAKER INSTALLATION

The unique integral four foot mounting system incorporated into each speaker


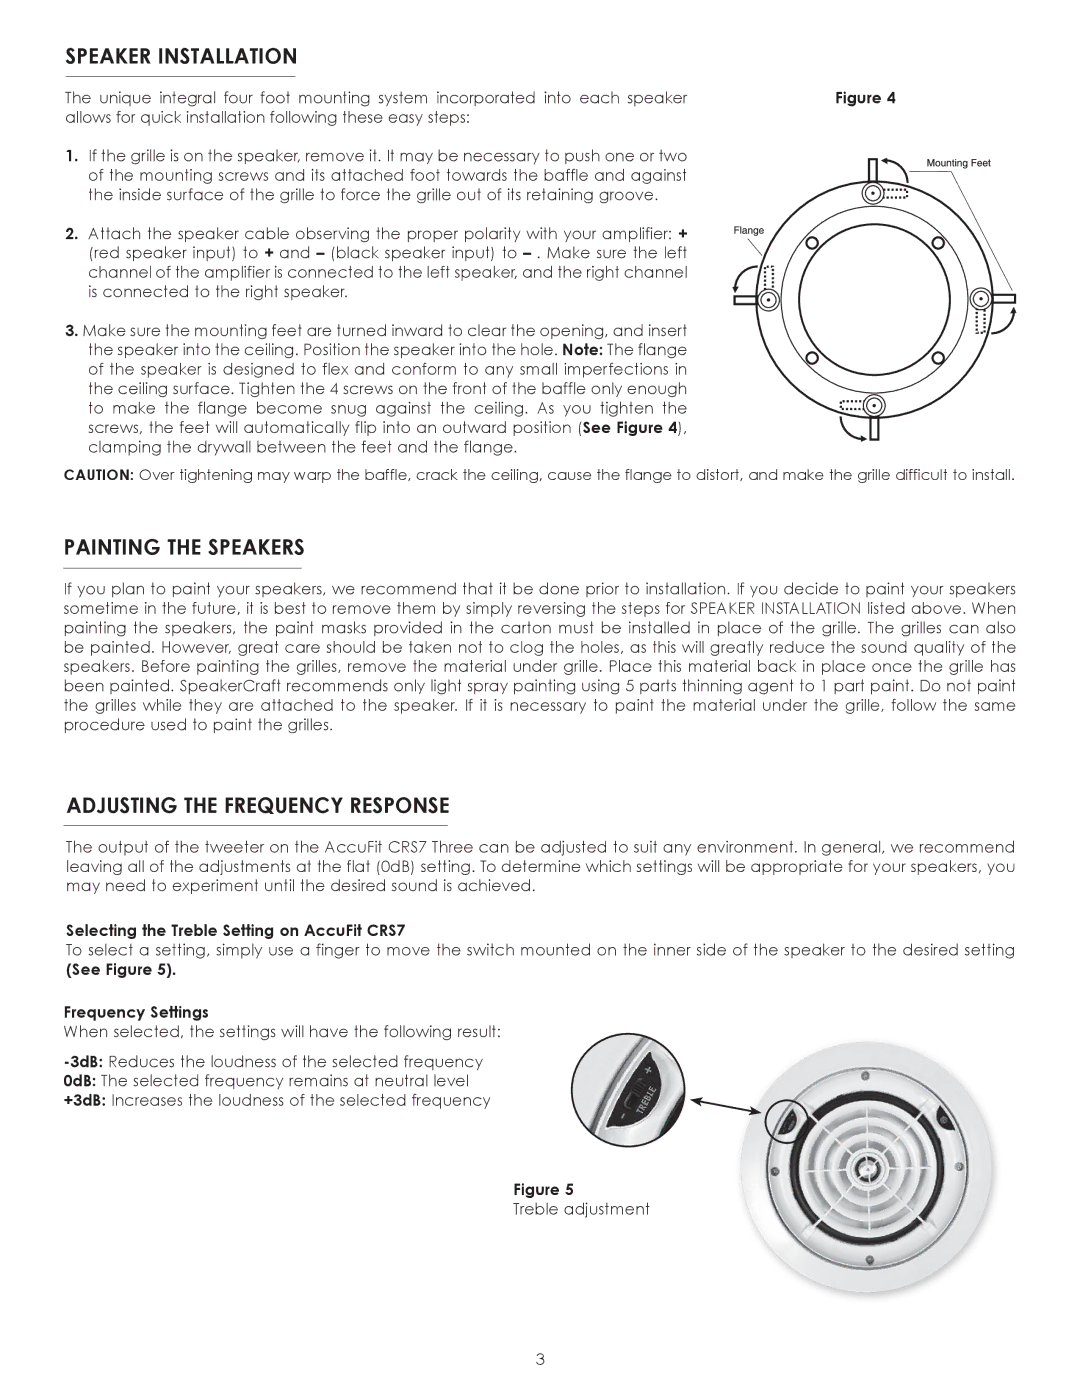
Figure 4

allows for quick installation following these easy steps:


1.

If the grille is on the speaker, remove it. It may be necessary to push one or two


of the mounting screws and its attached foot towards the baffle and against


the inside surface of the grille to force the grille out of its retaining groove.


2.

Attach the speaker cable observing the proper polarity with your amplifier: +


(red speaker input) to + and (black speaker input) to . Make sure the left


channel of the amplifier is connected to the left speaker, and the right channel


is connected to the right speaker.


3. Make sure the mounting feet are turned inward to clear the opening, and insert the speaker into the ceiling. Position the speaker into the hole. Note: The flange of the speaker is designed to flex and conform to any small imperfections in the ceiling surface. Tighten the 4 screws on the front of the baffle only enough to make the flange become snug against the ceiling. As you tighten the screws, the feet will automatically flip into an outward position (See Figure 4), clamping the drywall between the feet and the flange.

CAUTION: Over tightening may warp the baffle, crack the ceiling, cause the flange to distort, and make the grille difficult to install.

PAINTING THE SPEAKERS

If you plan to paint your speakers, we recommend that it be done prior to installation. If you decide to paint your speakers sometime in the future, it is best to remove them by simply reversing the steps for SPEAKER INSTALLATION listed above. When painting the speakers, the paint masks provided in the carton must be installed in place of the grille. The grilles can also be painted. However, great care should be taken not to clog the holes, as this will greatly reduce the sound quality of the speakers. Before painting the grilles, remove the material under grille. Place this material back in place once the grille has been painted. SpeakerCraft recommends only light spray painting using 5 parts thinning agent to 1 part paint. Do not paint the grilles while they are attached to the speaker. If it is necessary to paint the material under the grille, follow the same procedure used to paint the grilles.

ADJUSTING THE FREQUENCY RESPONSE

The output of the tweeter on the AccuFit CRS7 Three can be adjusted to suit any environment. In general, we recommend leaving all of the adjustments at the flat (0dB) setting. To determine which settings will be appropriate for your speakers, you may need to experiment until the desired sound is achieved.

Selecting the Treble Setting on AccuFit CRS7

To select a setting, simply use a finger to move the switch mounted on the inner side of the speaker to the desired setting

(See Figure 5).

Frequency Settings

When selected, the settings will have the following result:

-3dB:Reduces the loudness of the selected frequency

0dB: The selected frequency remains at neutral level

+3dB: Increases the loudness of the selected frequency

Figure 5

Treble adjustment

3

Page 4
Image 4
SpeakerCraft CRS7 owner manual Speaker Installation, Painting the Speakers, Adjusting the Frequency Response

CRS7 specifications

The SpeakerCraft CRS7 is a standout in the world of in-wall speakers, designed to deliver high-fidelity audio while maintaining a discreet presence in any living space. True to the brand's reputation for quality and innovation, the CRS7 speaker combines advanced technology with user-friendly features, making it an ideal choice for both home theater enthusiasts and casual listeners.

One of the main features of the CRS7 is its custom-engineered, 7-inch polypropylene woofer. This driver is designed to provide a robust bass response that complements the higher frequencies produced by its accompanying tweeter. The CRS7 incorporates a 1-inch titanium dome tweeter, which is notable for its ability to produce crisp, clear highs. Together, these components create a well-balanced sound signature, making the CRS7 suitable for a variety of audio applications, from movies to music.

The CRS7 also includes a unique swing-out mounting bracket, allowing for easy installation and secure placement within the wall. This feature minimizes distortion and optimizes sound quality, regardless of the mounting location. Additionally, the speaker's magnetic grille offers a sleek and unobtrusive aesthetic, ensuring that the CRS7 seamlessly integrates into any interior design.

Another significant characteristic of the CRS7 is its frequency response range, spanning from 50 Hz to 20 kHz. This broad range ensures that listeners can enjoy both the low-end thump of action-packed films and the delicate nuances of classical music with clarity and depth. Moreover, the speaker's power handling capacity of up to 125 watts allows it to perform well even in larger spaces, delivering sound that fills the room.

One of the standout technologies in the CRS7 is its carefully calibrated crossover network. This network ensures that sound frequencies are distributed evenly between the woofer and tweeter, optimizing audio performance and creating an immersive listening experience. The CRS7 is also designed for compatibility with a variety of amplifiers and receivers, making it a versatile addition to existing audio systems.

In conclusion, the SpeakerCraft CRS7 in-wall speaker offers exceptional sound quality, aesthetic appeal, and ease of installation. With features like a robust woofer, precision tweeter, and advanced crossover technology, it stands out as a premium choice for anyone looking to enhance their audio experience without compromising on style or space. Whether you're a film aficionado or simply enjoy high-quality music, the CRS7 provides a perfect blend of performance and elegance.