8.Clean the area around the element opening. Remove any sediment from or around the element opening and inside the tank.

9.If you are cleaning the element you have removed, do so by scraping or soaking in vinegar or a deliming solution.

NOTE: Replacement elements must (1) be the same voltage and (2) no greater wattage than listed on the model rating plate affixed to the water heater.

10.A new gasket should be used in all cases to prevent a possible water leak. Place the new element gasket on the threaded side of the cleaned or new element and screw into tank, securing tightly using an element wrench.

FIGURE 20.

11.Close the water heater drain valve by turning the handle to the right (clockwise). The drain valve is on the lower front of the water heater.

12.Open the cold water supply valve to the water heater.

NOTE: The cold water supply valve must be left open when the water heater is in use.

13.To insure complete filling of the tank, allow air to exit by opening the nearest hot water faucet. Allow water to run until a constant flow is obtained. This will let air out of the water heater and the piping.

Never use this water heater unless it is completely full of water. To prevent damage to the tank and heating element, the tank must be filled with water. Water must flow from the hot water faucet before turning “ON” power.

14.Check element for water leaks. If leakage occurs, tighten element or repeat Steps 2 and 3, remove element and reposition gasket. Then repeat Steps 10 through 14.

15.Reconnect the two wires to the element and then check to make sure the thermostat remains firmly against the surface of the tank.

16.Replace terminal cover on thermostat making sure the locking tabs on the terminal cover are in place.

17.Fold back the insulation so that it covers the thermostat and element.

18.Replace outer door.

19.Turn “ON” electric power to water heater.

FIGURE 22.

DRAIN VALVE WASHER REPLACEMENT

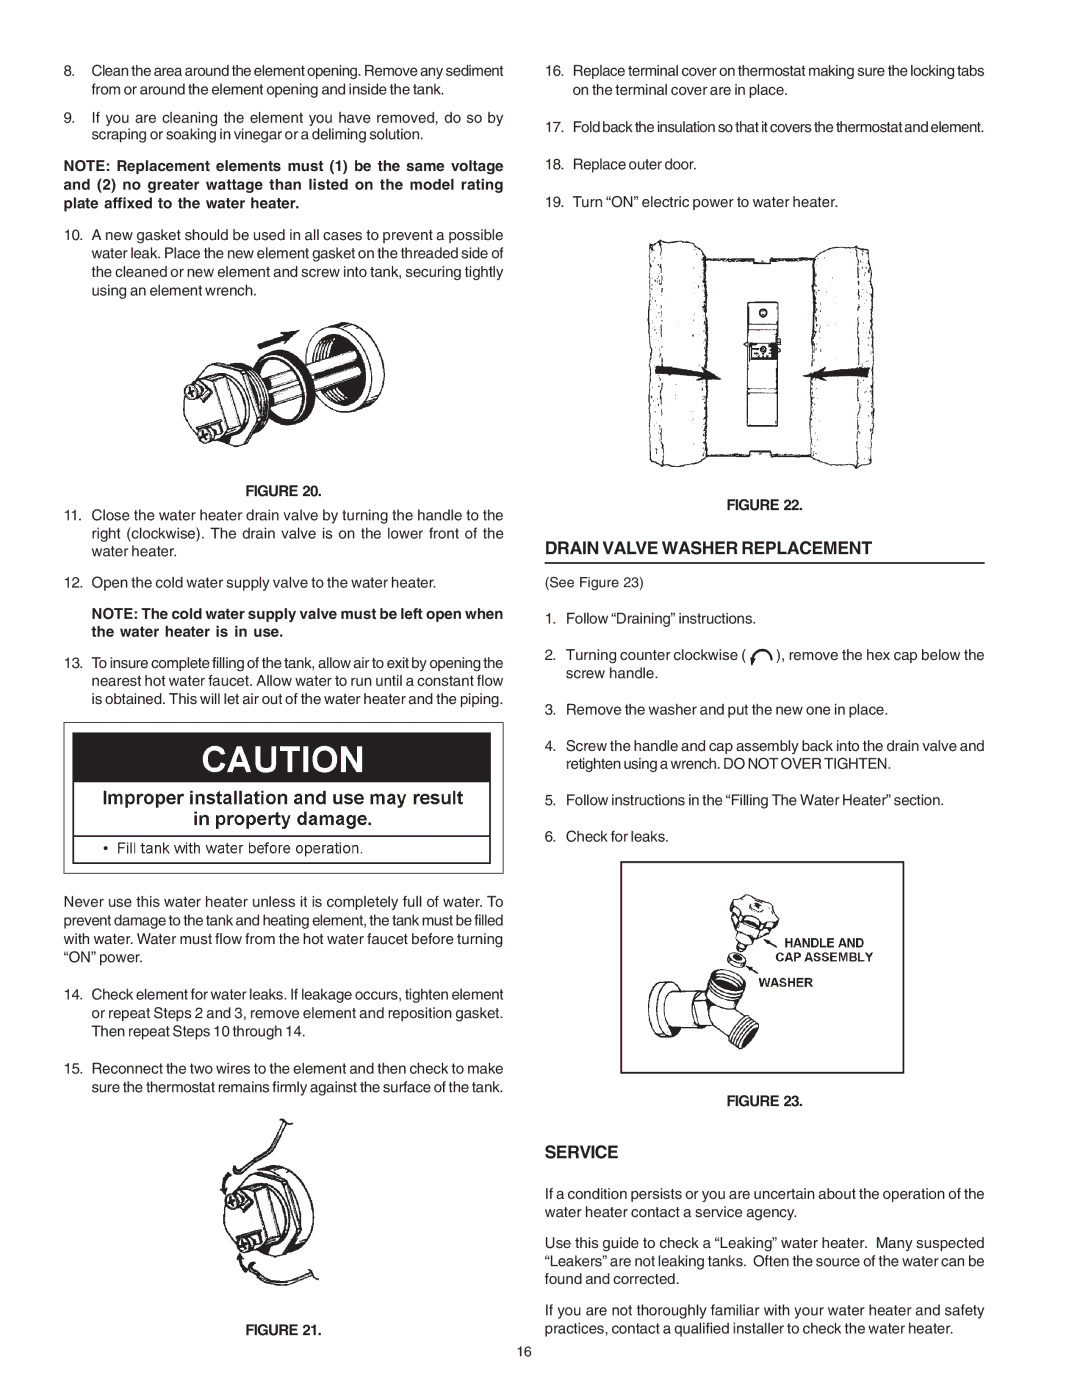
(See Figure 23)

1.Follow “Draining” instructions.

2.Turning counter clockwise ( ), remove the hex cap below the screw handle.

3.Remove the washer and put the new one in place.

4.Screw the handle and cap assembly back into the drain valve and retighten using a wrench. DO NOT OVER TIGHTEN.

5.Follow instructions in the “Filling The Water Heater” section.

6.Check for leaks.

FIGURE 23.


SERVICE


If a condition persists or you are uncertain about the operation of the


water heater contact a service agency.


Use this guide to check a “Leaking” water heater. Many suspected


“Leakers” are not leaking tanks. Often the source of the water can be


found and corrected.


If you are not thoroughly familiar with your water heater and safety

FIGURE 21.

practices, contact a qualified installer to check the water heater.

16

Page 16
Image 16
State Industries 184735-000 instruction manual Drain Valve Washer Replacement, Service

184735-000 specifications

State Industries is a prominent manufacturer known for its wide range of high-quality heating and cooling equipment, and the model number 184735-000 is a noteworthy example of its innovative product offerings. This particular model is designed to meet the demands of both residential and commercial settings, providing efficient solutions for temperature control.

One of the main features of the State Industries 184735-000 is its robust construction, ensuring durability and longevity even under the most demanding conditions. The unit is built with corrosion-resistant materials, making it a reliable choice for various environments, whether in humid coastal areas or dry inland regions. This factor significantly enhances its appeal to consumers who prioritize reliability in their heating and cooling systems.

In terms of technology, the 184735-000 incorporates advanced engineering principles that optimize energy efficiency. The unit is designed to adhere to modern energy standards and has potential for energy savings through its innovative compressor design. This technology not only reduces operational costs but also contributes to a reduced carbon footprint, making it an environmentally responsible choice.

The heating element in the State Industries 184735-000 utilizes state-of-the-art heating technology, providing rapid and efficient heating. This is particularly beneficial during colder months, ensuring that indoor spaces maintain a consistent and comfortable temperature. Additionally, it features user-friendly controls that allow for easy temperature adjustments, accommodating the varying preferences of different users.

Another characteristic worth mentioning is the unit's adaptability. The State Industries 184735-000 can be integrated with existing HVAC systems, enabling seamless installation and compatibility with current infrastructure. This aspect is crucial for both homeowners looking to upgrade their systems and businesses seeking to improve energy efficiency without a complete overhaul.

Furthermore, the model comes equipped with comprehensive safety features, including overheat protection and automatic shut-off mechanisms, ensuring safe operation even in the event of an unexpected malfunction. These features not only enhance user confidence but also contribute to the overall longevity of the unit.

In conclusion, the State Industries 184735-000 is designed with a focus on efficiency, durability, and user-friendliness. Its advanced technologies and robust construction make it a valuable asset for anyone seeking reliable heating and cooling solutions. Whether for residential or commercial use, this model stands out as a testament to State Industries' commitment to quality and innovation in the HVAC industry.