THE ROLE OF THE DUAL-MOTOR 3-WAY BEATING ACTION
Sunbeam launched its 3-way beating action technology in the 1930s, which revolutionized mixing at the turn of a dial. The beaters spin in opposing directions while the bowl spins counterclockwise for a powerful and thorough 3-way beating action. (See Figure 1)
Our latest innovation of this historic 3-way beating action is the introduction of an additional motor. One motor is located in the head of the Stand Mixer. This drives the individual beaters, each turning in opposite directions. The second motor is located in the base of the neck of the MIXMASTER® Stand Mixer and drives the turntable, rotating the bowl against the direction of the outside beater. The speed of the bowl rotation is automatically calibrated to the mixing speed selected. Therefore as the mixing speed increases so does the speed of the bowl, and as the mixing speed is decreased, the bowl speed also slows. These actions combine to ensure more powerful and thorough mixing. This dual motor design is patent pending.
PREPARING THE STAND MIXER FOR USE
Before preparing the mixer for use, be sure the speed control dial is in the OFF position and the electric cord is unplugged. Be sure to wash bowls and attachments before initial use.
ADJUSTING THE TURNTABLE
The turntable must be adjusted depending upon which bowl size is being used (see “Adding the Mixing Bowl”). To adjust, press down on the Turntable Bowl Selector Switch and slide switch to the proper icon. (See Figure 2)
RAISING AND LOWERING THE MIXING HEAD
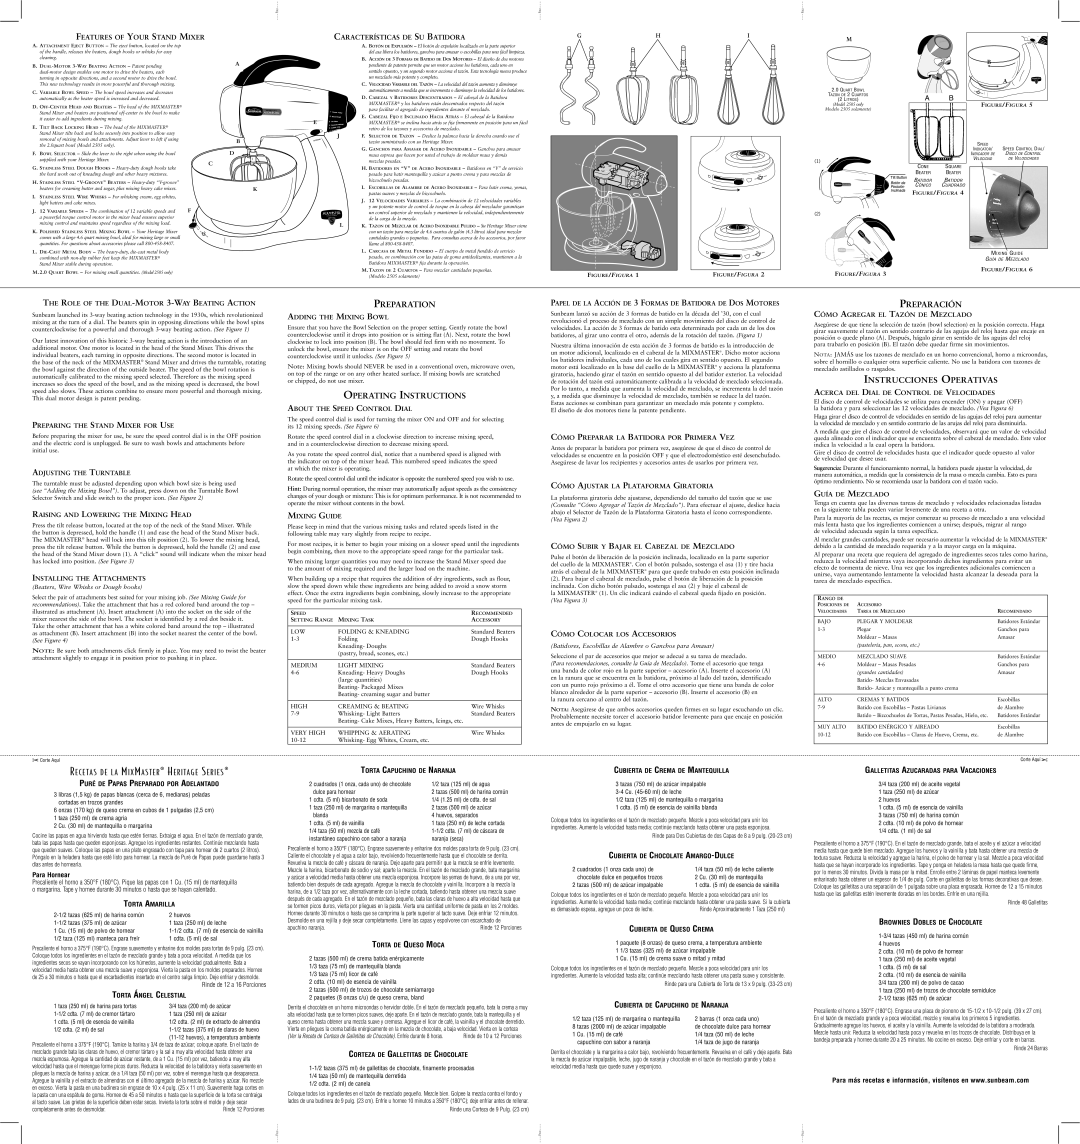
Press the tilt release button, located at the top of the neck of the Stand Mixer. While the button is depressed, hold the handle (1) and ease the head of the Stand Mixer back. The MIXMASTER® head will lock into this tilt position (2). To lower the mixing head, press the tilt release button. While the button is depressed, hold the handle (2) and ease the head of the Stand Mixer down (1). A “click” sound will indicate when the mixer head has locked into position. (See Figure 3)
INSTALLING THE ATTACHMENTS
(Beaters, Wire Whisks or Dough hooks)
Select the pair of attachments best suited for your mixing job. (See Mixing Guide for recommendations). Take the attachment that has a red colored band around the top – illustrated as attachment (A). Insert attachment (A) into the socket on the side of the mixer nearest the side of the bowl. The socket is identified by a red dot beside it. Take the other attachment that has a white colored band around the top – illustrated as attachment (B). Insert attachment (B) into the socket nearest the center of the bowl. (See Figure 4)
NOTE: Be sure both attachments click firmly in place. You may need to twist the beater attachment slightly to engage it in position prior to pushing it in place.
✂Corte Aquí
PREPARATION
ADDING THE MIXING BOWL
Ensure that you have the Bowl Selection on the proper setting. Gently rotate the bowl counterclockwise until it drops into position or is sitting flat (A). Next, rotate the bowl clockwise to lock into position (B). The bowl should feel firm with no movement. To unlock the bowl, ensure the mixer is on the OFF setting and rotate the bowl counterclockwise until it unlocks. (See Figure 5)
Note: Mixing bowls should NEVER be used in a conventional oven, microwave oven, on top of the range or on any other heated surface. If mixing bowls are scratched
or chipped, do not use mixer.
OPERATING INSTRUCTIONS
ABOUT THE SPEED CONTROL DIAL
The speed control dial is used for turning the mixer ON and OFF and for selecting its 12 mixing speeds. (See Figure 6)
Rotate the speed control dial in a clockwise direction to increase mixing speed, and in a counterclockwise direction to decrease mixing speed.
As you rotate the speed control dial, notice that a numbered speed is aligned with the indicator on top of the mixer head. This numbered speed indicates the speed at which the mixer is operating.
Rotate thespeed control dialuntilthe indicator is oppositethe numbered speed you wishto use.
Hint: During normal operation, the mixer may automatically adjust speeds as the consistency
changes of your dough or mixture: This is for optimum performance. It is not recommended to operate the mixer without contents in the bowl.
MIXING GUIDE
Please keep in mind that the various mixing tasks and related speeds listed in the following table may vary slightly from recipe to recipe.
For most recipes, it is better to begin your mixing on a slower speed until the ingredients begin combining, then move to the appropriate speed range for the particular task.
When mixing larger quantities you may need to increase the Stand Mixer speed due to the amount of mixing required and the larger load on the machine.
When building up a recipe that requires the addition of dry ingredients, such as flour, slow the speed down while these ingredients are being added to avoid a snow storm effect. Once the extra ingredients begin combining, slowly increase to the appropriate speed for the particular mixing task.
SPEED | | RECOMMENDED |
SETTING RANGE | MIXING TASK | ACCESSORY |
| | |
LOW | FOLDING & KNEADING | Standard Beaters |
1-3 | Folding | Dough Hooks |
| Kneading- Doughs | |
| (pastry, bread, scones, etc.) | |
| | |
MEDIUM | LIGHT MIXING | Standard Beaters |
4-6 | Kneading- Heavy Doughs | Dough Hooks |
| (large quantities) | |
| Beating- Packaged Mixes | |
| Beating- creaming sugar and butter | |
| | |
HIGH | CREAMING & BEATING | Wire Whisks |
7-9 | Whisking- Light Batters | Standard Beaters |
| Beating- Cake Mixes, Heavy Batters, Icings, etc. | |
| | |
VERY HIGH | WHIPPING & AERATING | Wire Whisks |
10-12 | Whisking- Egg Whites, Cream, etc. | |
| | |
PAPEL DE LA ACCIÓN DE 3 FORMAS DE BATIDORA DE DOS MOTORES
Sunbeam lanzó su acción de 3 formas de batido en la década del ’30, con el cual revolucionó el proceso de mezclado con un simple movimiento del disco de control de velocidades. La acción de 3 formas de batido esta determinada por cada un de los dos batidores, al girar uno contra el otro, además de la rotación del tazón. (Figura 1)
Nuestra última innovación de esta acción de 3 formas de batido es la introducción de un motor adicional, localizado en el cabezal de la MIXMASTER®. Dicho motor acciona los batidores individuales, cada uno de los cuales gira en sentido opuesto. El segundo motor está localizado en la base del cuello de la MIXMASTER® y acciona la plataforma giratoria, haciendo girar el tazón en sentido opuesto al del batidor exterior. La velocidad de rotación del tazón está automáticamente calibrada a la velocidad de mezclado seleccionada. Por lo tanto, a medida que aumenta la velocidad de mezclado, se incrementa la del tazón y, a medida que disminuye la velocidad de mezclado, también se reduce la del tazón. Estas acciones se combinan para garantizar un mezclado más potente y completo.
El diseño de dos motores tiene la patente pendiente.
CÓMO PREPARAR LA BATIDORA POR PRIMERA VEZ
Antes de preparar la batidora por primera vez, asegúrese de que el disco de control de velocidades se encuentre en la posición OFF y que el electrodoméstico esté desenchufado. Asegúrese de lavar los recipientes y accesorios antes de usarlos por primera vez.
CÓMO AJUSTAR LA PLATAFORMA GIRATORIA
La plataforma giratoria debe ajustarse, dependiendo del tamaño del tazón que se use (Consulte “Cómo Agregar el Tazón de Mezclado”). Para efectuar el ajuste, deslice hacia abajo el Selector de Tazón de la Plataforma Giratoria hasta el ícono correspondiente. (Vea Figura 2)
CÓMO SUBIR Y BAJAR EL CABEZAL DE MEZCLADO
Pulse el botón de liberación de la posición inclinada, localizado en la parte superior del cuello de la MIXMASTER®. Con el botón pulsado, sostenga el asa (1) y tire hacia atrás el cabezal de la MIXMASTER® para que quede trabado en esta posición inclinada (2). Para bajar el cabezal de mezclado, pulse el botón de liberación de la posición inclinada. Con dicho botón pulsado, sostenga el asa (2) y baje el cabezal de
la MIXMASTER® (1). Un clic indicará cuándo el cabezal queda fijado en posición. (Vea Figura 3)
CÓMO COLOCAR LOS ACCESORIOS
(Batidores, Escobillas de Alambre o Ganchos para Amasar)
Seleccione el par de accesorios que mejor se adecué a su tarea de mezclado. (Para recomendaciones, consulte la Guía de Mezclado). Tome el accesorio que tenga una banda de color rojo en la parte superior – accesorio (A). Inserte el accesorio (A) en la ranura que se encuentra en la batidora, próximo al lado del tazón, identificado con un punto rojo próximo a él. Tome el otro accesorio que tiene una banda de color blanco alrededor de la parte superior – accesorio (B). Inserte el accesorio (B) en
la ranura cercano al centro del tazón.
NOTA: Asegúrese de que ambos accesorios queden firmes en su lugar escuchando un clic. Probablemente necesite torcer el accesorio batidor levemente para que encaje en posición antes de empujarlo en su lugar.
PREPARACIÓN
CÓMO AGREGAR EL TAZÓN DE MEZCLADO
Asegúrese de que tiene la selección de tazón (bowl selection) en la posición correcta. Haga girar suavemente el tazón en sentido contrario de las agujas del reloj hasta que encaje en posición o quede plano (A). Después, hágalo girar en sentido de las agujas del reloj para trabarlo en posición (B). El tazón debe quedar firme sin movimientos.
NOTA: JAMÁS use los tazones de mezclado en un horno convencional, horno a microondas, sobre el hornillo o cualquier otra superficie caliente. No use la batidora con tazones de mezclado astillados o rasgados.
INSTRUCCIONES OPERATIVAS
ACERCA DEL DIAL DE CONTROL DE VELOCIDADES
El disco de control de velocidades se utiliza para encender (ON) y apagar (OFF) la batidora y para seleccionar las 12 velocidades de mezclado. (Vea Figura 6)
Haga girar el disco de control de velocidades en sentido de las agujas del reloj para aumentar la velocidad de mezclado y en sentido contrario de las arujas del reloj para disminuirla.
A medida que gire el disco de control de velocidades, observará que un valor de velocidad queda alineado con el indicador que se encuentra sobre el cabezal de mezclado. Este valor indica la velocidad a la cual opera la batidora.
Gire el disco de control de velocidades hasta que el indicador quede opuesto al valor de velocidad que desee usar.
Sugerencia: Durante el funcionamiento normal, la batidora puede ajustar la velocidad, de manera automática, a medida que la consistencia de la masa o mezcla cambia. Esto es para óptimo rendimiento. No se recomienda usar la batidora con el tazón vacío.
GUÍA DE MEZCLADO
Tenga en cuenta que las diversas tareas de mezclado y velocidades relacionadas listadas en la siguiente tabla pueden variar levemente de una receta a otra.
Para la mayoría de las recetas, es mejor comenzar su proceso de mezclado a una velocidad más lenta hasta que los ingredientes comiencen a unirse; después, migrar al rango
de velocidad adecuada según la tarea específica.
Al mezclar grandes cantidades, puede ser necesario aumentar la velocidad de la MIXMASTER® debido a la cantidad de mezclado requerida y a la mayor carga en la máquina.
Al preparar una receta que requiera del agregado de ingredientes secos tales como harina, reduzca la velocidad mientras vaya incorporando dichos ingredientes para evitar un efecto de tormenta de nieve. Una vez que los ingredientes adicionales comiencen a unirse, vaya aumentando lentamente la velocidad hasta alcanzar la deseada para la tarea de mezclado específica.
RANGO DE
POSICIONES DE | ACCESORIO | |
VELOCIDADES | TAREA DE MEZCLADO | RECOMENDADO |
| | |
BAJO | PLEGAR Y MOLDEAR | Batidores Estándar |
1-3 | Plegar | Ganchos para |
| Moldear – Masas | Amasar |
| (pastelería, pan, scons, etc.) | |
| | |
MEDIO | MEZCLADO SUAVE | Batidores Estándar |
4-6 | Moldear – Masas Pesadas | Ganchos para |
| (grandes cantidades) | Amasar |
| Batido- Mezclas Envasadas | |
| Batido- Azúcar y mantequilla a punto crema | |
| | |
ALTO | CREMAS Y BATIDOS | Escobillas |
7-9 | Batido con Escobillas – Pastas Livianas | de Alambre |
| Batido – Bizcochuelos de Tortas, Pastas Pesadas, Hielo, etc. | Batidores Estándar |
| | |
MUY ALTO | BATIDO ENÉRGICO Y AIREADO | Escobillas |
10-12 | Batido con Escobillas – Claras de Huevo, Crema, etc. | de Alambre |
| | |
| | Corte Aquí ✂ |
R E C E TAS DE LA M IX M A S TE R ® H E R ITA G E S ER IES ®
PURÉ DE PAPAS PREPARADO POR ADELANTADO
3 libras (1,5 kg) de papas blancas (cerca de 6, medianas) peladas cortadas en trozos grandes
6 onzas (170 kg) de queso crema en cubos de 1 pulgadas (2,5 cm) 1 taza (250 ml) de crema agria
2 Cu. (30 ml) de mantequilla o margarina
Cocine las papas en agua hirviendo hasta que estén tiernas. Extraiga el agua. En el tazón de mezclado grande, bata las papas hasta que queden esponjosas. Agregue los ingredientes restantes. Continúe mezclando hasta que queden suaves. Coloque las papas en una plato engrasado con tapa para hornear de 2 cuartos (2 litros). Póngalo en la heladera hasta que esté listo para hornear. La mezcla de Puré de Papas puede guardarse hasta 3 días antes de hornearla.
Para Hornear
Precaliente el horno a 350°F (180°C). Pique las papas con 1 Cu. (15 ml) de mantequilla o margarina. Tape y hornee durante 30 minutos o hasta que se hayan calentado.
TORTA AMARILLA
2-1/2 tazas (625 ml) de harina común | 2 huevos |
1-1/2 tazas (375 ml) de azúcar | 1 taza (250 ml) de leche |
1 Cu. (15 ml) de polvo de hornear | 1-1/2 cdta. (7 ml) de esencia de vainilla |
1/2 taza (125 ml) manteca para freír | 1 cdta. (5 ml) de sal |
Precaliente el horno a 375°F (190°C). Engrase suavemente y enharine dos moldes para tortas de 9 pulg. (23 cm). Coloque todos los ingredientes en el tazón de mezclado grande y bata a poca velocidad. A medida que los ingredientes secos se vayan incorporando con los húmedos, aumente la velocidad gradualmente. Bata a velocidad media hasta obtener una mezcla suave y esponjosa. Vierta la pasta en los moldes preparados. Hornee de 25 a 30 minutos o hasta que el escarbadientes insertado en el centro salga limpio. Deje enfriar y desmolde.
Rinde de 12 a 16 Porciones |
TORTA ÁNGEL CELESTIAL |
TORTA CAPUCHINO DE NARANJA
2 cuadrados (1 onza, cada uno) de chocolate | 1/2 taza (125 ml) de agua |
dulce para hornear | 2 tazas (500 ml) de harina común |
1 cdta. (5 ml) bicarbonato de soda | 1/4 (1.25 ml) de cdta. de sal |
1 taza (250 ml) de margarina o mantequilla | 2 tazas (500 ml) de azúcar |
blanda | 4 huevos, separados |
1 cdta. (5 ml) de vainilla | 1 taza (250 ml) de leche cortada |
1/4 taza (50 ml) mezcla de café | 1-1/2 cdta. (7 ml) de cáscara de |
instantáneo capuchino con sabor a naranja | naranja (seca) |
Precaliente el horno a 350°F (180°C). Engrase suavemente y enharine dos moldes para torta de 9 pulg. (23 cm). Caliente el chocolate y el agua a calor bajo, revolviendo frecuentemente hasta que el chocolate se derrita. Revuelva la mezcla de café y cáscara de naranja. Deje aparte para permitir que la mezcla se enfríe levemente. Mezcle la harina, bicarbonato de sodio y sal; aparte la mezcla. En el tazón de mezclado grande, bata margarina y azúcar a velocidad media hasta obtener una mezcla esponjosa. Incorpore las yemas de huevo, de a una por vez, batiendo bien después de cada agregado. Agregue la mezcla de chocolate y vainilla. Incorpore a la mezcla la harina, de a 1/2 taza por vez, alternativamente con la leche cortada, batiendo hasta obtener una mezcla suave después de cada agregado. En el tazón de mezclado pequeño, bata las claras de huevo a alta velocidad hasta que se formen picos duros, vierta por pliegues en la pasta. Vierta una cantidad uniforme de pasta en los 2 moldes. Hornee durante 30 minutos o hasta que se comprima la parte superior al tacto suave. Deje enfriar 12 minutos. Desmolde en una rejilla y deje secar completamente. Llene las capas y espolvoree con escarchado de
apuchino naranja. | Rinde 12 Porciones |
TORTA DE QUESO MOCA
2 tazas (500 ml) de crema batida enérgicamente 1/3 taza (75 ml) de mantequilla blanda
1/3 taza (75 ml) licor de café
2 cdta. (10 ml) de esencia de vainilla
2 tazas (500 ml) de trozos de chocolate semiamargo
2 paquetes (8 onzas c/u) de queso crema, bland
CUBIERTA DE CREMA DE MANTEQUILLA
3 tazas (750 ml) de azúcar impalpable 3-4 Cu. (45-60 ml) de leche
1/2 taza (125 ml) de mantequilla o margarina 1 cdta. (5 ml) de esencia de vainilla blanda
Coloque todos los ingredientes en el tazón de mezclado pequeño. Mezcle a poca velocidad para unir los ingredientes. Aumente la velocidad hasta media; continúe mezclando hasta obtener una pasta esponjosa.
Rinde para Dos Cubiertas de dos Capas de 8 a 9 pulg. (20-23 cm)
CUBIERTA DE CHOCOLATE AMARGO-DULCE
2 cuadrados (1 onza cada uno) de | 1/4 taza (50 ml) de leche caliente |
chocolate dulce en pequeños trozos | 2 Cu. (30 ml) de mantequilla |
2 tazas (500 ml) de azúcar impalpable | 1 cdta. (5 ml) de esencia de vainilla |
Coloque todos los ingredientes en el tazón de mezclado pequeño. Mezcle a poca velocidad para unir los ingredientes. Aumente la velocidad hasta media; continúe mezclando hasta obtener una pasta suave. Si la cubierta
es demasiado espesa, agregue un poco de leche. | Rinde Aproximadamente 1 Taza (250 ml) |
CUBIERTA DE QUESO CREMA
1 paquete (8 onzas) de queso crema, a temperatura ambiente 1 1/3 tazas (325 ml) de azúcar impalpable
1 Cu. (15 ml) de crema suave o mitad y mitad
Coloque todos los ingredientes en el tazón de mezclado pequeño. Mezcle a poca velocidad para unir los ingredientes. Aumente la velocidad hasta alta; continúe mezclando hasta obtener una pasta suave y consistente.
Rinde para una Cubierta de Torta de 13 x 9 pulg. (33-23 cm)
GALLETITAS AZUCARADAS PARA VACACIONES
3/4 taza (200 ml) de aceite vegetal 1 taza (250 ml) de azúcar
2 huevos
1 cdta. (5 ml) de esencia de vainilla
3 tazas (750 ml) de harina común
2 cdta. (10 ml) de polvo de hornear 1/4 cdta. (1 ml) de sal
Precaliente el horno a 375°F (190°C). En el tazón de mezclado grande, bata el aceite y el azúcar a velocidad media hasta que quede bien mezclado. Agregue los huevos y la vainilla y bata hasta obtener una mezcla de textura suave. Reduzca la velocidad y agregue la harina, el polvo de hornear y la sal. Mezcle a poca velocidad hasta que se hayan incorporado los ingredientes. Tape y ponga en heladera la masa hasta que quede firme, por lo menos 30 minutos. Divida la masa por la mitad. Enrolle entre 2 láminas de papel manteca levemente enharinado hasta obtener un espesor de 1/4 de pulg. Corte en galletitas de las formas decorativas que desee. Coloque las galletitas a una separación de 1 pulgada sobre una placa engrasada. Hornee de 12 a 15 minutos hasta que las galletitas estén levemente doradas en los bordes. Enfríe en una rejilla.
Rinde 48 Galletitas
BROWNIES DOBLES DE CHOCOLATE
1-3/4 tazas (450 ml) de harina común
4 huevos
2 cdta. (10 ml) de polvo de hornear
1 taza (250 ml) de aceite vegetal
1 cdta. (5 ml) de sal
2 cdta. (10 ml) de esencia de vainilla 3/4 taza (200 ml) de polvo de cacao
1 taza (250 ml) de trozos de chocolate semidulce
2-1/2 tazas (625 ml) de azúcar