9. Recording Features
Timer Recording
•Insert a tape with its record tab into the unit.
Hints for Timer Recording
• If there is a power failure or the unit has been unplugged for more than 30 sec- |
1
MENU
2
STOP | PLAY |
or
| - M E N U - |
| 5 Select the desired start | |||||||
B TIMER PROGRAMMING | ||||||||||
time (hour). |
|
|
| |||||||
AUTO REPEAT [OFF] |
|
|
| |||||||
CHANNEL SET UP |
| STOP | PLAY | ONE TIME PROGRAM |
| |||||
|
|
|
|
|
|
| ||||
|
|
|
| or |
| PROGRAM NUMBER | 1 | |||
|
|
|
|
| DATE |
| 10 / 2 4 | MON | ||
TIMER PROGRAMMING |
|
|
| |||||||
|
| START TIME | 0 7 : 3 0 | – – | ||||||
|
|
|
|
| F.FWD | |||||
PROG |
| 12345678 |
| END | TIME | – | – – | |||
|
|
| ||||||||
|
|
| CHANNEL | – – |
| |||||
DATE |
|
|
|
|
|
| ||||
|
|
|
|
| REC SPEED | – – |
| |||
START TIME |
|
| Select the |
| ||||||
|
|
|
|
|
| |||||
Available program |
|
|
|
|
| |||||
number flashes. |
| minute |
|
|
|
|
| |||
| F.FWD |
|
| STOP | PLAY |
|
|
|
| |
|
|
|
|
|
|
|
|
| ||
|
|
|
| or |
|
|
|
|
| |
PROGRAM NUMBER | 1 |
|
|
| F.FWD |
|
| |||
DATE |
| – |
|
|
|
|
|
| ||
|
|
|
|
|
|
|
| |||
START TIME | – | – – |
|
|
|
|
|
| ||
END | TIME | – | – – |
|
|
|
|
|
| |
CHANNEL | – – |
|
|
|
|
|
|
| ||
9 |
| ONE TIME PROGRAM |
| |
STOP | PLAY | PROGRAM NUMBER | 1 | |
|
| |||
|
| DATE | 1 0 / 2 4 | MON |
or |
| START TIME | 0 7 : 3 0 | PM |
| END TIME | 0 8 : 3 0 | PM | |
|
| CHANNEL | 1 6 |
|
|
| REC SPEED | SP |
|
|
| B SP |
| |
|
|
| SLP |
|
| Select the desired recording speed. | |||
|
| C.RESET |
|
|
|
| EXIT |
|
|
10 Turn off the | POWER |
| ||
VCR for recording
•TIMER indicator on the VCR lights up.
Hint
onds, the clock setting and all timer settings will be lost. |
• If the tape runs out before the end time, the unit will switch to the Stop mode |
immediately, eject the tape and the power will be turned off. The TIMER indicator |
will flash. |
• If a tape is not in the unit or does not have the record tab, the TIMER indicator |
flashes and timer recording cannot be performed. Please insert a recordable tape. |
• When all the Timer Recording are completed, the TIMER indicator flashes. |
To play or eject the recorded tape, hit [POWER] first, and then press |
[PLAY B] or [EJECT A]. |
To cancel a Timer Recording that is in progress |
Hit [STOP/EJECT C / A] on the unit.
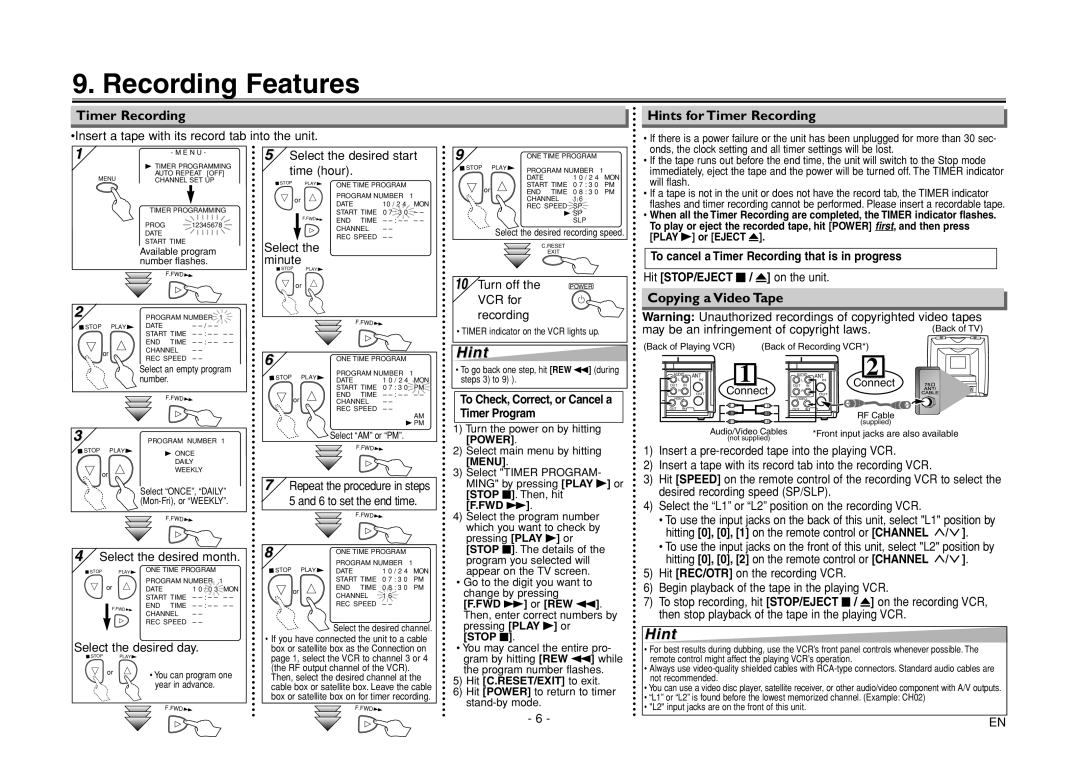
Copying a Video Tape
Warning: Unauthorized recordings of copyrighted video tapes
may be an infringement of copyright laws. | (Back of TV) | |
(Back of Playing VCR) | (Back of Recording VCR*) |
|
REC SPEED – – | 6 |
| ONE TIME PROGRAM |
| ||
Select an empty program |
|
|
|
| ||
|
| PROGRAM NUMBER | 1 | |||
number. | STOP | PLAY | ||||
DATE | 1 0 / 2 4 | MON | ||||
|
| |||||
|
|
| START TIME | 0 7 : 3 0 | PM | |
F.FWD | or |
| END TIME | – | – – | |
| CHANNEL | – – |
| |||
|
|
| ||||
|
|
| REC SPEED | – – | AM | |
|
|
|
|
| ||
|
|
|
| B PM | ||
•To go back one step, hit [REW h] (during steps 3) to 9) ).
To Check, Correct, or Cancel a Timer Program
AUDIO | ANT | |
L |
| IN |
OUT | IN |
|
R |
| OUT |
|
| |
VIDEO |
| |
OUT | IN |
|
1 |
Connect
AUDIO | ANT | |
L |
| IN |
OUT | IN |
|
R |
| OUT |
|
| |
VIDEO |
| |
OUT | IN |
|
2 |
Connect
RF Cable
(supplied)
3
STOP | PLAY |
or
Select “AM” or “PM”. |
PROGRAM NUMBER 1 |
F.FWD |
B ONCE |
DAILY |
WEEKLY |
| 7 Repeat the procedure in steps |
Select “ONCE”, “DAILY” | |
5 and 6 to set the end time. |
1) Turn the power on by hitting | |
| [POWER]. |
2) | Select main menu by hitting |
| [MENU]. |
3) | Select "TIMER PROGRAM- |
| MING" by pressing [PLAY B] or |
| [STOP C]. Then, hit |
| [F.FWD g]. |
Audio/Video Cables | *Front input jacks are also available |
(not supplied) |
|
1) | Insert a |
2) | Insert a tape with its record tab into the recording VCR. |
3) | Hit [SPEED] on the remote control of the recording VCR to select the |
| desired recording speed (SP/SLP). |
4) | Select the “L1” or “L2” position on the recording VCR. |
F.FWD | F.FWD |
|
4) Select the program number |
which you want to check by |
pressing [PLAY B] or |
• To use the input jacks on the back of this unit, select "L1" position by | |
hitting [0], [0], [1] on the remote control or [CHANNEL | ]. |
• To use the input jacks on the front of this unit, select "L2" position by | |
4Select the desired month.
STOP | PLAY | ONE TIME PROGRAM |
| ||
| or | PROGRAM NUMBER | 1 | ||
| DATE | 1 | 0 / 0 3 | MON | |
|
| START TIME | – | – – | |
| F.FWD | END TIME | – | – – | |
| CHANNEL | – – |
| ||
|
|
| |||
|
| REC SPEED | – – |
| |
8
STOP | PLAY |
or
ONE TIME PROGRAM |
| |
PROGRAM NUMBER | 1 | |
DATE | 1 0 / 2 4 | MON |
START TIME | 0 7 : 3 0 | PM |
END TIME | 0 8 : 3 0 | PM |
CHANNEL | 1 6 |
|
REC SPEED | – – |
|
Select the desired channel.
[STOP C]. The details of the |
program you selected will |
appear on the TV screen. |
• Go to the digit you want to |
change by pressing |
[F.FWD g] or [REW h]. |
Then, enter correct numbers by |
pressing [PLAY B] or |
| hitting [0], [0], [2] on the remote control or [CHANNEL | ]. |
5) | Hit [REC/OTR] on the recording VCR. |
|
6) | Begin playback of the tape in the playing VCR. |
|
7) | To stop recording, hit [STOP/EJECT C / A] on the recording VCR, | |
| then stop playback of the tape in the playing VCR. |
|
Hint
Select the desired day.
STOP | PLAY |
or | • You can program one |
| year in advance. |
| F.FWD |
•If you have connected the unit to a cable box or satellite box as the Connection on page 1, select the VCR to channel 3 or 4 (the RF output channel of the VCR).
Then, select the desired channel at the cable box or satellite box. Leave the cable box or satellite box on for timer recording.
![]() F.FWD
F.FWD![]()
[STOP C]. |
• You may cancel the entire pro- |
gram by hitting [REW h] while |
the program number flashes. |
5)Hit [C.RESET/EXIT] to exit.
6)Hit [POWER] to return to timer
- 6 -
•For best results during dubbing, use the VCR’s front panel controls whenever possible. The remote control might affect the playing VCR’s operation.
•Always use
•You can use a video disc player, satellite receiver, or other audio/video component with A/V outputs.
•“L1” or “L2” is found before the lowest memorized channel. (Example: CH02)
•"L2" input jacks are on the front of this unit.
EN