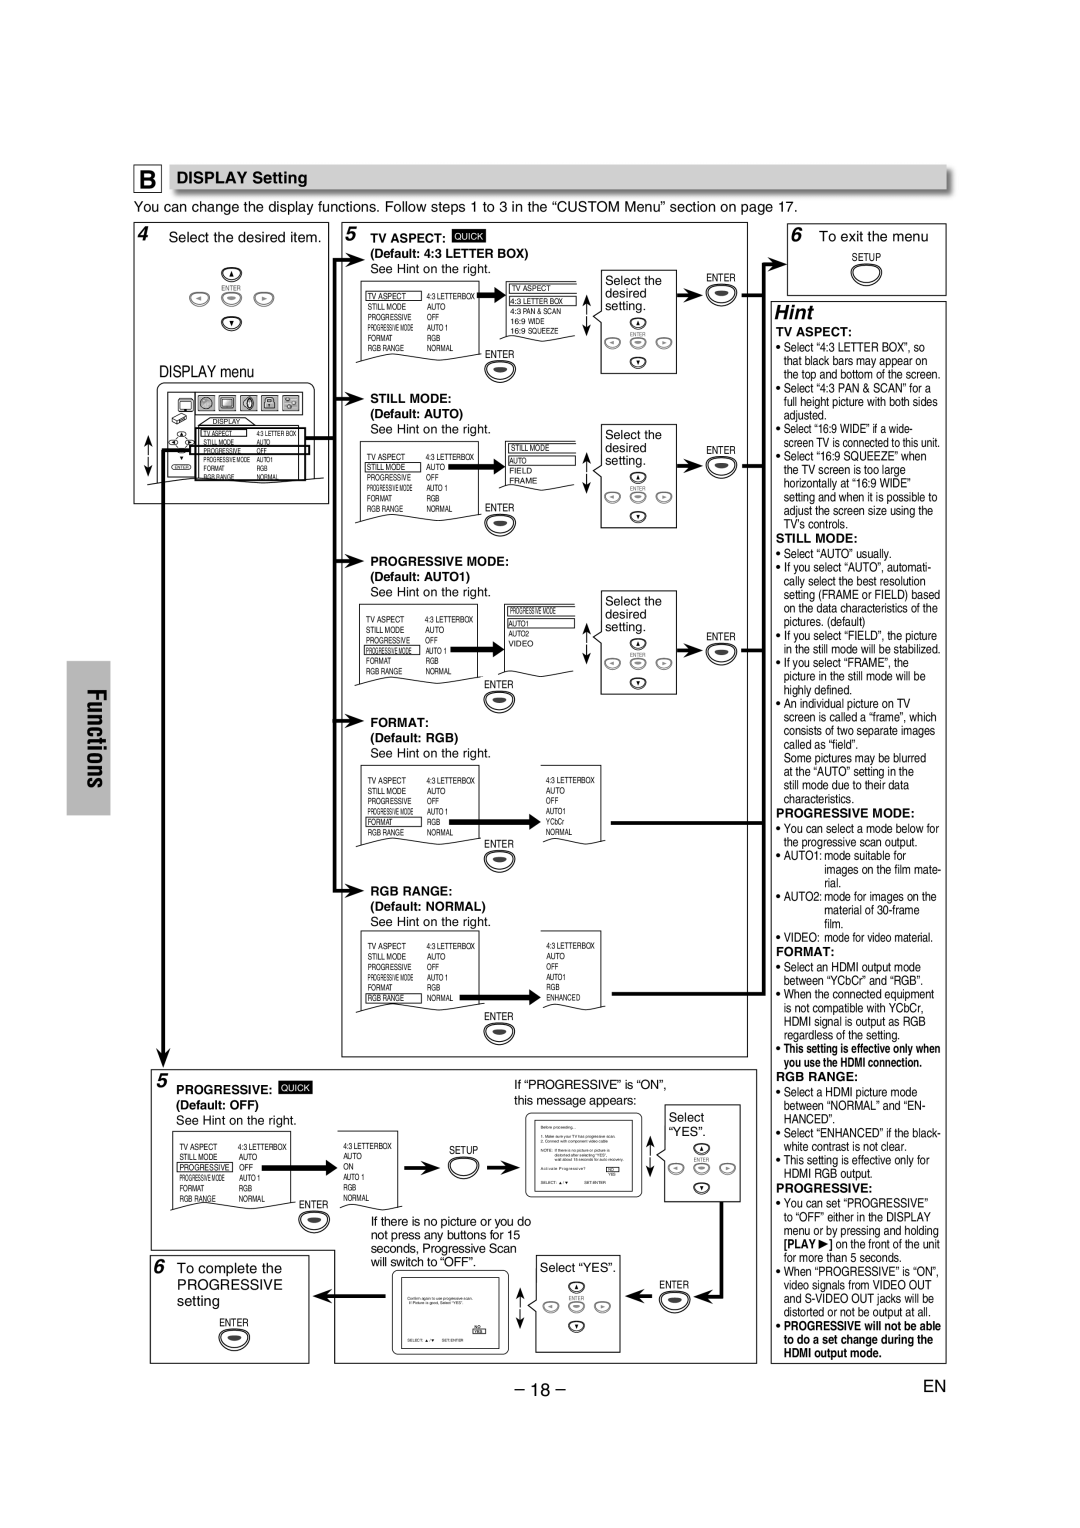
B DISPLAY Setting
You can change the display functions. Follow steps 1 to 3 in the “CUSTOM Menu” section on page 17.
4Select the desired item. 5
ENTER
DISPLAY menu
| DISPLAY |
|
| TV ASPECT | 4:3 LETTER BOX |
| STILL MODE | AUTO |
| PROGRESSIVE | OFF |
| PROGRESSIVE MODE | AUTO1 |
ENTER | FORMAT | RGB |
| RGB RANGE | NORMAL |
TV ASPECT: QUICK
(Default: 4:3 LETTER BOX)
See Hint on the right.
TV ASPECT | 4:3 LETTERBOX |
|
|
| TV ASPECT | |
|
|
| 4:3 LETTER BOX | |||
STILL MODE | AUTO |
|
|
| ||
|
|
| 4:3 PAN & SCAN | |||
PROGRESSIVE | OFF |
|
|
| ||
|
|
| 16:9 WIDE | |||
PROGRESSIVE MODE | AUTO 1 |
|
|
| ||
|
|
| 16:9 SQUEEZE | |||
FORMAT | RGB |
|
|
|
|
|
RGB RANGE | NORMAL |
|
|
|
|
|
| ENTER |
| ||||
|
|
|
| |||
|
|
|
|
|
|
|
STILL MODE:
(Default: AUTO) See Hint on the right.
TV ASPECT | 4:3 LETTERBOX |
|
| STILL MODE | ||
|
| AUTO | ||||
STILL MODE | AUTO |
|
|
| FIELD | |
PROGRESSIVE | OFF |
|
| FRAME | ||
PROGRESSIVE MODE | AUTO 1 |
|
|
|
| |
FORMAT | RGB |
|
|
|
| |
ENTER |
| |||||
RGB RANGE | NORMAL |
| ||||
|
|
|
|
|
|
|
Select the | ENTER |
desired |
|
setting. |
|
ENTER |
|
Select the
desired ENTER setting.
ENTER
6To exit the menu
SETUP
Hint
TV ASPECT:
•Select “4:3 LETTER BOX”, so that black bars may appear on the top and bottom of the screen.
•Select “4:3 PAN & SCAN” for a full height picture with both sides adjusted.
•Select “16:9 WIDE” if a wide- screen TV is connected to this unit.
•Select “16:9 SQUEEZE” when the TV screen is too large horizontally at “16:9 WIDE” setting and when it is possible to adjust the screen size using the TV’s controls.
STILL MODE:
Functions
PROGRESSIVE MODE: (Default: AUTO1)
See Hint on the right.
TV ASPECT | 4:3 LETTERBOX | PROGRESSIVE MODE | |||
AUTO1 | |||||
STILL MODE | AUTO | ||||
AUTO2 | |||||
PROGRESSIVE | OFF | ||||
VIDEO | |||||
PROGRESSIVE MODE | AUTO 1 |
|
|
| |
FORMAT | RGB |
| |||
RGB RANGE | NORMAL |
| |||
| |||||
ENTER
 FORMAT: (Default: RGB)
See Hint on the right.
TV ASPECT | 4:3 LETTERBOX | 4:3 LETTERBOX | |
STILL MODE | AUTO | AUTO | |
PROGRESSIVE | OFF | OFF | |
PROGRESSIVE MODE | AUTO 1 | AUTO1 | |
FORMAT | RGB |
| YCbCr |
RGB RANGE | NORMAL | NORMAL | |
ENTER
Select the desired setting.
ENTER
ENTER
•Select “AUTO” usually.
•If you select “AUTO”, automati- cally select the best resolution setting (FRAME or FIELD) based on the data characteristics of the pictures. (default)
•If you select “FIELD”, the picture in the still mode will be stabilized.
•If you select “FRAME”, the picture in the still mode will be highly defined.
•An individual picture on TV screen is called a “frame”, which consists of two separate images called as “field”.
Some pictures may be blurred at the “AUTO” setting in the still mode due to their data characteristics.
PROGRESSIVE MODE:
• You can select a mode below for |
the progressive scan output. |
• AUTO1: mode suitable for |
images on the film mate- |
rial. |
RGB RANGE: (Default: NORMAL) See Hint on the right.
TV ASPECT | 4:3 LETTERBOX | |
STILL MODE | AUTO | |
PROGRESSIVE | OFF | |
PROGRESSIVE MODE | AUTO 1 | |
FORMAT | RGB | |
RGB RANGE | NORMAL |
|
ENTER
4:3 LETTERBOX AUTO
OFF
AUTO1
RGB ENHANCED
• AUTO2: mode for images on the |
material of |
film. |
• VIDEO: mode for video material. |
FORMAT: |
• Select an HDMI output mode |
between “YCbCr” and “RGB”. |
• When the connected equipment |
is not compatible with YCbCr, |
HDMI signal is output as RGB |
regardless of the setting. |
• This setting is effective only when |
you use the HDMI connection. |
5 PROGRESSIVE: QUICK
(Default: OFF)
See Hint on the right.
TV ASPECT | 4:3 LETTERBOX |
| |
STILL MODE | AUTO |
| |
PROGRESSIVE | OFF |
|
|
PROGRESSIVE MODE | AUTO 1 |
| |
FORMAT | RGB |
| |
RGB RANGE | NORMAL | ENTER | |
|
|
| |
If “PROGRESSIVE” is “ON”, this message appears:
|
|
|
|
|
|
| Select |
|
|
|
| Before proceeding… |
|
| “YES”. |
|
|
|
| 1. Make sure your TV has progressive scan. | |||
4:3 LETTERBOX |
|
|
| 2. Connect with component video cable |
|
| |
| SETUP |
| NOTE: If there is no picture or picture is |
| |||
AUTO |
|
| distorted after selecting “YES”, |
| ENTER | ||
|
|
|
| wait about 15 seconds for auto recovery. | |||
ON |
|
|
| Activate Progressive? | NO |
| |
|
|
|
| ||||
AUTO 1 |
|
|
|
|
| YES |
|
|
|
| SELECT: K / L | SET:ENTER |
|
| |
RGB |
|
|
|
|
| ||
|
|
|
|
|
|
| |
NORMAL
RGB RANGE:
•Select a HDMI picture mode between “NORMAL” and “EN- HANCED”.
•Select “ENHANCED” if the black- white contrast is not clear.
•This setting is effective only for HDMI RGB output.
PROGRESSIVE:
• You can set “PROGRESSIVE” |
6To complete the
PROGRESSIVE setting
ENTER
If there is no picture or you do not press any buttons for 15 seconds, Progressive Scan will switch to “OFF”.
Confirm again to use progressive scan.
If Picture is good, Select “YES”.
NO
YES
SELECT: K / L SET:ENTER
Select “YES”.
ENTER![]()
ENTER
to “OFF” either in the DISPLAY |
menu or by pressing and holding |
[PLAY B] on the front of the unit |
for more than 5 seconds. |
• When “PROGRESSIVE” is “ON”, |
video signals from VIDEO OUT |
and |
distorted or not be output at all. |
• PROGRESSIVE will not be able |
to do a set change during the |
HDMI output mode. |
– 18 – | EN |