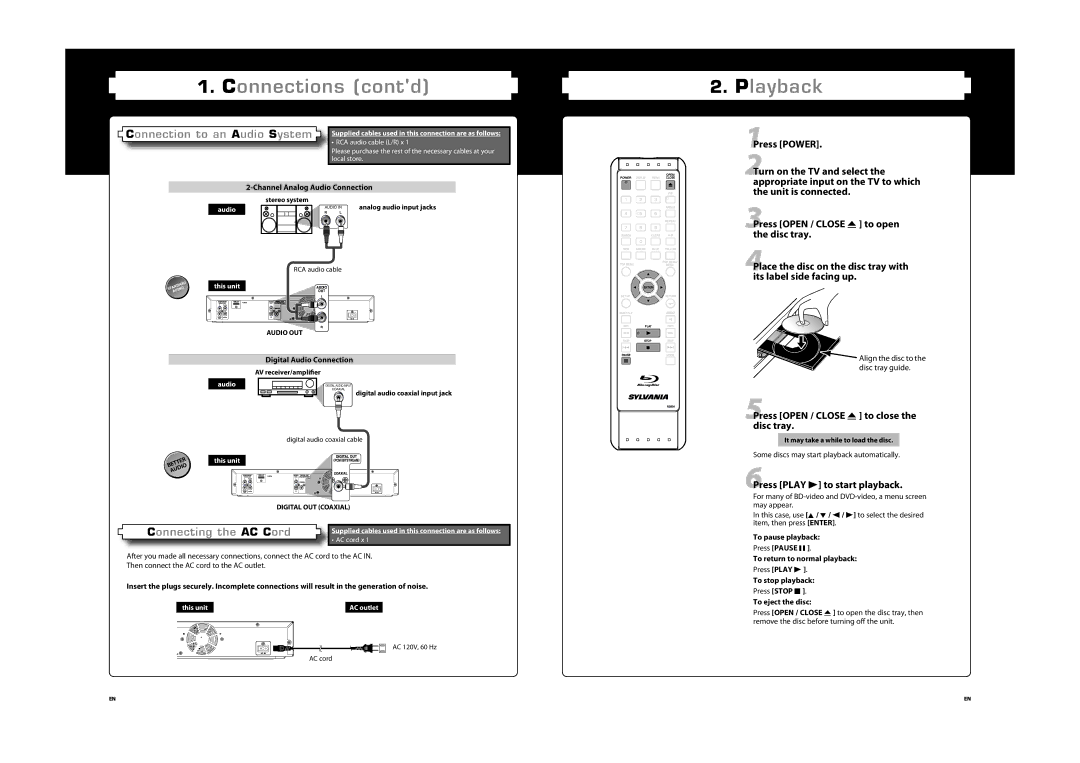
1.Connections (cont'd)
| Connection to an Audio System |
|
| Supplied cables used in this connection are as follows: |
|
| |||
|
|
| • RCA audio cable (L/R) x 1 | |
|
|
|
| |
|
|
|
| Please purchase the rest of the necessary cables at your |
|
|
|
| local store. |
2-Channel Analog Audio Connection
| stereo system |
| analog audio input jacks | ||
audio |
| AUDIO IN | |||
| R | L |
| ||
|
|
|
|
|
|
|
|
|
|
|
|
|
|
|
|
|
|
|
|
|
|
|
|
|
|
|
|
|
|
|
|
| RCA audio cable | ||||||||||||||||||||
|
|
|
|
|
|
|
|
|
| ||||||||||||||||||||||||||
| STANDARD |
| this unit |
|
|
|
|
| AUDIO | ||||||||||||||||||||||||||
|
| AUDIO |
|
|
|
|
|
|
|
|
|
|
|
|
|
|
| OUT | |||||||||||||||||
|
|
|
|
|
|
|
|
|
|
|
|
|
|
|
|
|
|
|
| L |
| ||||||||||||||
|
|
|
|
|
|
|
|
|
|
|
|
|
|
|
|
|
|
|
|
|
|
|
|
|
|
|
|
|
|
|
|
|
|
|
|
|
|
|
|
|
|
|
|
|
|
|
|
|
|
|
|
|
|
|
|
|
|
|
| ||||||||||||
|
|
|
|
|
|
|
|
|
|
|
|
|
|
|
|
|
|
|
|
|
|
|
|
|
|
|
|
|
|
|
|
|
|
|
|
|
|
|
|
|
|
|
|
|
|
|
|
|
|
|
|
|
|
|
|
|
|
|
|
|
|
|
|
|
|
|
|
|
|
|
|
|
|
|
|
|
|
|
|
|
|
|
|
|
|
|
|
|
|
|
|
|
|
|
|
|
|
|
|
|
|
|
|
|
|
|
|
|
|
|
|
|
|
|
|
|
|
|
|
|
|
|
|
|
|
|
|
|
|
|
|
|
|
|
|
|
|
|
|
|
|
|
|
|
|
|
|
|
|
|
|
|
|
|
|
|
|
|
|
|
|
|
| R | |||||||||||||||
|
|
|
|
|
|
|
|
|
|
|
| AUDIO OUT | |||||||||||||||||||||||
|
|
|
|
|
|
|
|
|
|
|
|
|
|
|
|
|
|
|
|
|
|
|
|
|
|
|
|
|
|
|
|
|
| ||
|
|
|
|
|
|
|
|
|
|
|
| Digital Audio Connection |
| ||||||||||||||||||||||
|
|
|
|
|
|
|
|
| AV receiver/amplifier | ||||||||||||||||||||||||||
|
|
|
|
|
|
|
|
|
|
|
|
|
|
|
|
|
|
|
|
|
|
|
|
|
| ||||||||||
|
|
|
|
| audio |
|
|
|
|
|
|
|
|
|
|
|
|
| DIGITAL AUDIO INPUT | ||||||||||||||||
|
|
|
|
|
|
|
|
|
|
|
|
|
|
|
|
|
|
|
|
|
|
| COAXIAL | ||||||||||||
|
|
|
|
|
|
|
|
|
|
|
|
|
|
|
|
|
|
|
|
|
|
|
|
|
|
|
|
| digital audio coaxial input jack | ||||||
|
|
|
|
|
|
|
|
|
|
|
|
|
|
|
|
|
|
|
|
|
|
| |||||||||||||
|
|
|
|
|
|
|
|
|
|
|
|
|
|
|
|
|
|
|
|
|
|
|
| ||||||||||||
|
|
|
|
|
|
|
|
|
|
|
|
|
|
|
|
|
|
|
|
|
|
|
|
|
|
|
|
|
|
|
|
|
|
|
|
|
|
|
|
|
|
|
|
|
|
|
|
|
|
|
|
|
|
|
|
|
|
|
|
|
|
|
|
|
|
|
|
|
|
|
|
|
|
|
|
|
|
|
|
|
|
|
|
| digital audio coaxial cable | ||||||||||||||||||||||
|
|
|
|
|
|
|
|
|
|
|
|
|
|
|
|
|
|
|
|
|
|
|
|
|
|
|
|
|
|
|
| ||||
|
|
|
|
|
|
|
|
|
|
|
|
|
|
|
|
|
|
|
|
|
|
|
|
|
|
|
|
|
| ||||||
| BETTER |
| this unit |
|
|
|
|
|
|
|
|
|
|
|
|
|
|
|
|
|
|
|
|
|
|
|
| ||||||||
|
|
|
|
|
|
|
|
|
|
|
|
|
|
|
|
|
|
|
|
|
|
|
|
|
|
|
|
|
|
|
|
| |||
|
| AUDIO |
|
|
|
|
|
|
|
|
|
|
|
|
|
|
|
|
|
|
|
|
|
|
|
|
|
|
|
|
|
|
|
| |
|
|
|
|
|
|
|
|
|
|
|
|
|
|
|
|
|
|
|
|
|
|
|
|
|
|
|
|
|
|
|
|
|
| ||
|
|
|
|
|
|
|
|
|
|
|
|
|
|
|
|
|
|
|
|
|
|
|
|
|
|
|
|
|
|
|
|
|
|
|
|
|
|
|
|
|
|
|
|
|
|
|
|
|
|
|
|
|
|
|
|
|
|
|
|
|
|
|
|
|
|
|
|
|
| ||
|
|
|
|
|
|
|
|
|
|
|
|
|
|
|
|
|
|
|
|
|
|
|
|
|
|
|
|
|
|
|
|
|
|
|
|
|
|
|
|
|
|
|
|
|
|
|
|
|
|
|
|
|
|
|
|
|
|
|
|
|
|
|
|
|
|
|
|
|
|
|
|
|
|
|
|
|
|
|
|
|
|
|
|
|
|
|
|
|
|
|
|
|
|
|
|
|
|
|
|
|
|
|
|
|
|
|
|
|
|
|
|
|
|
|
|
|
|
|
|
|
|
|
|
|
|
|
|
|
|
|
|
|
|
|
|
|
|
|
|
|
|
|
|
|
|
|
|
|
|
|
|
|
|
|
|
|
|
|
|
|
|
|
|
|
|
|
|
|
|
|
|
| |||||||
|
|
|
|
|
|
|
|
|
|
|
| DIGITAL OUT (COAXIAL) | |||||||||||||||||||||||
|
|
|
|
|
|
|
|
|
|
|
|
|
|
|
|
| |||||||||||||||||||
| Connecting the AC Cord |
|
|
|
|
|
|
| Supplied cables used in this connection are as follows: | ||||||||||||||||||||||||||
|
|
|
|
|
|
|
| • AC cord x 1 | |||||||||||||||||||||||||||
|
|
|
|
|
|
|
|
|
|
|
|
|
|
|
|
|
|
|
|
|
| ||||||||||||||
After you made all necessary connections, connect the AC cord to the AC IN.
Then connect the AC cord to the AC outlet.
Insert the plugs securely. Incomplete connections will result in the generation of noise.
this unit |
| AC outlet |
AC 120V, 60 Hz
AC cord
OPEN/
POWER DISPLAY HDMI CLOSE
SEARCH | CLEAR | ||
RED | GREEN | BLUE | YELLOW |
| ENTER |
| |
SUBTITLE |
|
| AUDIO |
REV | PLAY |
| FWD |
| STOP |
|
|
PAUSE |
|
| MODE |
2.Playback
1Press [POWER].
2Turn on the TV and select the appropriate input on the TV to which the unit is connected.
3Press [OPEN / CLOSE A ] to open the disc tray.
4Place the disc on the disc tray with its label side facing up.
 Align the disc to the disc tray guide.
5Press [OPEN / CLOSE A ] to close the disc tray.
It may take a while to load the disc.
Some discs may start playback automatically.
6Press [PLAY B] to start playback.
For many of
In this case, use [K / L / s / B] to select the desired item, then press [ENTER].
To pause playback:
Press [PAUSE F ].
To return to normal playback:
Press [PLAY B ].
To stop playback:
Press [STOP C ].
To eject the disc:
Press [OPEN / CLOSE A ] to open the disc tray, then remove the disc before turning off the unit.
EN | EN |