Manuals
/
Sylvania
/
TV and Video
/
TV DVD Combo
Sylvania
SRTD309
owner manual
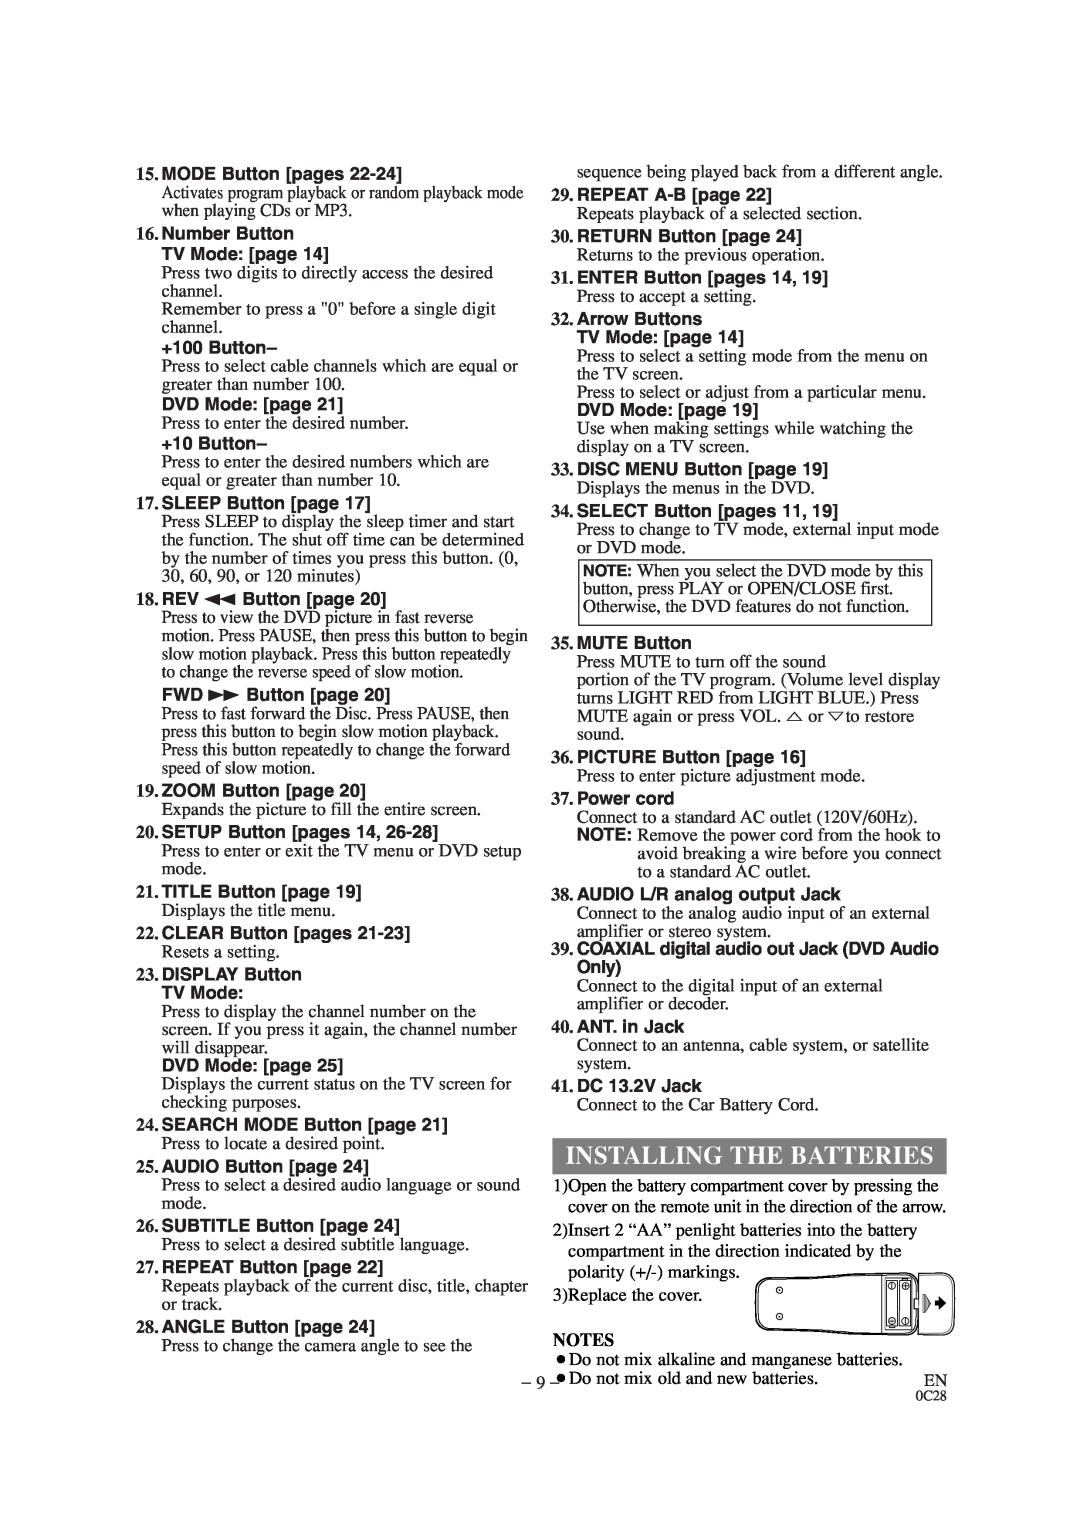
Installing The Batteries
Models:
SRTD309
1
9
40
40
Download
40 pages
5.48 Kb
6
7
8
9
10
11
12
13
Troubleshooting
Specification
Install
Password
Sleep Timer
Symbols Used In This Manual
Connecting To A Stereo System
Maintenance
Set Up For Use
Changing The Settings
Page 9
Image 9
Page 8
Page 10
Page 9
Image 9
Page 8
Page 10
Contents
This Owner’s Manual is made of recycled paper
INSTRUCCIONES EN ESPAÑOL INCLUIDAS
Please read before using this equipment
SRTD309
IMPORTANT SAFEGUARDS
FIGURE A EXAMPLE OF ANTENNA GROUNDING AS PER NATIONAL ELECTRICAL CODE
S2 8 9 8 A
LASER SAFETY
PRECAUTIONS
IMPORTANT COPYRIGHT INFORMATION
RADIO-TV INTERFERENCE
SYMBOLS USED IN THIS MANUAL
SUPPLIED ACCESSORY
LOCATION
AVOID THE HAZARDS OF ELECTRICAL SHOCK AND FIRE
TABLE OF CONTENTS
TV SECTION
DVD SECTION
FEATURES
TV Mode
DVD Mode
OPERATING CONTROLS AND FUNCTIONS
REMOTE CONTROL
TV/DVD FRONT PANEL Fig
TV/DVD REAR VIEW
INSTALLING THE BATTERIES
ANTENNA/CABLE CONNECTIONS
PREPARATION FOR USE
INDOOR ANTENNA
VHF/UHF COMBINED ANTENNA
CONNECTING TO A STEREO SYSTEM
CONNECTING TO EXTERNAL INPUT JACKS
Front of the TV/DVD
To the audio output jacks Audio/Video
CONNECTING TO A RECEIVER WITH DOLBY DIGITAL DECODER for DVD
CONNECTING TO AN AMPLIFIER EQUIPPED WITH DIGITAL
INPUT JACKS, MD DECK OR DAT DECK for DVD only
Center speaker
MOBILE CONNECTION
DANGER Do not use this TV/DVD while driving
Do not leave this TV/DVD in a car
CHANNEL SET UP FOR THE FIRST TIME
SET UP FOR USE
TV SECTION
DELETING OR ADDING CHANNEL
SELECTING THE LANGUAGE
CHANNEL SET UP AGAIN
TV SETUP B CHANNEL SET UP LANGUAGE ENGLISH
CHANNEL SET UP ADD / DELETE CH TV B AUTO PRESET
TV OPERATION
Note for using the Number on the remote control
WATCHING A TV PROGRAM
DEGAUSSING
To cancel the sleep timer
SLEEP TIMER
DVD SECTION
ABOUT THE DISCS
PLAYABLE DISCS
DISC TYPES
PLAYING A DISC
GENERAL FEATURES
BASIC PLAYBACK
DISC MENU
RESUME
Note for using buttons on the main unit
PAUSE
SLOW FORWARD SLOW REVERSE
SEARCH FUNCTION
MARKER SETUP SCREEN
TRACK SEARCH
TITLE / CHAPTER SEARCH
REPEATPROGRAM
SPECIAL PLAYBACK FUNCTION
RANDOM PLAYBACK
REPEAT TITLE / CHAPTER
MP3 PLAYBACK
PLAYING A MP3 DISC
TRACK SELECTION
PROGRAM
BLACK LEVEL SETTING
CHANGING THE SETTINGS
SUBTITLE LANGUAGE
AUDIO LANGUAGE
THE ON-SCREEN INFORMATION
For audio CDs
For MP3
CHANGING THE DVD SETUP ITEMS
LANGUAGE SETTING
TO CHANGE THE ON-SCREEN MENUS
DISPLAY SETTING
AUDIO SETTINGS
When playing disc with copyright Protection
PARENTAL LEVEL
PARENTAL CONTROL
IF YOU FORGET THE PASSWORD
CONTROL LEVELS
TROUBLESHOOTING GUIDE
Problem
Corrective Action
Audio or subtitle language cannot be
CABINET CLEANING
MAINTENANCE
DISC HANDLING
SERVICING
GENERAL SPECIFICATIONS
SPECIFICATIONS
ELECTRICAL SPECIFICATIONS
OTHER SPECIFICATIONS
CONTROLES DE OPERACIÓN Y FUNCIONES
INDICE
Consulte la figura 1 de la página
Consulte la figura 2 de la página
PARA INSERTAR LAS PILAS
PREPARACIÓN PARA LA UTILIZACIÓN
CONEXIONES DE
ANTENA/CABLE
CONEXIÓN A TOMAS DE ENTRADA EXTERNA
LA ANTENA INTERIOR
CONEXIÓN A UN SISTEMA
ESTÉREO
CONEXION MOVIL
CONEXCIONA UN DECODIFICADOR DOLBY DIGITAL Para DVD
Consulte la figura 9 de la página NOTAS
BORRADO O AGREGACION DE CANALES
SELECCIÓN DE IDIOMA
REPRODUCCIÓN DE UN DVD DE VÍDEO O UN CD DE AUDIO
REPRODUCCION BASICA
DVD-V CD
MEMO
Sears Roebuck and Co., Dept. 817WA Hoffman Estates, IL
For the location of a Sears Service Center in your area
Get it fixed, at your home or ours
Your Home
Top
Page
Image
Contents