TV/VCR SECTION
TV OPERATION AND SETTINGS
SECTION
WATCHING A TV PROGRAM
1 After antenna or cable connection is TV/VCR completed, connect the power cord into
a standard AC outlet.
2Press [POWER] to turn on the unit.
3Use [CH. K / L] or the Number buttons to select your desired channel number.
To use the number buttons
•Single digit channels: (Ex. 02, 03, 04 and so on) Press [0] first to select a single digit channel.
•Two digit channels: (Ex. 12, 38, 95 ...) Press two digits directly.
•Three digit channels: (Ex. 115, 125 ...)
Press [+100] first, then press the last two digits.
4Use [VOL. X / Y] to adjust the volume.
Press [MUTE] to instantly
mute the sound. Press it again VOLUME 20
C C C C C C C C C C C C C C C C
to restore the previous sound level.
NOTE:
•Even if you turn off the unit in the DVD mode, the unit will be in the TV/VCR mode when you turn it on again.
TO WATCH CABLE OR SATELLITE CHANNEL
If the unit is connected to a cable box or satellite box, use [CH. K / L] to select CH3 or CH4 accord- ing to the output channel setting of the device and select desired channel on that device.
SLEEP TIMER / PICTURE CONTROL
You can set Sleep Timer and picture | TV/VCR |
| |
adjustment with [PICTURE / SLEEP]. |
|
•The menu changes as described below every time you press [PICTURE / SLEEP].
Sleep Timer | BRIGHT | CONTRAST |
SHARPNESSTINTCOLOR
SLEEP TIMER SETTING
The Sleep Timer function is used to turn off the unit without pressing [POWERy] after a desired time.
1Press [PICTURE / SLEEP] to
SLEEP 0 MINUTE
display the Sleep Timer menu.
2Within 5 seconds, set your desired sleep time using [s / B].
•[B]...Increase by 30 min. (Up to 120 min.)
•[s]...Decrease by 30 min.
NOTE:
•To cancel the Sleep Timer, use [CLEAR] or [s / B] to set the time to "0".
3To confirm the remainder time to shutdown, press [PICTURE / SLEEP].
PICTURE CONTROL
1 Press [PICTURE / SLEEP] | BRIGHT |
repeatedly until desired control | – P P P P P P P C P P P P P P P + |
is displayed. |
|
CONTROLS AND FUNCTIONS / TV OPERATION AND SETTINGS TV/VCR
TO WATCH EXTERNAL INPUT
When an external equipment is
AUX
connected to the front AUDIO/ VIDEO input jacks, press [SELECT] or [CH. K / L] repeat- edly until "AUX" appears on the screen.
NOTE:
•If there is no signal input from the antenna terminal and no operation for 15 minutes, the unit will turn itself off automatically.
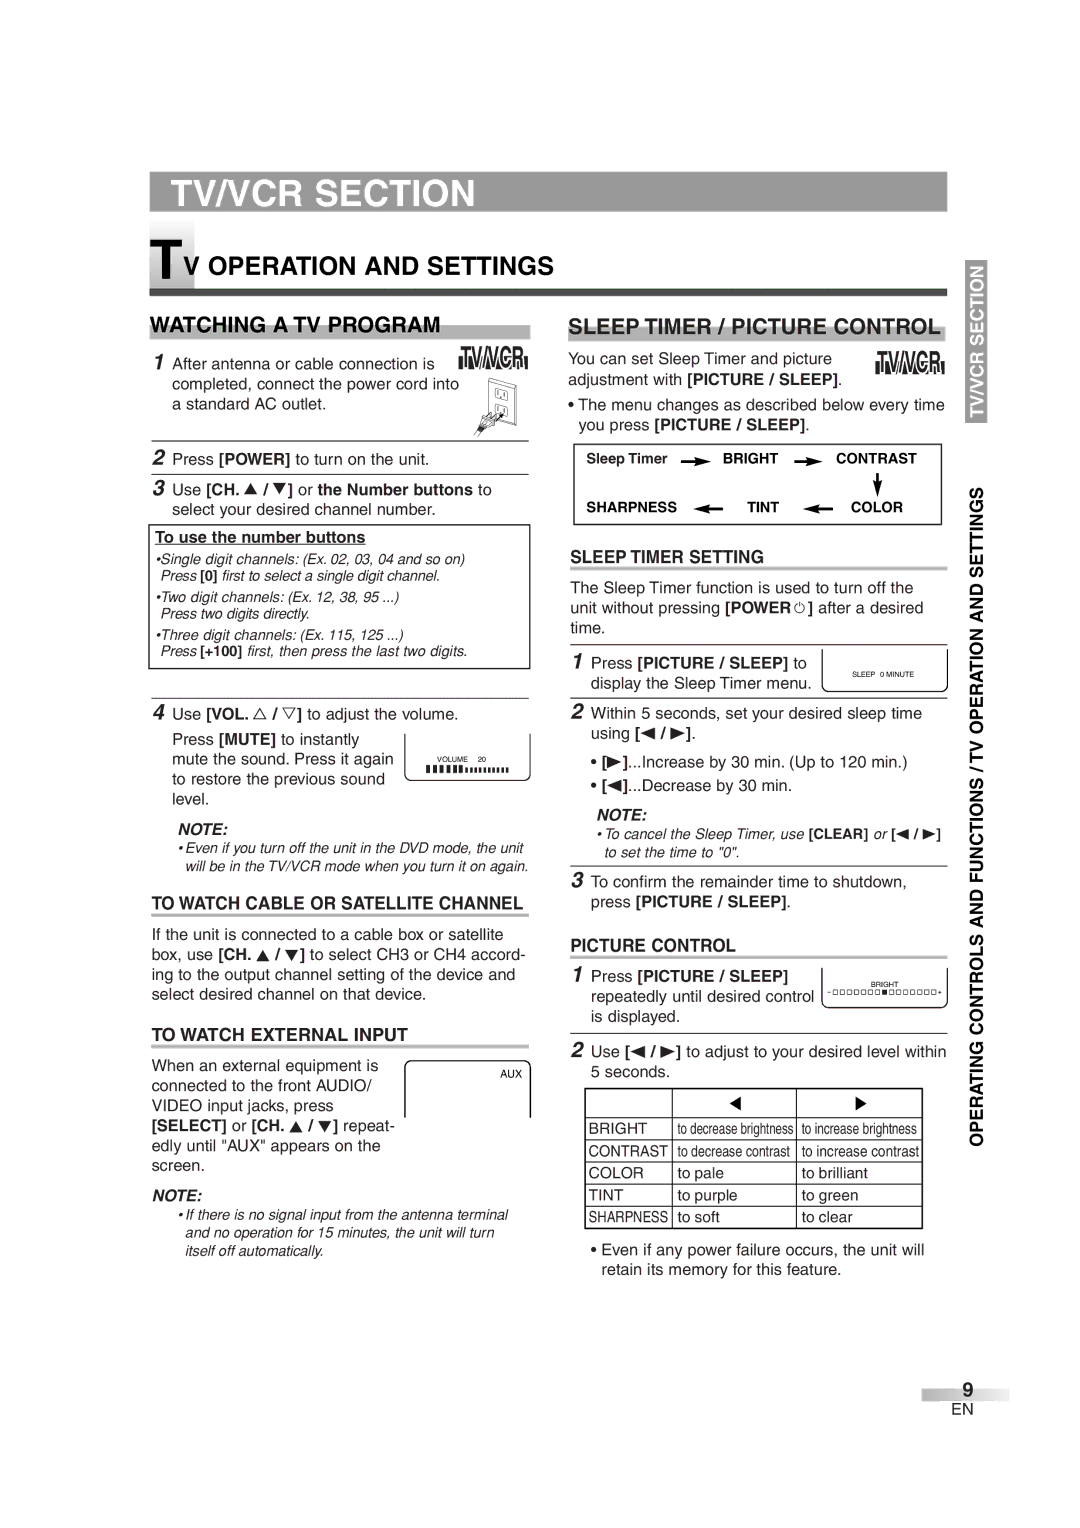
2Use [s / B] to adjust to your desired level within 5 seconds.
|
|
|
BRIGHT | to decrease brightness | to increase brightness |
|
|
|
CONTRAST | to decrease contrast | to increase contrast |
COLOR | to pale | to brilliant |
TINT | to purple | to green |
SHARPNESS | to soft | to clear |
|
|
|
•Even if any power failure occurs, the unit will retain its memory for this feature.
OPERATING
9
EN
