Thank you for purchasing the Taylor® Digital Cooking Thermometer/Timer. Your Thermometer/Timer is an example of superior design and craftsmanship. This product helps to eliminate
Battery Installation
The thermometer operates on 2 AAA alkaline batteries (included). There is a strip under the battery cover to prevent battery drain in shipping. Please remove the strip before continuing with these instructions (you may need to remove the battery compartment cover to avoid breaking the strip). If readings grow dim or irregular, the batteries may need to be replaced. To replace the batteries:
1. | Use 2- AAA alkaline batteries (as installed). Always replace |
| both batteries at the same time; do not combine old and new |
| batteries. |
2. | Remove the battery compartment cover, located on the back |
| of the unit (FIG. 2). |
General Operation (continued)
FIG. 3 |
General Operation (continued)
7. | Turn TEMP ALERT on for audible alarm. Press the |
| START/STOP button to begin timing. The thermometer |
| alarm will automatically sound when the inner temperature |
| reaches your preset temperature. |
8. | Press the START/STOP button and the alarm will stop |
| temporarily. The alarm will produce a 5 second reminder |
| beep every minute for 5 minutes until you turn it off. To turn |
| the alarm off, slide the TEMP ALERT switch to the OFF |
FIG. 1
Thermo
Temp
Sensor
Plug
Hour
Minute
Temp Set
Up/Down
LCD
Readout
Set
Temp
Temp
Alert
On/Off
Power
On/Off
Start/Stop Probe
3. | Remove the old batteries from the battery compartment. |
4. | Place the new batteries into the compartment as indicated by |
| the polarity symbols marked inside the battery compartment. |
5. | Replace the battery compartment cover. |
General Operation
1.Preheat the oven to desired cooking temperature.
2.Sterilize the metal probe by inserting it into an appropriate solution such as boiling water for several minutes.
| FIG. 2 | |
Cooking |
| |
Table |
| |
| Magnet | |
Battery |
| |
Compartment | °F/°C Slide | |
Reset | Switch | |
°C °F | ||
Button | RESET | |
Magnet | ||
|
Probe |
3.Turn unit on with switch located on the side. Select °F or °C temperature scale by moving the slide switch on the back of the thermometer.
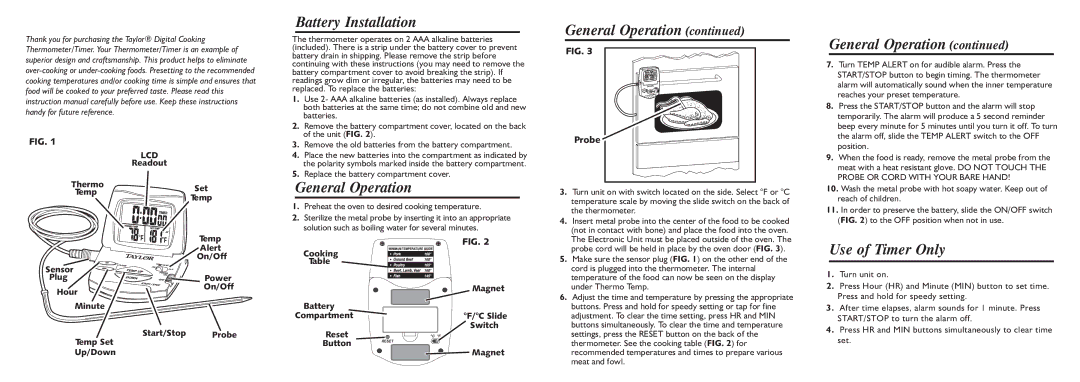
4.Insert metal probe into the center of the food to be cooked (not in contact with bone) and place the food into the oven. The Electronic Unit must be placed outside of the oven. The probe cord will be held in place by the oven door (FIG. 3).
5.Make sure the sensor plug (FIG. 1) on the other end of the cord is plugged into the thermometer. The internal temperature of the food can now be seen on the display under Thermo Temp.
6.Adjust the time and temperature by pressing the appropriate buttons. Press and hold for speedy setting or tap for fine adjustment. To clear the time setting, press HR and MIN buttons simultaneously. To clear the time and temperature settings, press the RESET button on the back of the thermometer. See the cooking table (FIG. 2) for recommended temperatures and times to prepare various meat and fowl.
position. |
9. When the food is ready, remove the metal probe from the |
meat with a heat resistant glove. DO NOT TOUCH THE |
PROBE OR CORD WITH YOUR BARE HAND! |
10. Wash the metal probe with hot soapy water. Keep out of |
reach of children. |
11. In order to preserve the battery, slide the ON/OFF switch |
(FIG. 2) to the OFF position when not in use. |
Use of Timer Only
1.Turn unit on.
2.Press Hour (HR) and Minute (MIN) button to set time. Press and hold for speedy setting.
3.After time elapses, alarm sounds for 1 minute. Press START/STOP to turn the alarm off.
4.Press HR and MIN buttons simultaneously to clear time set.