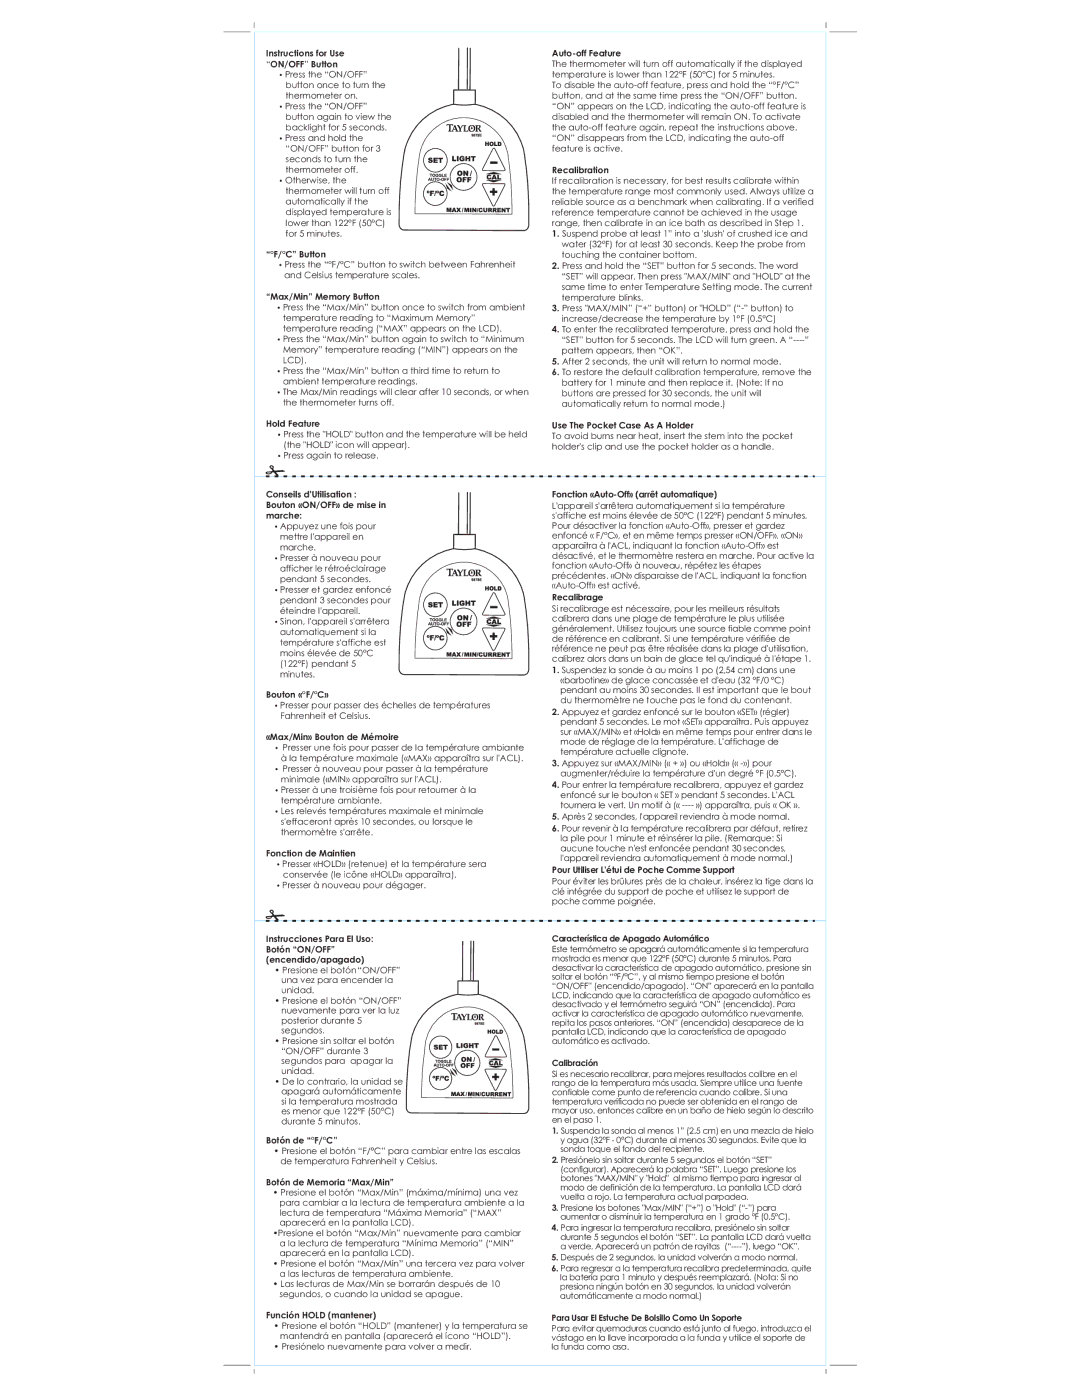
Instructions for Use “ON/OFF” Button
•Press the “ON/OFF” button once to turn the thermometer on.
•Press the “ON/OFF” button again to view the
backlight for 5 seconds.
•Press and hold the “ON/OFF” button for 3
seconds to turn the thermometer off.
• Otherwise, the thermometer will turn off automatically if the displayed temperature is lower than 122°F (50°C) for 5 minutes.
“°F/°C” Button
•Press the “°F/°C” button to switch between Fahrenheit and Celsius temperature scales.
“Max/Min” Memory Button
•Press the “Max/Min” button once to switch from ambient temperature reading to “Maximum Memory” temperature reading (“MAX” appears on the LCD).
•Press the “Max/Min” button again to switch to “Minimum Memory” temperature reading (“MIN”) appears on the LCD).
•Press the “Max/Min” button a third time to return to ambient temperature readings.
•The Max/Min readings will clear after 10 seconds, or when the thermometer turns off.
Hold Feature
Auto-off Feature
The thermometer will turn off automatically if the displayed temperature is lower than 122°F (50°C) for 5 minutes.
To disable the
Recalibration
If recalibration is necessary, for best results calibrate within the temperature range most commonly used. Always utilize a reliable source as a benchmark when calibrating. If a verified reference temperature cannot be achieved in the usage range, then calibrate in an ice bath as described in Step 1.
1.Suspend probe at least 1” into a 'slush' of crushed ice and water (32°F) for at least 30 seconds. Keep the probe from touching the container bottom.
2.Press and hold the “SET” button for 5 seconds. The word “SET” will appear. Then press "MAX/MIN" and "HOLD" at the same time to enter Temperature Setting mode. The current temperature blinks.
3.Press "MAX/MIN” (“+” button) or "HOLD”
4.To enter the recalibrated temperature, press and hold the “SET” button for 5 seconds. The LCD will turn green. A
5.After 2 seconds, the unit will return to normal mode.
6.To restore the default calibration temperature, remove the battery for 1 minute and then replace it. (Note: If no buttons are pressed for 30 seconds, the unit will automatically return to normal mode.)
Use The Pocket Case As A Holder
•Press the "HOLD" button and the temperature will be held (the "HOLD" icon will appear).
•Press again to release.
To avoid burns near heat, insert the stem into the pocket holder's clip and use the pocket holder as a handle.
Conseils d'Utilisation : Bouton «ON/OFF» de mise in marche:
•Appuyez une fois pour mettre l'appareil en marche.
•Presser à nouveau pour afficher le rétroéclairage
pendant 5 secondes.
• Presser et gardez enfoncé pendant 3 secondes pour éteindre l'appareil.
• Sinon, l'appareil s'arrêtera automatiquement si la température s'affiche est moins élevée de 50°C (122°F) pendant 5 minutes.
Bouton «°F/°C»
•Presser pour passer des échelles de températures Fahrenheit et Celsius.
«Max/Min» Bouton de Mémoire
•Presser une fois pour passer de la température ambiante à la température maximale («MAX» apparaîtra sur l'ACL).
•Presser à nouveau pour passer à la température minimale («MIN» apparaîtra sur l'ACL).
•Presser à une troisième fois pour retourner à la température ambiante.
•Les relevés températures maximale et minimale s'effaceront après 10 secondes, ou lorsque le thermomètre s'arrête.
Fonction de Maintien
•Presser «HOLD» (retenue) et la température sera conservée (le icône «HOLD» apparaîtra).
•Presser à nouveau pour dégager.
Fonction «Auto-Off» (arrêt automatique)
L'appareil s'arrêtera automatiquement si la température s'affiche est moins élevée de 50°C (122°F) pendant 5 minutes. Pour désactiver la fonction
Recalibrage
Si recalibrage est nécessaire, pour les meilleurs résultats calibrera dans une plage de température le plus utilisée généralement. Utilisez toujours une source fiable comme point de référence en calibrant. Si une température vérifiée de référence ne peut pas être réalisée dans la plage d'utilisation, calibrez alors dans un bain de glace tel qu'indiqué à l'étape 1.
1.Suspendez la sonde à au moins 1 po (2,54 cm) dans une «barbotine» de glace concassée et d'eau (32 °F/0 °C) pendant au moins 30 secondes. Il est important que le bout du thermomètre ne touche pas le fond du contenant.
2.Appuyez et gardez enfoncé sur le bouton «SET» (régler) pendant 5 secondes. Le mot «SET» apparaîtra. Puis appuyez sur «MAX/MIN» et «Hold» en même temps pour entrer dans le mode de réglage de la température. L'affichage de température actuelle clignote.
3.Appuyez sur «MAX/MIN» (« + ») ou «Hold» («
4.Pour entrer la température recalibrera, appuyez et gardez enfoncé sur le bouton « SET » pendant 5 secondes. L'ACL tournera le vert. Un motif à («
5.Après 2 secondes, l'appareil reviendra à mode normal.
6.Pour revenir à la température recalibrera par défaut, retirez la pile pour 1 minute et réinsérer la pile. (Remarque: Si aucune touche n'est enfoncée pendant 30 secondes, l'appareil reviendra automatiquement à mode normal.)
Pour Utiliser L'étui de Poche Comme Support
Pour éviter les brûlures près de la chaleur, insérez la tige dans la clé intégrée du support de poche et utilisez le support de poche comme poignée.
Instrucciones Para El Uso: Botón “ON/OFF” (encendido/apagado)
•Presione el botón “ON/OFF” una vez para encender la unidad.
•Presione el botón “ON/OFF” nuevamente para ver la luz posterior durante 5
segundos.
• Presione sin soltar el botón “ON/OFF” durante 3 segundos para apagar la unidad.
• De lo contrario, la unidad se apagará automáticamente si la temperatura mostrada es menor que 122°F (50°C) durante 5 minutos.
Botón de “°F/°C”
•Presione el botón “F/°C” para cambiar entre las escalas de temperatura Fahrenheit y Celsius.
Botón de Memoria “Max/Min”
•Presione el botón “Max/Min” (máxima/mínima) una vez para cambiar a la lectura de temperatura ambiente a la lectura de temperatura “Máxima Memoria” (“MAX” aparecerá en la pantalla LCD).
•Presione el botón “Max/Min” nuevamente para cambiar a la lectura de temperatura “Mínima Memoria” (“MIN” aparecerá en la pantalla LCD).
•Presione el botón “Max/Min” una tercera vez para volver a las lecturas de temperatura ambiente.
•Las lecturas de Max/Min se borrarán después de 10 segundos, o cuando la unidad se apague.
Función HOLD (mantener)
Característica de Apagado Automático
Este termómetro se apagará automáticamente si la temperatura mostrada es menor que 122°F (50°C) durante 5 minutos. Para desactivar la característica de apagado automático, presione sin soltar el botón “°F/°C”, y al mismo tiempo presione el botón “ON/OFF” (encendido/apagado). “ON” aparecerá en la pantalla LCD, indicando que la característica de apagado automático es desactivado y el termómetro seguirá “ON” (encendida). Para activar la característica de apagado automático nuevamente, repita los pasos anteriores. “ON” (encendida) desaparece de la pantalla LCD, indicando que la característica de apagado automático es activado.
Calibración
Si es necesario recalibrar, para mejores resultados calibre en el rango de la temperatura más usada. Siempre utilice una fuente confiable come punto de referencia cuando calibre. Si una temperatura verificada no puede ser obtenida en el rango de mayor uso, entonces calibre en un baño de hielo según lo descrito en el paso 1.
1.Suspenda la sonda al menos 1” (2.5 cm) en una mezcla de hielo y agua (32°F - 0°C) durante al menos 30 segundos. Evite que la sonda toque el fondo del recipiente.
2.Presiónelo sin soltar durante 5 segundos el botón “SET” (configurar). Aparecerá la palabra “SET”. Luego presione los botones "MAX/MIN" y "Hold" al mismo tiempo para ingresar al modo de definición de la temperatura. La pantalla LCD dará vuelta a rojo. La temperatura actual parpadea.
3.Presione los botones "Max/MIN" (“+”) o "Hold"
4.Para ingresar la temperatura recalibra, presiónelo sin soltar durante 5 segundos el botón “SET”. La pantalla LCD dará vuelta a verde. Aparecerá un patrón de rayitas
5.Después de 2 segundos, la unidad volverán a modo normal.
6.Para regresar a la temperatura recalibra predeterminada, quite la batería para 1 minuto y después reemplazará. (Nota: Si no presiona ningún botón en 30 segundos, la unidad volverán automáticamente a modo normal.)
Para Usar El Estuche De Bolsillo Como Un Soporte
•Presione el botón “HOLD” (mantener) y la temperatura se mantendrá en pantalla (aparecerá el ícono “HOLD”).
•Presiónelo nuevamente para volver a medir.
Para evitar quemaduras cuando está junto al fuego, introduzca el vástago en la llave incorporada a la funda y utilice el soporte de la funda como asa.