itc251-en 2/02/06 11:42 Page 7

Getting started

Switching on

220 - 240 V ~ 50 Hz

Mains socket in continental Europe

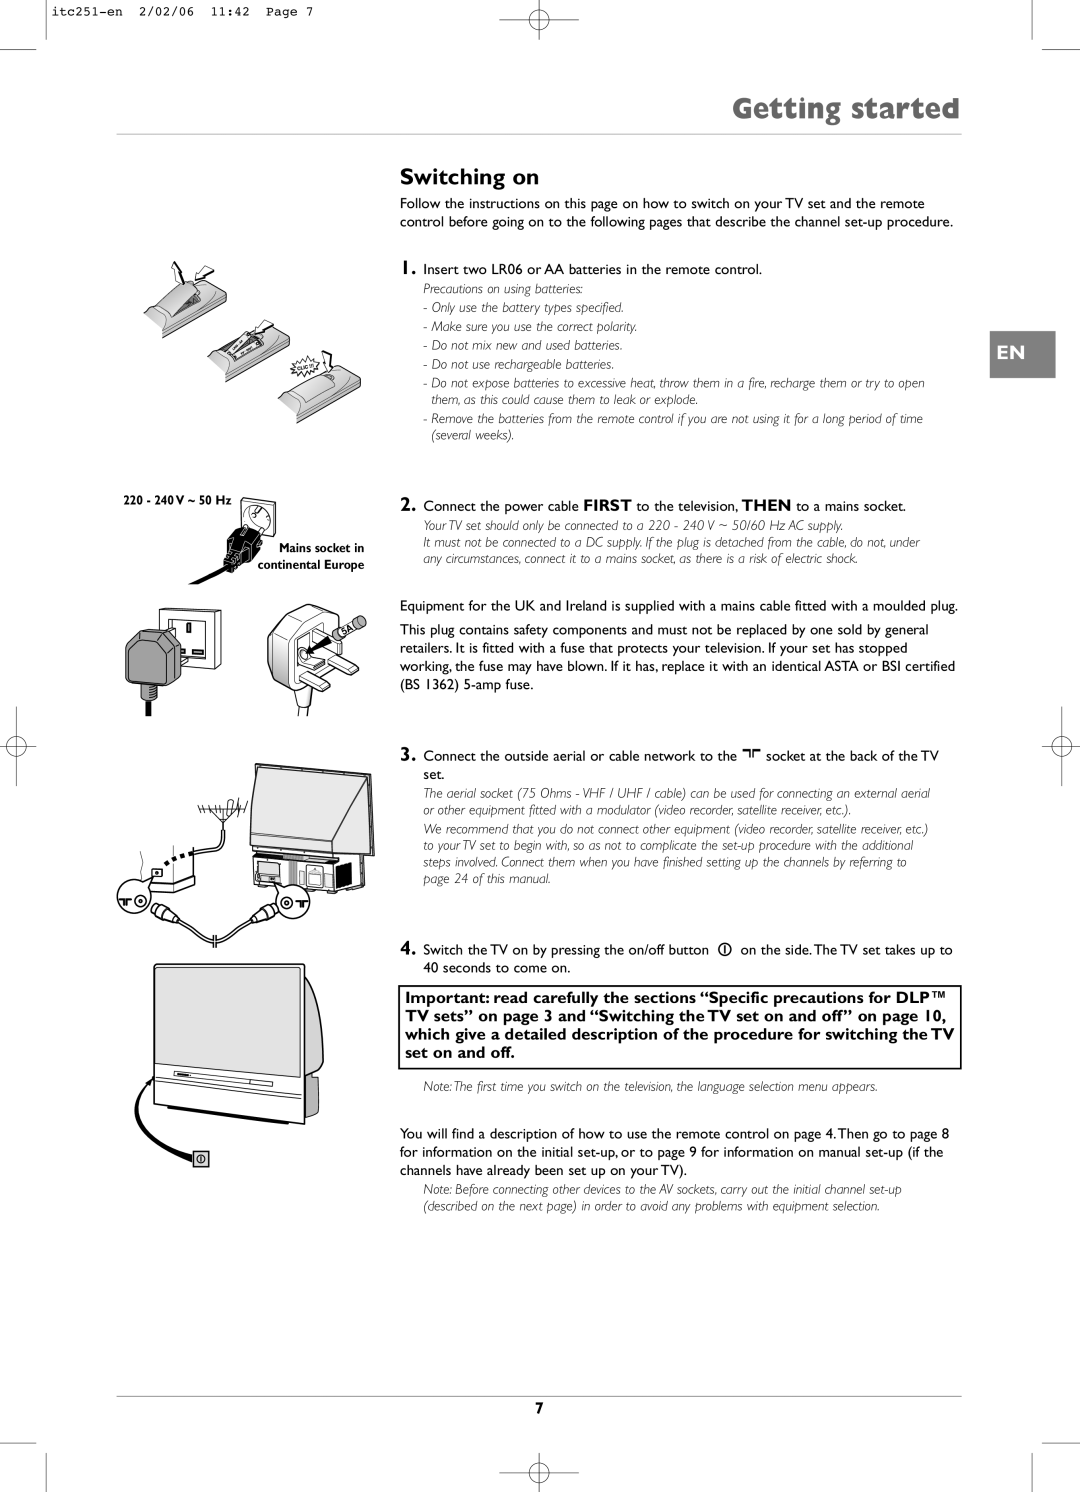
Follow the instructions on this page on how to switch on your TV set and the remote control before going on to the following pages that describe the channel set-up procedure.

1. Insert two LR06 or AA batteries in the remote control.

Precautions on using batteries:


- Only use the battery types specified.


- Make sure you use the correct polarity.


- Do not mix new and used batteries.

EN

- Do not use rechargeable batteries.


- Do not expose batteries to excessive heat, throw them in a fire, recharge them or try to open


them, as this could cause them to leak or explode.


- Remove the batteries from the remote control if you are not using it for a long period of time


(several weeks).


2. Connect the power cable FIRST to the television, THEN to a mains socket.


Your TV set should only be connected to a 220 - 240 V ~ 50/60 Hz AC supply.


It must not be connected to a DC supply. If the plug is detached from the cable, do not, under


any circumstances, connect it to a mains socket, as there is a risk of electric shock.


Equipment for the UK and Ireland is supplied with a mains cable fitted with a moulded plug.

This plug contains safety components and must not be replaced by one sold by general retailers. It is fitted with a fuse that protects your television. If your set has stopped working, the fuse may have blown. If it has, replace it with an identical ASTA or BSI certified (BS 1362) 5-amp fuse.

3.Connect the outside aerial or cable network to the g socket at the back of the TV set.

The aerial socket (75 Ohms - VHF / UHF / cable) can be used for connecting an external aerial or other equipment fitted with a modulator (video recorder, satellite receiver, etc.).

We recommend that you do not connect other equipment (video recorder, satellite receiver, etc.) to your TV set to begin with, so as not to complicate the set-up procedure with the additional steps involved. Connect them when you have finished setting up the channels by referring to page 24 of this manual.

4.Switch the TV on by pressing the on/off button A on the side.The TV set takes up to 40 seconds to come on.

Important: read carefully the sections “Specific precautions for DLP™ TV sets” on page 3 and “Switching the TV set on and off” on page 10, which give a detailed description of the procedure for switching the TV set on and off.

Note:The first time you switch on the television, the language selection menu appears.

You will find a description of how to use the remote control on page 4.Then go to page 8 for information on the initial set-up, or to page 9 for information on manual set-up (if the channels have already been set up on your TV).

Note: Before connecting other devices to the AV sockets, carry out the initial channel set-up (described on the next page) in order to avoid any problems with equipment selection.

7

Page 7
Image 7
Technicolor - Thomson ITC251 manual Switching on, Insert two LR06 or AA batteries in the remote control

ITC251 specifications

The Technicolor - Thomson ITC251 is a standout in the realm of television technology, recognized for its excellent picture quality and robust features. This model highlights the evolution of television design and functionality that meets the demands of modern viewers.

One of the most notable features of the ITC251 is its use of advanced cathode-ray tube (CRT) technology. The CRT provides vibrant colors and deep contrasts, which deliver rich and immersive viewing experiences. This technology is particularly noteworthy, as it represents a time when CRT was at the height of television innovation, showcasing how manufacturers were pushing the boundaries of visual experience.

The ITC251 also includes various input options, allowing users to connect a range of playback devices. This versatility makes it compatible with both traditional antenna signals and modern AV equipment, catering to a wide audience while ensuring accessibility to all types of media. Viewers can enjoy a diverse selection of content, from classic broadcasts to DVD players and game consoles, without the need for additional converters or adapters.

In terms of sound quality, the Technicolor ITC251 doesn't fall short. It boasts built-in speakers that provide a balanced and rich audio experience. While external audio systems are often preferred, the integrated speakers are sufficient for casual viewing, allowing for a smooth, engaging experience right out of the box.

The design of the ITC251 is both functional and aesthetically pleasing. With a sleek frame and compact dimensions, it suits various living spaces without imposing on décor. The user interface is intuitive, allowing users to navigate through channels and settings with ease. This user-centric approach reflects Technicolor's commitment to enhancing the consumer experience.

Additionally, the ITC251 is equipped with technologies that enhance picture clarity and color accuracy, ensuring viewers enjoy high-definition output. The inclusion of features like various picture modes further allows users to customize their viewing preferences, whether they are watching movies, sports, or nature documentaries.

Overall, the Technicolor - Thomson ITC251 exemplifies a fusion of advanced technology, user-friendly design, and versatility. It serves as a testament to the innovation of its time, catering to viewers looking for quality entertainment solutions. With its combination of vivid imagery, reliable sound, and functional versatility, the ITC251 remains a cherished choice for many dedicated users.