PARTS INCLUDED
PIÈCES INCLUSES
INSTALLATION (CONT‘D) (SUITE)
THULE RACK GUIDELINES
Universal Hardware
End Cap x 4 | Lockable Knob x 4 |
Embout | |
Capuchon de | |
| verrouillage |
|
Washer x 4 | Bolt x 4 |
Rondelle | Boulon |
368 Components
| Bracket 02* x 4 | Bracket 04* x 4 |
Foot x 4 | Fixation | Fixation |
Base d’appui | Lexus 250, | Saab 90/99 |
| Toyota Camry 4DR Wgn | 900, |
| Corolla Sedan 4DR, |
|
| Cressida, |
|
| *Bracket numbers stamped on the back of each bracket. | |
| *Numéro de crochet poinconné | À l’endos de chaque crochet. |
369 Components
Foot x 4 | Bracket 01* x 4 | Bracket 02* x 4 |
Base d’appui | Fixation | Fixation |
| BMW | BMW |
| BMW | Toyota Corolla 98- |
| Mercedes | Chevrolet Prizm 98- |
|
|
*Bracket numbers stamped on the back of each bracket.
*Numéro de crochet poinconné À l’endos de chaque crochet.
INSTALLATION |
|
1 | Slide the load bar through the feet. |
You may need to pivot the top of the | |
foot and pull out the lever to allow | |
| the bar to slide through. Attach the |
| end caps to the load bars. |
| Glissez la barre de chargement |
| dans la base d’appui. Il peut être |
| nécessaire de faire pivoter la partie |
| supérieure de la base et de pousser |
| le levier afin de faciliter le passage |
| de la barre. Installez les embouts sur |
| les barres. |
LEVER |
|
Levier |
|
2 | Open the car doors before attaching to |
the roof. Position the foot behind the | |
car’s rain gutter. Attach the bracket | |
| around the rain gutter by feeding the |
| bolt through the foot, bracket and |
| washer. Before you begin to tighten |
| with the locking knob, make sure the |
| load bars are positioned evenly in |
| between the feet. |
| Avant de procéder à l'installation de la |
| galerie |
| ouvrez les portières du véhicule. |
| Positionnez les bases d’appui à |
| l'intérieur de la gouttière du véhicule. |
| Installez la fixation sur la gouttière en |
| insérant le boulon à l'intérieur de la |
| base. Avant de serrer à l’aide du |
| capuchon de verrouillage, |
| que les barres sont positionnées de |
| façon égale entre les bases. |
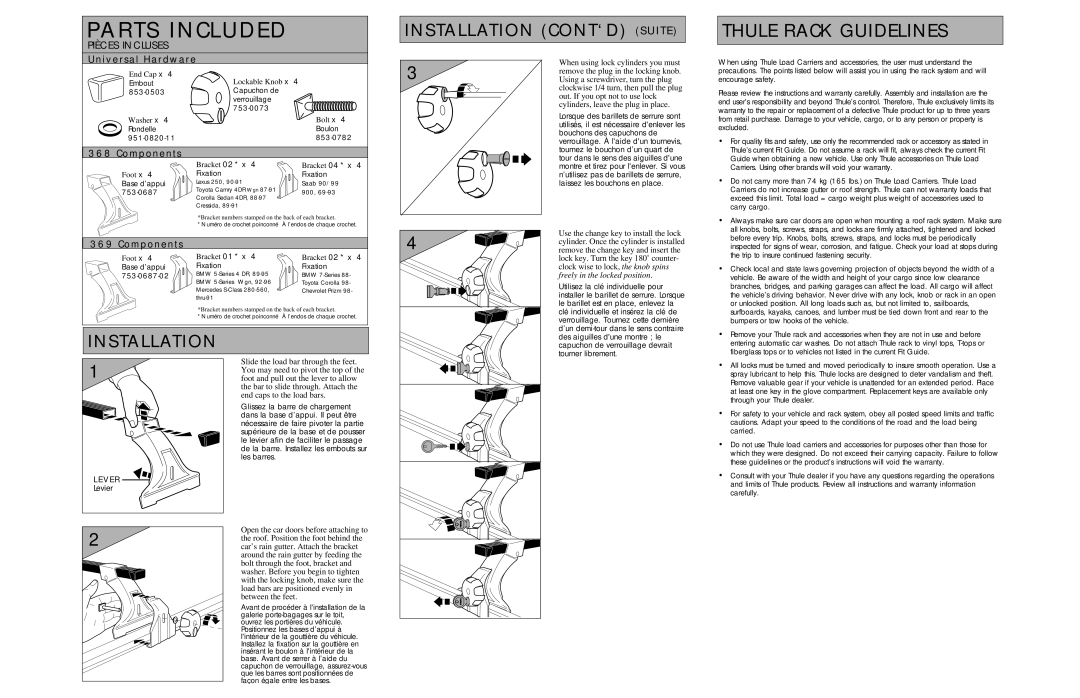
3 |
4 |
When using lock cylinders you must remove the plug in the locking knob. Using a screwdriver, turn the plug clockwise 1/4 turn, then pull the plug out. If you opt not to use lock cylinders, leave the plug in place.
Lorsque des barillets de serrure sont utilisés, il est nécessaire d'enlever les bouchons des capuchons de verrouillage. À l'aide d'un tournevis, tournez le bouchon d’un quart de tour dans le sens des aiguilles d'une montre et tirez pour l'enlever. Si vous n’utilisez pas de barillets de serrure, laissez les bouchons en place.
Use the change key to install the lock cylinder. Once the cylinder is installed remove the change key and insert the lock key. Turn the key 180˚ counter- clock wise to lock, the knob spins freely in the locked position.
Utilisez la clé individuelle pour installer le barillet de serrure. Lorsque le barillet est en place, enlevez la clé individuelle et insérez la clé de verrouillage. Tournez cette dernière d’un
When using Thule Load Carriers and accessories, the user must understand the precautions. The points listed below will assist you in using the rack system and will encourage safety.
Please review the instructions and warranty carefully. Assembly and installation are the end user’s responsibility and beyond Thule’s control. Therefore, Thule exclusively limits its warranty to the repair or replacement of a defective Thule product for up to three years from retail purchase. Damage to your vehicle, cargo, or to any person or property is excluded.
•For quality fits and safety, use only the recommended rack or accessory as stated in Thule’s current Fit Guide. Do not assume a rack will fit, always check the current Fit Guide when obtaining a new vehicle. Use only Thule accessories on Thule Load Carriers. Using other brands will void your warranty.
•Do not carry more than 74 kg (165 lbs.) on Thule Load Carriers. Thule Load Carriers do not increase gutter or roof strength. Thule can not warranty loads that exceed this limit. Total load = cargo weight plus weight of accessories used to carry cargo.
•Always make sure car doors are open when mounting a roof rack system. Make sure all knobs, bolts, screws, straps, and locks are firmly attached, tightened and locked before every trip. Knobs, bolts, screws, straps, and locks must be periodically inspected for signs of wear, corrosion, and fatigue. Check your load at stops during the trip to insure continued fastening security.
•Check local and state laws governing projection of objects beyond the width of a vehicle. Be aware of the width and height of your cargo since low clearance branches, bridges, and parking garages can affect the load. All cargo will affect the vehicle’s driving behavior. Never drive with any lock, knob or rack in an open or unlocked position. All long loads such as, but not limited to, sailboards, surfboards, kayaks, canoes, and lumber must be tied down front and rear to the bumpers or tow hooks of the vehicle.
•Remove your Thule rack and accessories when they are not in use and before entering automatic car washes. Do not attach Thule rack to vinyl tops,
•All locks must be turned and moved periodically to insure smooth operation. Use a spray lubricant to help this. Thule locks are designed to deter vandalism and theft. Remove valuable gear if your vehicle is unattended for an extended period. Place at least one key in the glove compartment. Replacement keys are available only through your Thule dealer.
•For safety to your vehicle and rack system, obey all posted speed limits and traffic cautions. Adapt your speed to the conditions of the road and the load being carried.
•Do not use Thule load carriers and accessories for purposes other than those for which they were designed. Do not exceed their carrying capacity. Failure to follow these guidelines or the product’s instructions will void the warranty.
•Consult with your Thule dealer if you have any questions regarding the operations and limits of Thule products. Review all instructions and warranty information carefully.