Register your product at
www.timex.com
THANK YOU FOR PURCHASING YOUR TIMEX® WATCH.
EXTENDED WARRANTY
Available in U. S. o n l y. Extend your warranty for an additional 4 years from date of purchase for $5. You can pay with AMEX, D i s c o v e r, Visa or MasterCard by calling 1
Please read instructions carefully to understand how to operate your Timex® watch. Your model may not have all of the features described in this booklet.
F E ATURE S AND BA SIC OPERAT I O N
•All functions work simultaneously
•Time with 12- or
•Date with
•3 time zones
•Optional hourly chime
•Electronic compass with virtual needle and automatic declination compensation
•
•
•Occasion reminders
•Hydration timer
•3 daily/weekday/weekend alarms with
•Customizable mode set (hide unwanted modes)
•INDIGLO®
Press MODE repeatedly to step through modes: Compass, Chrono, Timer, Occasion, Hydration, Alarm 1, Alarm 2, and Alarm 3. Press MODE to exit current mode and return to Time mode.
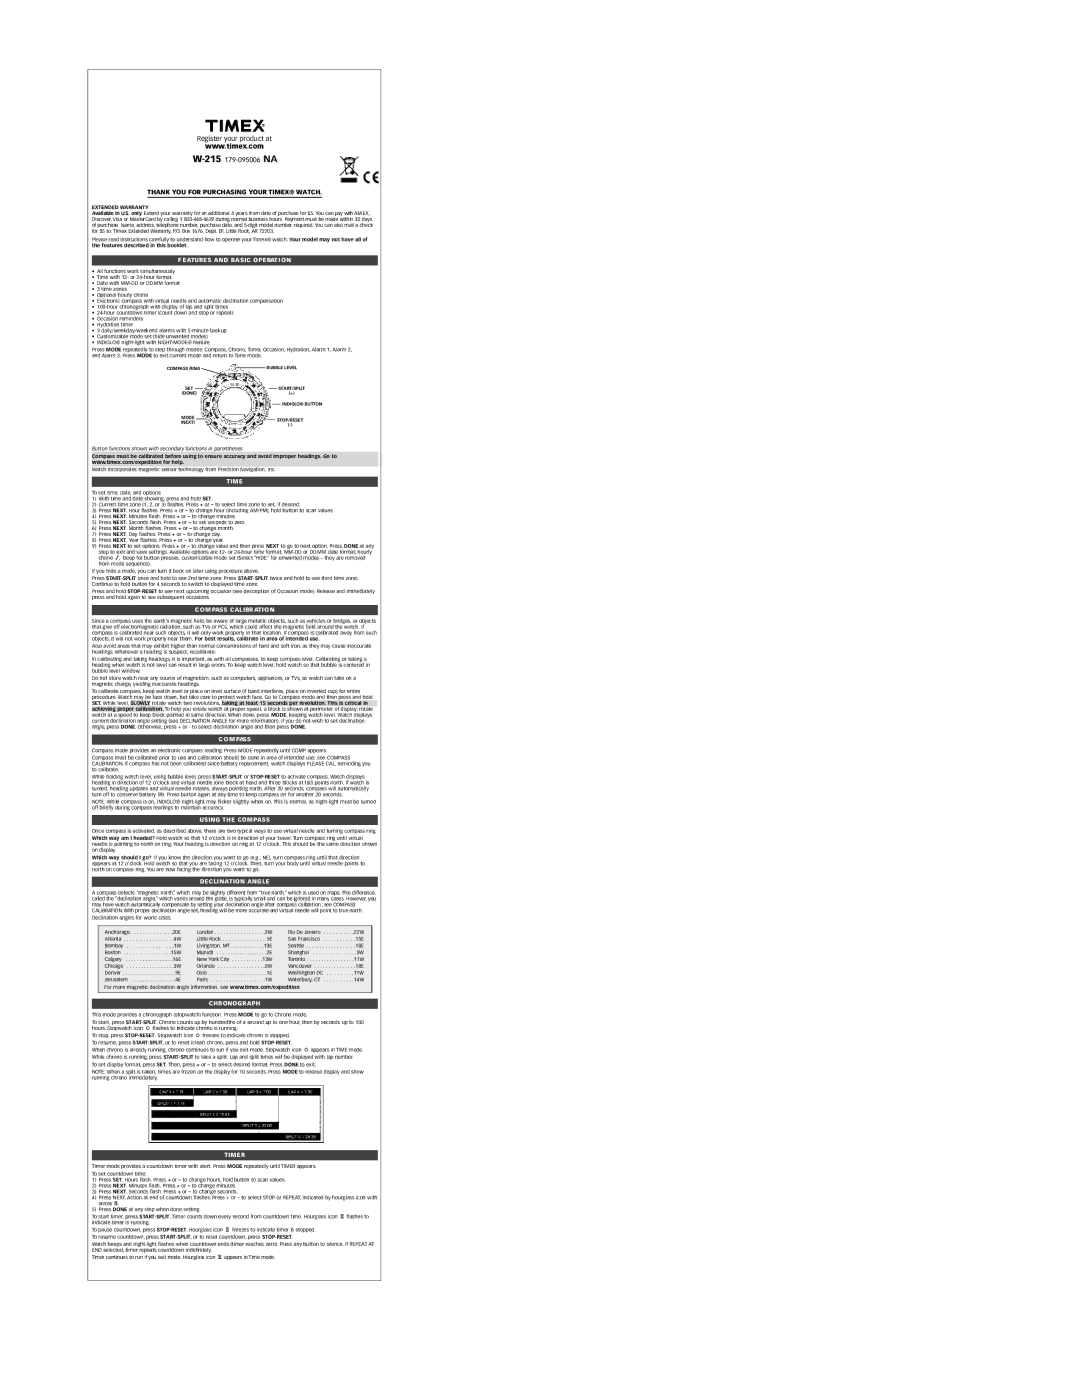
COMPASS RING |
| BUBBLE LEVEL | ||||||
SET |
|
|
|
|
|
| START/SPLIT | |
(DONE) | (+) | |||||||
|
|
|
|
|
|
|
| INDIGLO® BUTTON |
MODE
(NEXT)STOP/RESET
Button functions shown with secondary functions in parentheses
Compass must be calibrated before using to ensure accuracy and avoid improper headings. Go to www.timex.com/expedition for help.
Watch incorporates magnetic sensor technology from Precision Navigation, Inc.
TIME
To set time, date, and options:
1)With time and date showing, press and hold SET.
2)Current time zone (1, 2, or 3) flashes. Press + or – to select time zone to set, if desired.
3)Press NEXT. Hour flashes. Press + or – to change hour (including AM/PM); hold button to scan values
4)Press NEXT. Minutes flash. Press + or – to change minutes
5)Press NEXT. Seconds flash. Press + or – to set seconds to zero.
6)Press NEXT. Month flashes. Press + or – to change month.
7)Press NEXT. Day flashes. Press + or – to change day.
8)Press NEXT. Year flashes. Press + or – to change year.
9)Press NEXT to set options. Press + or – to change value and then press NEXT to go to next option. Press DONE at any step to exit and save settings. Available options are 12- or
If you hide a mode, you can turn it back on later using procedure above.
Press START·SPLIT once and hold to see 2nd time zone. Press START·SPLIT twice and hold to see third time zone. Continue to hold button for 4 seconds to switch to displayed time zone.
Press and hold STOP·RESET to see next upcoming occasion (see description of Occasion mode). Release and immediately press and hold again to see subsequent occasions.
C O M PASS CAL IBR AT I O N
Since a compass uses the earth’s magnetic field, be aware of large metallic objects, such as vehicles or bridges, or objects that give off electromagnetic radiation, such as TVs or PCs, which could affect the magnetic field around the watch. If compass is calibrated near such objects, it will only work properly in that location. If compass is calibrated away from such objects, it will not work properly near them. For best results, calibrate in area of intended use.
Also avoid areas that may exhibit higher than normal concentrations of hard and soft iron, as they may cause inaccurate headings. Whenever a heading is suspect, recalibrate.
In calibrating and taking headings, it is important, as with all compasses, to keep compass level. Calibrating or taking a heading when watch is not level can result in large errors. To keep watch level, hold watch so that bubble is centered in bubble level window.
Do not store watch near any source of magnetism, such as computers, appliances, or TVs, as watch can take on a magnetic charge, yielding inaccurate headings.
To calibrate compass, keep watch level or place on level surface (if band interferes, place on inverted cup) for entire procedure. Watch may be face down, but take care to protect watch face. Go to Compass mode and then press and hold SET. While level, SLOWLY rotate watch two revolutions, taking at least 15 seconds per revolution. This is critical in achieving proper calibration. To help you rotate watch at proper speed, a block is shown at perimeter of display; rotate watch at a speed to keep block pointed in same direction. When done, press MODE, keeping watch level. Watch displays current declination angle setting (see DECLINATION ANGLE for more information). If you do not wish to set declination angle, press DONE. Otherwise, press + or - to select declination angle and then press DONE.
C O M PASS
Compass mode provides an electronic compass reading. Press MODE repeatedly until COMP appears.
Compass must be calibrated prior to use and calibration should be done in area of intended use; see COMPASS CALIBRATION. If compass has not been calibrated since battery replacement, watch displays PLEASE CAL, reminding you to calibrate.
While holding watch level, using bubble level, press START·SPLIT or STOP·RESET to activate compass. Watch displays heading in direction of 12 o’clock and virtual needle (one block at head and three blocks at tail) points north. If watch is turned, heading updates and virtual needle rotates, always pointing north. After 20 seconds, compass will automatically turn off to conserve battery life. Press button again at any time to keep compass on for another 20 seconds.
NOTE: While compass is on, INDIGLO®
USING TH E COMPASS
Once compass is activated, as described above, there are two typical ways to use virtual needle and turning compass ring.
Which way am I headed? Hold watch so that 12 o’clock is in direction of your travel. Turn compass ring until virtual needle is pointing to north on ring. Your heading is direction on ring at 12 o’clock. This should be the same direction shown on display.
Which way should I go? If you know the direction you want to go (e.g., NE), turn compass ring until that direction appears at 12 o’clock. Hold watch so that you are facing 12 o’clock. Then, turn your body until virtual needle points to north on compass ring. You are now facing the direction you want to go.
DECLINATIO N ANG LE
A compass detects “magnetic north,” which may be slightly different from “true north,” which is used on maps. This difference, called the “declination angle,” which varies around the globe, is typically small and can be ignored in many cases. H o w e v e r, y o u may have watch automatically compensate by setting your declination angle after compass calibration; see COMPA S S
C A L I B R ATION. With proper declination angle set, heading will be more accurate and virtual needle will point to true north.
Declination angles for world cities.
Anchorage | .20E | London | .2W | Rio De Janeiro | .22W |
Atlanta | . .4W | Little Rock | . .1E | San Francisco | . .15E |
Bombay | . .1W | Livingston, MT | .13E | Seattle | . .18E |
Boston | .15W | Munich | . .2E | Shanghai | . .5W |
Calgary | .16E | New York City | 13W | Toronto | .11W |
Chicago | . .3W | Orlando | .5W | Vancouver | . .18E |
Denver | . .9E | Oslo | . .1E | Washington DC | .11W |
Jerusalem | . .4E | Paris | .1W | Waterbury, CT | .14W |
For more magnetic declination angle information, see www.timex.com/expedition
CHRONOGRAPH
This mode provides a chronograph (stopwatch) function. Press MODE to go to Chrono mode.
To start, press START·SPLIT. Chrono counts up by hundredths of a second up to one hour, then by seconds up to 100 hours. Stopwatch icon w flashes to indicate chrono is running.
To stop, press STOP·RESET. Stopwatch icon w freezes to indicate chrono is stopped.
To resume, press START·SPLIT, or to reset (clear) chrono, press and hold STOP·RESET.
When chrono is already running, chrono continues to run if you exit mode. Stopwatch icon w appears in TIME mode.
While chrono is running, press START·SPLIT to take a split. Lap and split times will be displayed with lap number.
To set display format, press SET. Then, press + or – to select desired format. Press DONE to exit.
NOTE: When a split is taken, times are frozen on the display for 10 seconds. Press MODE to release display and show running chrono immediately.
TIMER
Timer mode provides a countdown timer with alert. Press MODE repeatedly until TIMER appears.
To set countdown time:
1)Press SET. Hours flash. Press + or – to change hours; hold button to scan values.
2)Press NEXT. Minutes flash. Press + or – to change minutes.
3)Press NEXT. Seconds flash. Press + or – to change seconds.
4)Press NEXT. Action at end of countdown flashes. Press + or – to select STOP or REPEAT, indicated by hourglass icon with arrow I.
5)Press DONE at any step when done setting.
To start timer, press START·SPLIT. Timer counts down every second from countdown time. Hourglass icon H flashes to indicate timer is running.
To pause countdown, press STOP·RESET. Hourglass icon H freezes to indicate timer is stopped.
To resume countdown, press START·SPLIT, or to reset countdown, press STOP·RESET.
Watch beeps and
Timer continues to run if you exit mode. Hourglass icon H appears in Time mode.