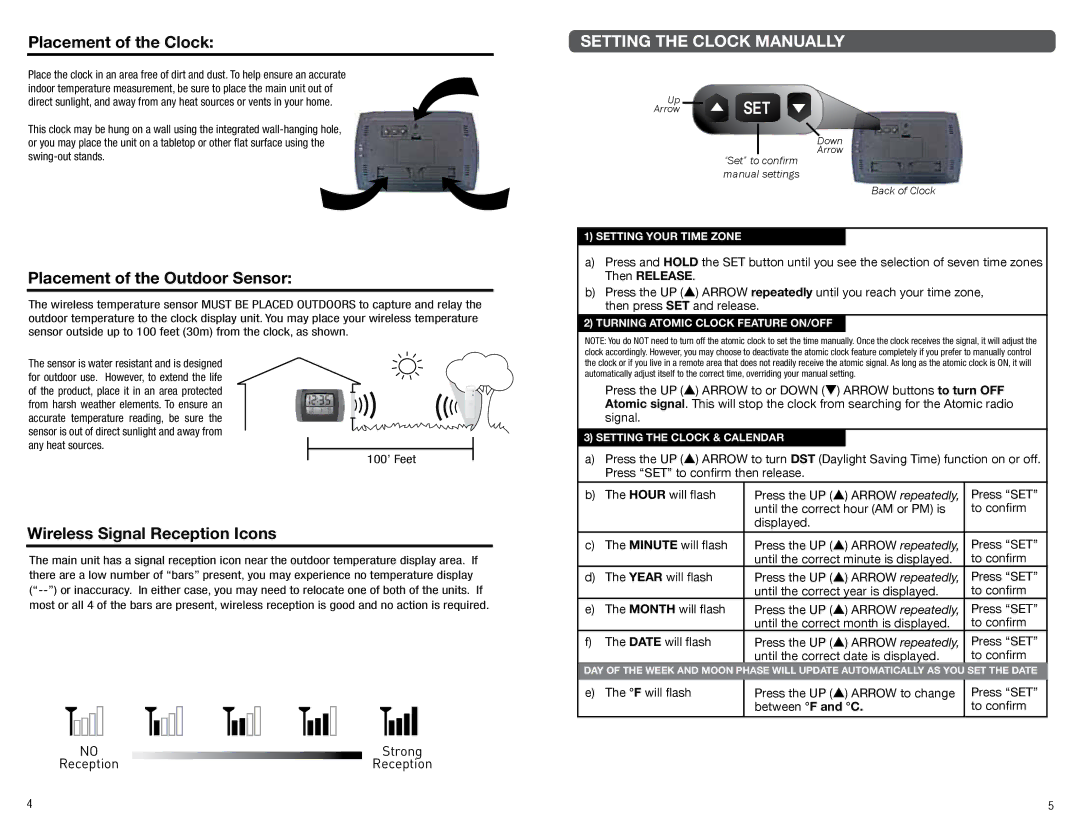
Placement of the Clock:
Place the clock in an area free of dirt and dust. To help ensure an accurate indoor temperature measurement, be sure to place the main unit out of direct sunlight, and away from any heat sources or vents in your home.
This clock may be hung on a wall using the integrated
Placement of the Outdoor Sensor:
The wireless temperature sensor MUST BE PLACED OUTDOORS to capture and relay the outdoor temperature to the clock display unit. You may place your wireless temperature sensor outside up to 100 feet (30m) from the clock, as shown.
The sensor is water resistant and is designed for outdoor use. However, to extend the life of the product, place it in an area protected
from harsh weather elements. To ensure an accurate temperature reading, be sure the
sensor is out of direct sunlight and away from any heat sources.
100’ Feet
Wireless Signal Reception Icons
The main unit has a signal reception icon near the outdoor temperature display area. If there are a low number of “bars” present, you may experience no temperature display
NO | Strong |
Reception | Reception |
SETTING THE CLOCK MANUALLY
Up | SET |
|
Arrow | |
Down
Arrow
“Set” to confirm manual settings
Back of Clock
1)SETTING YOUR TIME ZONE
a)Press and HOLD the SET button until you see the selection of seven time zones Then RELEASE.
b)Press the UP (s) ARROW repeatedly until you reach your time zone, then press SET and release.
2)TURNING ATOMIC CLOCK FEATURE ON/OFF
NOTE: You do NOT need to turn off the atomic clock to set the time manually. Once the clock receives the signal, it will adjust the clock accordingly. However, you may choose to deactivate the atomic clock feature completely if you prefer to manually control the clock or if you live in a remote area that does not readily receive the atomic signal. As long as the atomic clock is ON, it will automatically adjust itself to the correct time, overriding your manual setting.
Press the UP (s) ARROW to or DOWN (t) ARROW buttons to turn OFF Atomic signal. This will stop the clock from searching for the Atomic radio signal.
3)SETTING THE CLOCK & CALENDAR
a)Press the UP (s) ARROW to turn DST (Daylight Saving Time) function on or off. Press “SET” to confirm then release.
b) | The HOUR will flash | Press the UP (s) ARROW repeatedly, | Press “SET” |
|
| until the correct hour (AM or PM) is | to confirm |
|
| displayed. |
|
|
|
|
|
c) | The MINUTE will flash | Press the UP (s) ARROW repeatedly, | Press “SET” |
|
| until the correct minute is displayed. | to confirm |
d) | The YEAR will flash | Press the UP (s) ARROW repeatedly, | Press “SET” |
|
| until the correct year is displayed. | to confirm |
e) | The MONTH will flash | Press the UP (s) ARROW repeatedly, | Press “SET” |
|
| until the correct month is displayed. | to confirm |
f) | The DATE will flash | Press the UP (s) ARROW repeatedly, | Press “SET” |
|
| until the correct date is displayed. | to confirm |
DAY OF THE WEEK AND MOON PHASE WILL UPDATE AUTOMATICALLY AS YOU SET THE DATE
e) The °F will flash | Press the UP (s) ARROW to change | Press “SET” |
| between °F and °C. | to confirm |
|
|
|
4 | 5 |
