19LV505C 22LV505C
Ownerʼs Record
Child Safety
Location of the required Marking
Introduction
Installation
Manufacturer, or sold with
Safety Instructions
Choosing a location for your LCD TV
Precautions
Important notes about your LCD TV
Structure of disc contents
Precautions /Notes on discs
On cleaning discs
On handling discs
On Video CDs
About this ownerʼs manual
Playable discs
Contents
Front
Identification of controls
Side
Rear
Antenna jack
Remote control
DVD Menu button
Inserting batteries
Operation
Antenna connections
Cable TV connections
Connections
Connecting to optional equipment
Using the audio/video inputs
Ex. VCR with S-Video
Connecting to an optional equipment with S-video output
Ex. DVD player with Component video
Back side
Connecting to an amplifier equipped with a DTS decoder
Dolby Digital
Digital Theater Systems DTS
Connecting to an Hdmi or a DVI device
Channel digital stereo
Power source
Connecting to optional equipment Power source
Connecting to a PC Personal Computer
To use AC power source
Press or to select Signal Type, then
Auto Setup
Auto Setup
Press or to select Air or Cable
Setting the language
Setting the language
Press or to select Language
Air/Cable selection
To memorize channels
Automatic search
Press or to select Add/Delete, then Press or Enter
Add/Delete channel
Select Channel, then press or Enter
Press or to select the channel that you Want to skip
Adding Channel
Clear All
TV operation
TV operation
Mute CH RTN
Operation
Press or Enter Ch Label menu will appear
Labeling channels
Press or to select Ch Label, then
Press or to select a channel you want to label, then press
Labeling video inputs
Select Setup, then press or Enter
Press or to select Video Label, then press or Enter
Setting the closed captions
Press or to select CC Setting, then press or to select On
CC advanced
CC advanced
Adjusting the picture preference
Adjusting the picture preference/ Picture settings
Picture settings
Theater Wide1 picture size for 43 format programs
Viewing the wide-screen picture formats
Viewing the wide-screen picture formats
Theater Wide2 picture size for letter box programs
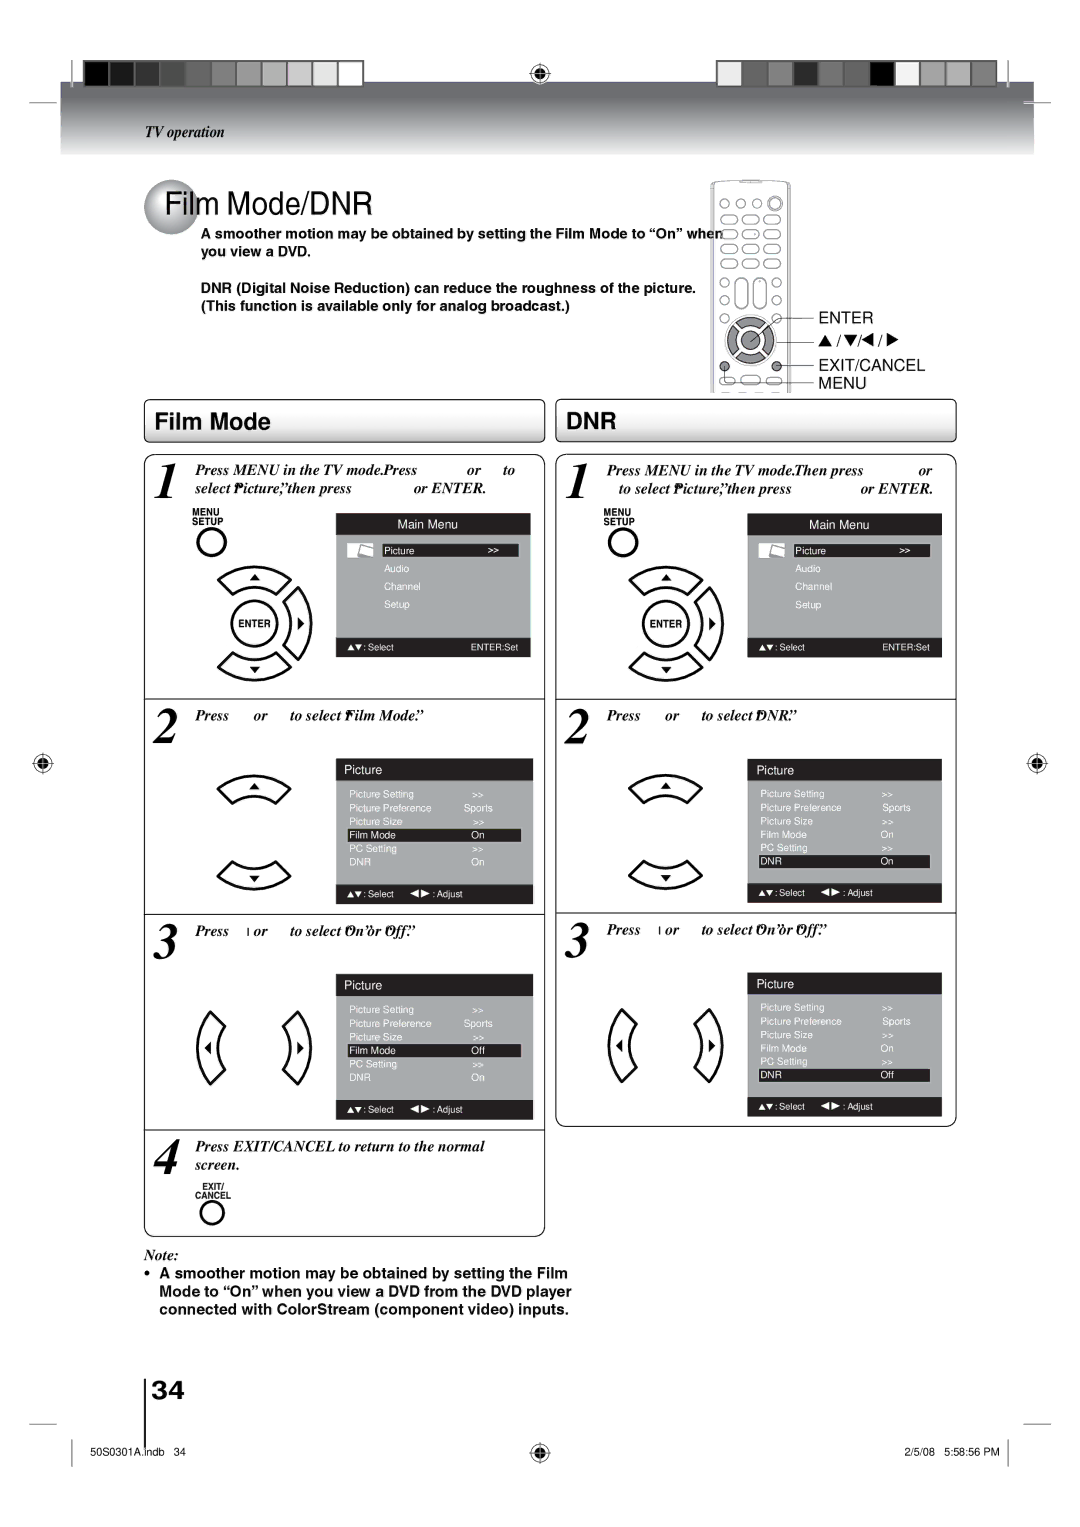
Film Mode/DNR
Film Mode
Press or to select Film Mode
Press or to select On or Off
Picture control adjustment in the PC mode
Picture control adjustment in the PC mode
Press INPUT, then press / or 4 to select
Select Audio , then press or Enter
Sound control adjustment
Selecting Stereo/Second Audio Program SAP
Select Audio, then press or Enter
Selecting the audio language
Selecting the Hdmi audio input source
Adjusting the back lighting
Using the aspect feature Adjusting the back lighting
Using the aspect feature
Select Setup , then press or Enter
Resetting your settings
Setting the Auto Shut Off Resetting your settings
Setting the Auto Shut Off
Press or to select Reset
Playing a disc
Vcdcd Basic playback
VCD Basic playback
Basic playback
DVD Playing in slow-motion
Vcdcd Playing in fast reverse or fast forward directions
Dvdvcd Playing frame by frame
VCD Locating a chapter or track
VCD Zooming
Zooming/Locating desired scene
VCD Locating desired scene
Dvdvcd Marking the scenes
To cancel the Marker
Marking desired scenes
Dvdvcd Returning to the scenes
Dvdvcd Repeat playback
Repeat playback/A-B Repeat playback
VCD A-B Repeat playback
VCD Program playback
Program playback/Random playback
CD Random playback
Title selection
Changing angles/Title selection/DVD menu
Changing angles
DVD menu
Press Audio Select during playback
Changing soundtrack language/Subtitles
DVD VCD Changing soundtrack language Subtitles
Case of Video CD playback
Dvdvcd Disc status
Press Play Mode in the stop mode
Disc status/To turn off the PBC
VCD To turn off the PBC see
Limitations on MP3/WMA/JPEG/DivX CD playback
MP3/WMA/JPEG/DivX and Audio CD operation
CD Audio CD/MP3/WMA/JPEG/DivX CD information
Limitations on display
file browser screen will appear on the screen
CD MP3/WMA and Audio CD playback
Select Files
CD Jpeg playback CD Slide show playback
MP3/WMA/JPEG/DivX and Audio CD
Operation
Preparation
Press / to select file
CD Playing DivX VOD content
CD DivX playback
Press Stop to end playback
CD Repeat playback Audio CD/ MP3/WMA/JPEG/DivX
Repeat, random and program playback using file browser
file browser, press / / / to select Repeat during stop mode
CD Random playback Audio CD/ MP3/WMA/JPEG/DivX
CD Program playback Audio CD/MP3/WMA/JPEG/DivX
Program View
VCD Setting procedure
Customizing the function settings
Then press or ENTER. The selectable settings will appear
Setting details
Other
Menu, Subtitle, Audio
English, Francais, Espanol
Original Audio
Off
Night Mode
Digital Out
Bitstream
If you forget the password
Parental control setting
Set the new password
DivX VOD
Playback will commence if the entered password is correct
DVD Temporary cancel the rating level by DVD disc
Load a DVD disc
Troubleshooting
Understanding the Power Return feature
Make sure the connection of AC cord is secured
Symptoms Possible Solutions DVD
Others
Reception disturbances
Ignition
Language code list
Language Name Code
Specifications
Model 19LV505C 22LV505C General
Your Responsibility
Limited One 1 Year Warranty on Parts and Labour
Limited Warranty for Commercial Units
Others Rental Units
Disclaimer and Limitation of Remedy
Arbitration and Dispute Resolution
How to Obtain Warranty Services
Critical Applications