Using the TV’s Features
Labeling channels
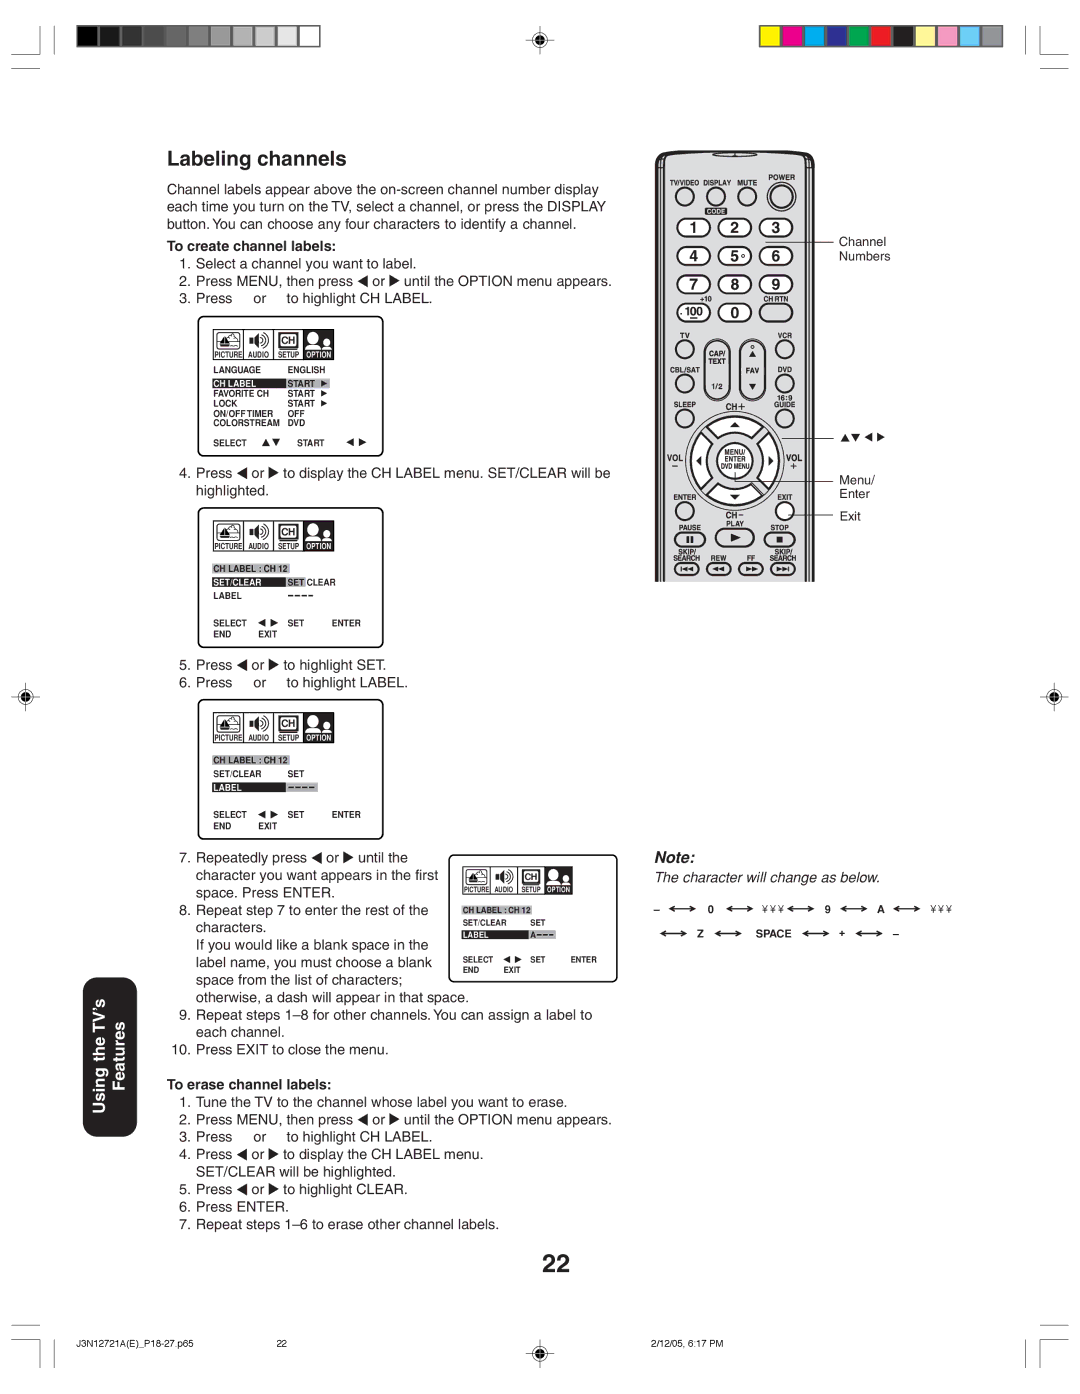
Channel labels appear above the
To create channel labels:
1.Select a channel you want to label.
2.Press MENU, then press  or
or  until the OPTION menu appears.
3.Press ▲ or ▼ to highlight CH LABEL.
| CH |
PICTURE AUDIO | SETUP OPTION |
LANGUAGE | ENGLISH |
CH LABEL | START |
FAVORITE CH | START |
LOCK | START |
ON/OFF TIMER | OFF |
COLORSTREAM DVD
SELECTSTART
4.Press ![]() or
or ![]() to display the CH LABEL menu. SET/CLEAR will be highlighted.
to display the CH LABEL menu. SET/CLEAR will be highlighted.
|
| CH |
|
PICTURE | AUDIO | SETUP | OPTION |
CH LABEL : CH 12 |
| ||
SET/CLEAR | SET CLEAR | ||
LABEL |
|
|
|
SELECT |
| SET | ENTER |
END | EXIT |
|
|
5.Press ![]() or
or ![]() to highlight SET.
to highlight SET.
6.Press ▲ or ▼ to highlight LABEL.
|
| CH |
|
PICTURE | AUDIO | SETUP | OPTION |
CH LABEL : CH 12 |
| ||
SET/CLEAR | SET |
| |
LABEL |
|
|
|
SELECT |
| SET | ENTER |
END | EXIT |
|
|
7. Repeatedly press ![]() or
or ![]() until the
until the
character you want appears in the first |
|
|
|
|
|
|
|
| CH |
|
|
| |||
|
|
|
|
|
|
|
|
|
|
| |||||
space. Press ENTER. | PICTURE |
| AUDIO |
| SETUP | OPTION |
| ||||||||
|
|
|
|
|
|
|
|
|
|
|
|
|
| ||
8. Repeat step 7 to enter the rest of the |
|
|
|
|
|
| |||||||||
| CH LABEL : CH 12 |
|
|
| |||||||||||
|
|
|
|
| |||||||||||
characters. |
| SET/CLEAR |
| SET |
|
|
| ||||||||
|
|
|
|
|
|
|
|
|
|
|
|
|
|
| |
| LABEL |
|
|
|
| A |
|
|
| ||||||
If you would like a blank space in the |
|
|
|
|
|
|
|
|
|
|
|
|
|
|
|
label name, you must choose a blank | SELECT |
|
|
|
| SET |
| ENTER | |||||||
END |
| EXIT |
|
|
|
|
|
| |||||||
|
|
|
|
|
|
|
|
| |||||||
space from the list of characters; otherwise, a dash will appear in that space.
9.Repeat steps
10.Press EXIT to close the menu.
To erase channel labels:
1.Tune the TV to the channel whose label you want to erase.
2.Press MENU, then press  or
or  until the OPTION menu appears.
3.Press ▲ or ▼ to highlight CH LABEL.
4.Press ![]() or
or ![]() to display the CH LABEL menu. SET/CLEAR will be highlighted.
to display the CH LABEL menu. SET/CLEAR will be highlighted.
5.Press  or
or  to highlight CLEAR.
6.Press ENTER.
7.Repeat steps
22
Channel
Numbers
Menu/
Enter
Exit
Note:
The character will change as below.
– | 0 | ¥¥¥ | 9 | A | ¥¥¥ |
Z |
| SPACE | + |
| – |
22 | 2/12/05, 6:17 PM |