Repeat steps 4 and 5 until you have entered all desired text.
Open the Channel Labeling window.
Press <or ,to select a channel you want to label.

Chapter 5: Setting up your TV

To create and assign a custom label:

1

2

3 Press Bb c to highlight Custom and press T. The software keyboard will appear.

1

1

2EditA

BCHCRTNa Canb cel2

Send3 D EXITE F dExite f 3

4

G H I g h i 4

5

J K L j k l 5

6

M N O m n o 6

7

P Q R S p q r s 7

8

T U V t u v 8

9

W X Y Z w x y z 9

_

Backspace

0

0


INPUT

Space

100


4 Repeatedly press the corresponding key on the remote control to highlight the desired character on the on-screen software keyboard.

5 The highlighted character is entered after you either press a different key, press c key, or after a two-second pause.

6

7 When finished, press T.

8 New labels will be added to the list in alphabetical order

and marked with an icon to indicate that they are custom. Highlight the new custom label and press Tto assign.

Assigned channel labels will be displayed in the banner, Channel Add/Delete, Channels Block, and Channel Browser.

To delete the custom label:

1 Open the Channel Labeling window.

2 Highlight the label to be deleted and press =.

3 Highlight Yes from the deletion confirmation window and press T.

Delete the selected custom label?

NoYes

4 Highlight Done and press Tto save changes, and go back to the Channel Labeling window.

Setting the HDMIaudio mode

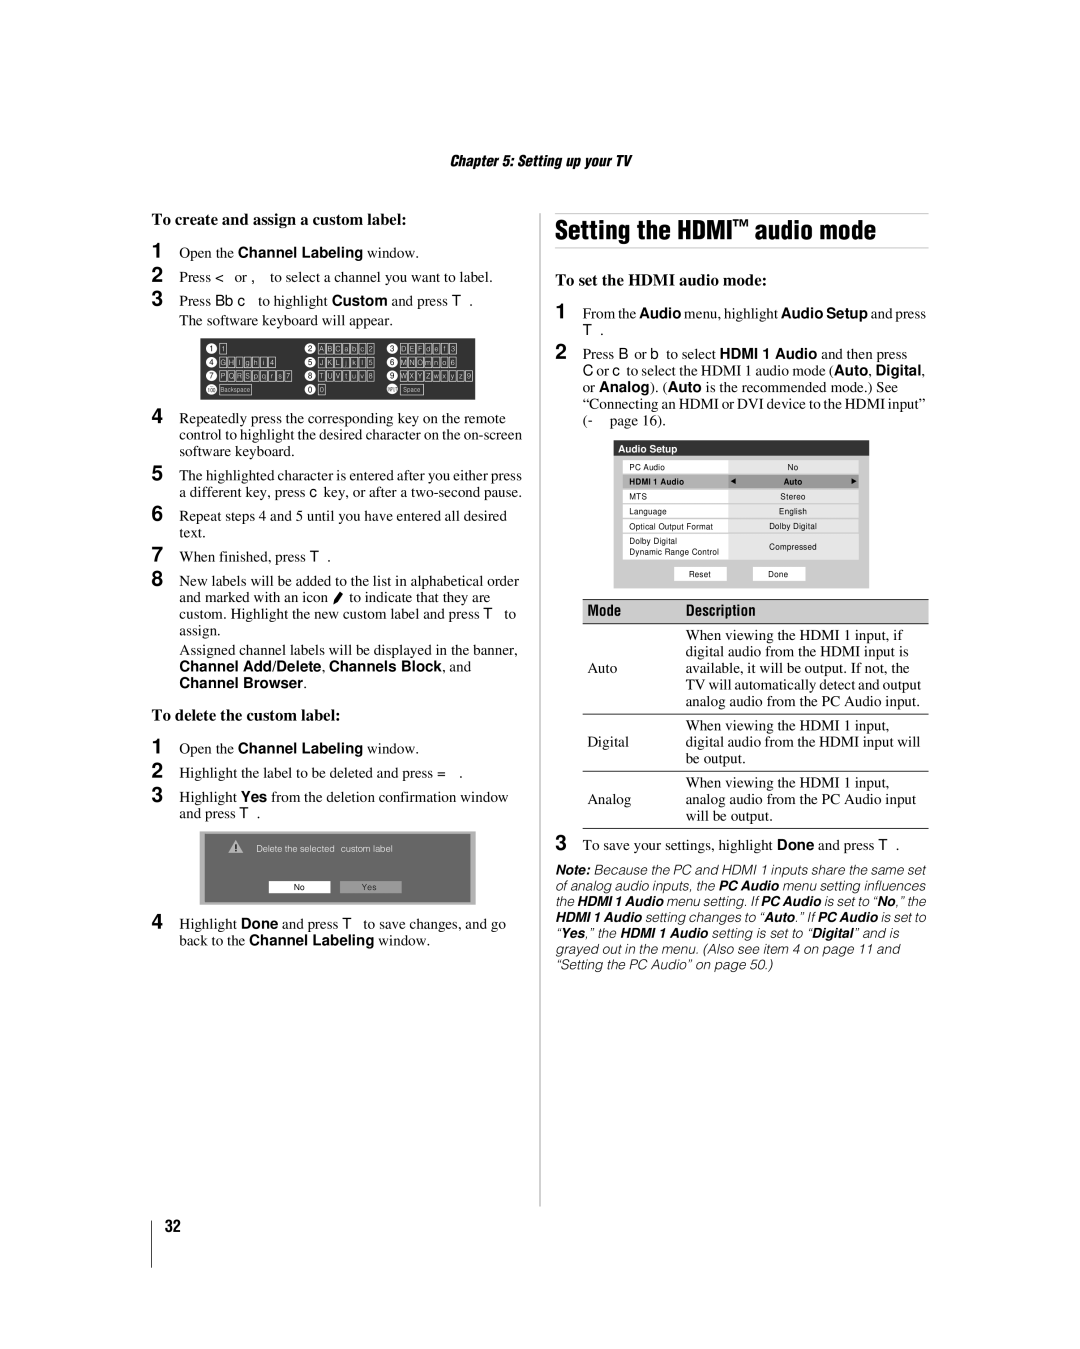
To set the HDMI audio mode:

1 From the Audio menu, highlight Audio Setup and press T.

2 Press B or b to select HDMI 1 Audio and then press C or c to select the HDMI 1 audio mode (Auto, Digital, or Analog). (Auto is the recommended mode.) See “Connecting an HDMI or DVI device to the HDMI input” (- page 16).

Audio Setup

PC Audio


No


HDMI 1 Audio


Auto


MTS


Stereo


Language


English


Optical Output Format


Dolby Digital


Dolby Digital


Compressed

Dynamic Range Control


Reset


Done


Mode Description

When viewing the HDMI 1 input, if digital audio from the HDMI input is

Auto available, it will be output. If not, the TV will automatically detect and output analog audio from the PC Audio input.

When viewing the HDMI 1 input,

Digital digital audio from the HDMI input will be output.

When viewing the HDMI 1 input,

Analog analog audio from the PC Audio input will be output.

3 To save your settings, highlight Done and press T.

Note: Because the PC and HDMI 1 inputs share the same set of analog audio inputs, the PC Audio menu setting influences the HDMI 1 Audio menu setting. If PC Audio is set to “No,” the HDMI 1 Audio setting changes to “Auto.” If PC Audio is set to “Yes,” the HDMI 1 Audio setting is set to “Digital” and is grayed out in the menu. (Also see item 4 on page 11 and “Setting the PC Audio” on page 50.)

32

Page 32
Image 32
Toshiba 52RV530U, 32RV530U Setting the Hdmi audio mode, To create and assign a custom label, To delete the custom label

32RV530U, 46RV530U, 37RV530U, 52RV530U, 42RV530U specifications

The Toshiba RV530 series, comprising models 32RV530U, 37RV530U, 42RV530U, 46RV530U, and 52RV530U, represents a fine convergence of design and technological advancement in the realm of flat-panel LCD televisions. These models emerged as notable contenders in the market, appealing to various audiences with their versatile sizes and features.

One of the main highlights of the RV530 series is its impressive display quality. With a native resolution of 1080p, the TVs deliver sharp and vibrant images, enriching the viewing experience. They feature Toshiba’s proprietary PixelPure technology, which enhances image clarity and optimizes color reproduction. This is particularly beneficial for movie enthusiasts and gamers who demand high visual fidelity.

These models incorporate Toshiba’s Dynamic Picture Processing, an innovative technology designed to reduce blurring during fast-motion scenes, making them ideal for action movies and sports broadcasts. Viewers can enjoy a seamless experience without missing crucial details, thanks to this advanced processing capability.

Audio output is another strong suit of the RV530 series, boasting an integrated audio system that utilizes Dolby Digital technology. This provides a rich sound experience that complements the high-quality visuals, immersing viewers in their favorite shows and films. Additionally, the TVs feature adjustable sound modes, allowing users to customize audio settings based on their content preference, whether for music, dialogue-heavy shows, or movies.

Connectivity is also well addressed in the RV530 models. Each television is equipped with multiple HDMI ports, allowing users to connect several high-definition devices such as Blu-ray players, gaming consoles, and set-top boxes simultaneously. The inclusion of USB ports permits direct playback of media files, enhancing usability and convenience.

Energy efficiency is increasingly important in modern electronics, and the RV530 series is designed with this in mind. The models comply with Energy Star guidelines, ensuring reduced power consumption without compromising performance. This aspect not only benefits the environment but also helps consumers save on energy costs over time.

In terms of aesthetics, the RV530 series sports a sleek and modern design that can easily fit into various home decors. The slim bezels and attractive finish make these televisions a stylish addition to living rooms, home theaters, or bedrooms.

Overall, Toshiba's RV530 series stands out with its combination of advanced technologies, superior picture and sound quality, ample connectivity options, and energy efficiency, making these models a solid choice for anyone looking to upgrade their home entertainment systems. Whether for casual viewing or immersive gaming experiences, the RV530 series caters to diverse needs while ensuring a fantastic viewing experience.