Recording

On-Screen Keyboard & Scheduled Recordings

About On-Screen Keyboard

Saving Your Changes

Introduction

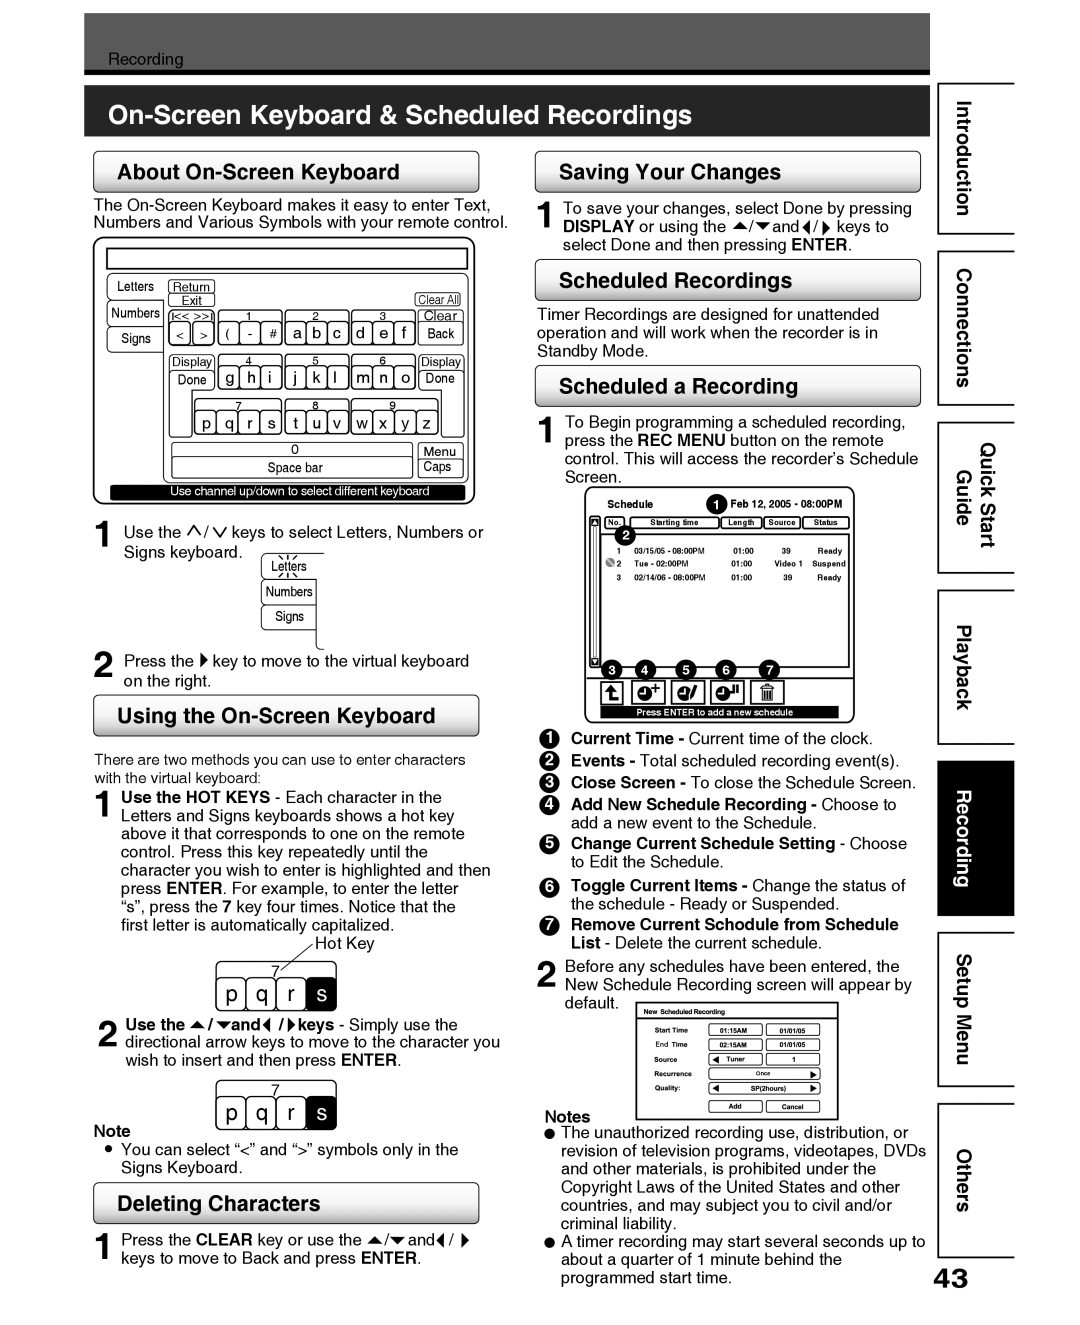
The On-Screen Keyboard makes it easy to enter Text, Numbers and Various Symbols with your remote control.

Letters

Return


Clear All

Numbers

Exit


<< >>


1


2


3


Clear

Signs

< >

(

-

#

a

b

c

d

e

f

Back


Display


4


5


6


Display


Done

g

h

i

j

k

l

m

n

o

Done


7


8


9


p q r s t

u v w x y z


0


Menu


Space bar


Caps

Use channel up/down to select different keyboard

1To save your changes, select Done by pressing DISPLAY or using the / and / keys to select Done and then pressing ENTER.

Scheduled Recordings

Timer Recordings are designed for unattended operation and will work when the recorder is in Standby Mode.

Scheduled a Recording

1To Begin programming a scheduled recording, press the REC MENU button on the remote control. This will access the recorder’s Schedule Screen.

Schedule

1 Feb 12, 2005 - 08:00PM

Quick Connections Guide

1Use the / keys to select Letters, Numbers or Signs keyboard.

Letters

Numbers

Signs

2Press the key to move to the virtual keyboard on the right.

No.

Starting time

Length


2


1

03/15/05 - 08:00PM

01:00

2

Tue - 02:00PM

01:00

3

02/14/06 - 08:00PM

01:00

3

4

5

6

Source

Status

39Ready Video 1 Suspend

39 Ready

7

Start

Playback

Using the On-Screen Keyboard

There are two methods you can use to enter characters with the virtual keyboard:

1Use the HOT KEYS - Each character in the Letters and Signs keyboards shows a hot key above it that corresponds to one on the remote control. Press this key repeatedly until the character you wish to enter is highlighted and then press ENTER. For example, to enter the letter “s”, press the 7 key four times. Notice that the first letter is automatically capitalized.

Hot Key

7

p q r s

2Use the / and / keys - Simply use the directional arrow keys to move to the character you wish to insert and then press ENTER.

Press ENTER to add a new schedule

1Current Time - Current time of the clock.

2Events - Total scheduled recording event(s).

3 Close Screen - To close the Schedule Screen.

4Add New Schedule Recording - Choose to add a new event to the Schedule.

5Change Current Schedule Setting - Choose to Edit the Schedule.

6Toggle Current Items - Change the status of the schedule - Ready or Suspended.

Remove Current Schodule from Schedule List - Delete the current schedule.

2Before any schedules have been entered, the New Schedule Recording screen will appear by default.

End

Once

Recording Setup Menu

7

p q r s

Note

You can select “<” and “>” symbols only in the Signs Keyboard.

Deleting Characters

1Press the CLEAR key or use the / and / keys to move to Back and press ENTER.

Notes

The unauthorized recording use, distribution, or revision of television programs, videotapes, DVDs and other materials, is prohibited under the Copyright Laws of the United States and other countries, and may subject you to civil and/or criminal liability.

A timer recording may start several seconds up to about a quarter of 1 minute behind the programmed start time.

Others

43

Page 43
Image 43
Toshiba D-R5SC, D-R5SU manual On-Screen Keyboard & Scheduled Recordings, Playback

D-R5SC, D-R5SU specifications

The Toshiba D-R5SU and D-R5SC are cutting-edge digital video recorders designed to enhance your home entertainment experience. With their sleek and compact designs, these models offer a perfect blend of functionality and style, catering to the needs of modern consumers who seek a reliable solution for recording and playing back their favorite content.

One of the standout features of both the D-R5SU and D-R5SC is their impressive recording capabilities. They support high-definition video recording, allowing users to capture their favorite television shows and movies in stunning quality. The devices are equipped with built-in tuners, enabling users to record digital broadcasts directly from over-the-air sources without the need for additional equipment. This convenience makes it easier for users to manage their viewing schedules and ensures that they never miss their favorite programs.

The D-R5SU and D-R5SC utilize advanced compression technologies, including MPEG-2 and MPEG-4, which help to optimize storage without sacrificing quality. This means that users can record hours of content while minimizing the storage space required on the device, making it a practical choice for those who enjoy binge-watching their favorite series.

Connectivity is another highlight of these models. Both the D-R5SU and D-R5SC feature HDMI outputs, ensuring that they can be easily connected to modern televisions and home theater systems. They also come with USB ports that allow for external storage connections and quick data transfer, making it simple to back up and manage recorded content. This level of connectivity ensures that users can enjoy their media on larger screens with ease.

In terms of user-friendliness, Toshiba has designed the D-R5SU and D-R5SC with intuitive interfaces and remote controls that simplify operation. The menu systems are straightforward, enabling users to schedule recordings, navigate through saved content, and customize settings without unnecessary complexity.

Additionally, both models boast multiple playback options, supporting a variety of file formats. Users can enjoy watching their recorded shows as well as playing DVDs or other media directly from the devices, making them versatile tools for entertainment.

In conclusion, the Toshiba D-R5SU and D-R5SC exemplify the ideal digital video recorder for anyone looking to elevate their viewing experience. With their high-definition recording, advanced compression technologies, seamless connectivity, and user-friendly operation, these devices stand out as excellent choices for enhancing home entertainment.