Internet connection setting procedure (Outline)

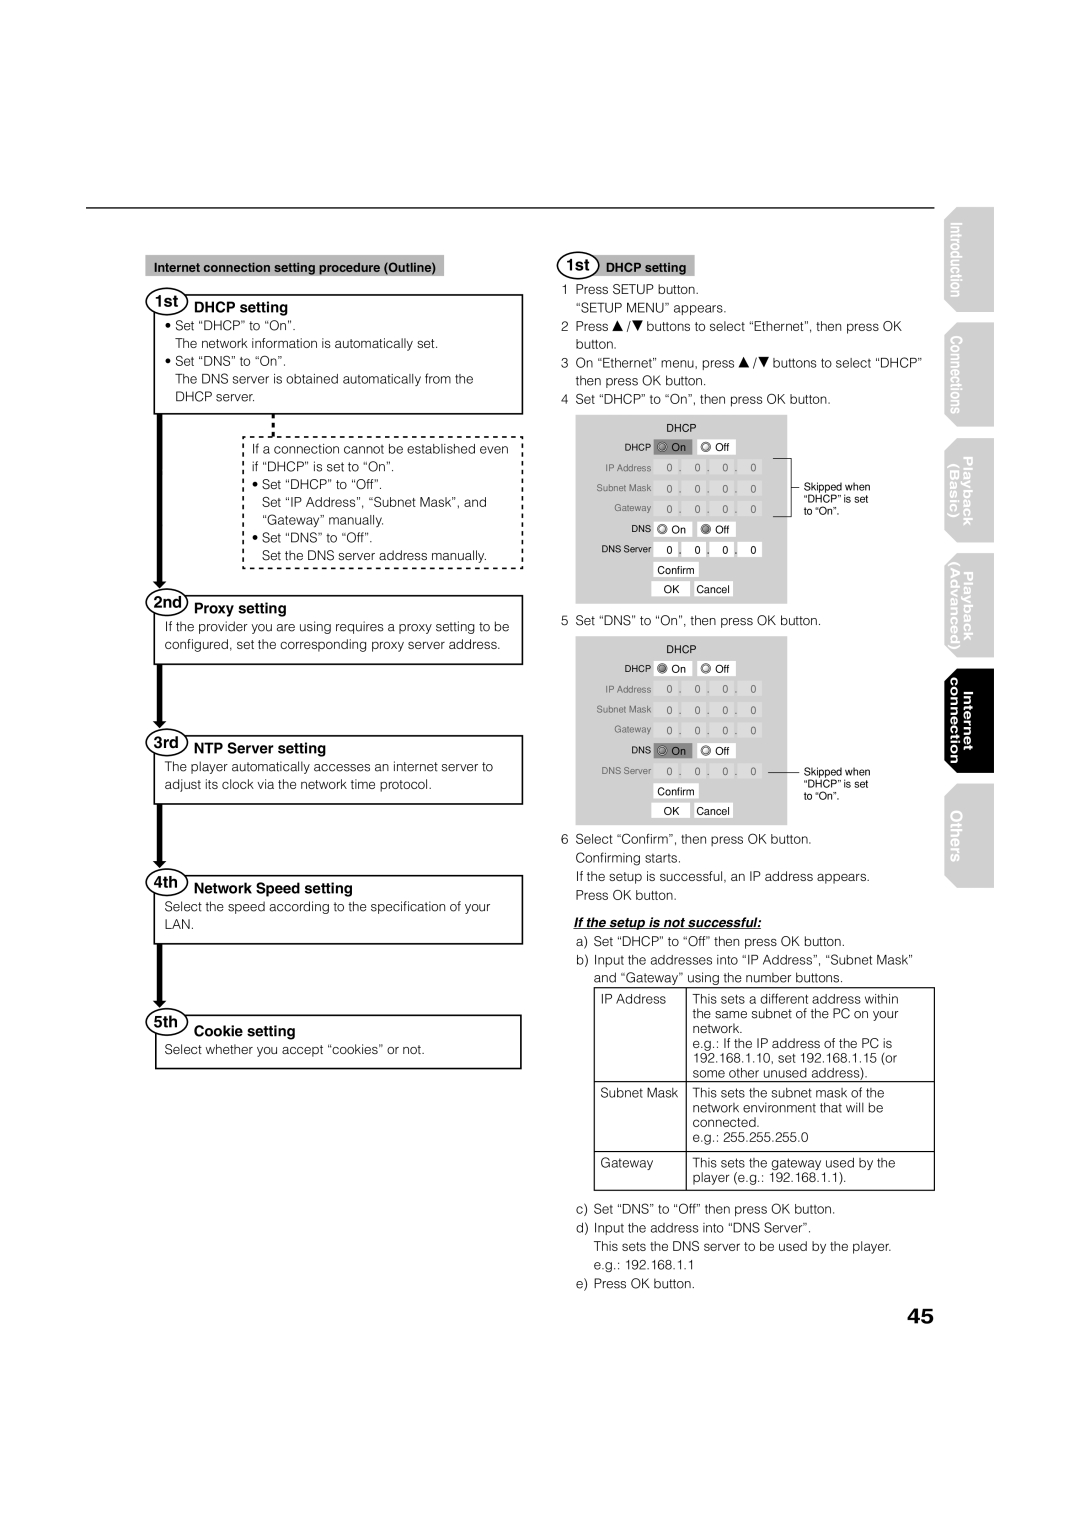
1st DHCP setting

Set “DHCP” to “On”.

The network information is automatically set.

Set “DNS” to “On”.

The DNS server is obtained automatically from the DHCP server.

1st DHCP setting

1Press SETUP button. “SETUP MENU” appears.

2Press / buttons to select “Ethernet”, then press OK button.

3On “Ethernet” menu, press / buttons to select “DHCP” then press OK button.

4Set “DHCP” to “On”, then press OK button.

Introduction Connections

If a connection cannot be established even if “DHCP” is set to “On”.

Set “DHCP” to “Off”.

Set “IP Address”, “Subnet Mask”, and “Gateway” manually.

Set “DNS” to “Off”.

Set the DNS server address manually.

2nd Proxy setting


DHCP


DHCP

On


Off


IP Address

0

.


0

.

0

.

0


Subnet Mask


0

.


0

.

0

.

0


Gateway


0

.


0

.

0

.

0


DNS


On


Off


DNS Server


0

.


0

.

0

.

0


Confirm


OK

Cancel


Skipped when “DHCP” is set to “On”.

(Basic)

Playback

(Advanced)

Playback

If the provider you are using requires a proxy setting to be confi gured, set the corresponding proxy server address.

3rd NTP Server setting

The player automatically accesses an internet server to adjust its clock via the network time protocol.

4th Network Speed setting

Select the speed according to the specifi cation of your LAN.

5th

Cookie setting

Select whether you accept “cookies” or not.

5 Set “DNS” to “On”, then press OK button.


DHCP


DHCP

On


Off


IP Address

0

.


0

.

0

.

0


Subnet Mask


0

.


0

.

0

.

0


Gateway


0

.


0

.

0

.

0


DNS


On


Off


DNS Server


0

.


0

.

0

.

0


Skipped when


“DHCP” is set


Confirm


to “On”.


OK

Cancel


6Select “Confi rm”, then press OK button. Confi rming starts.

If the setup is successful, an IP address appears. Press OK button.

If the setup is not successful:

a)Set “DHCP” to “Off” then press OK button.

b)Input the addresses into “IP Address”, “Subnet Mask” and “Gateway” using the number buttons.

IP Address

This sets a different address within


the same subnet of the PC on your


network.


e.g.: If the IP address of the PC is


192.168.1.10, set 192.168.1.15 (or


some other unused address).

Subnet Mask

This sets the subnet mask of the


network environment that will be


connected.


e.g.: 255.255.255.0


Gateway

This sets the gateway used by the


player (e.g.: 192.168.1.1).


c)Set “DNS” to “Off” then press OK button.

d)Input the address into “DNS Server”.

This sets the DNS server to be used by the player. e.g.: 192.168.1.1

e)Press OK button.

Internet connection

Others

45

Page 45
Image 45
Toshiba HD-A2WKU 1st Dhcp setting, 2nd Proxy setting, 3rd NTP Server setting, 4th Network Speed setting, Cookie setting

HD-A2WKU specifications

The Toshiba HD-A2WKU is a cutting-edge high-definition DVD player that heralds the era of HD movie playback in home entertainment. Launched as part of Toshiba's commitment to high-definition technologies, the HD-A2WKU stood out in the market due to its advanced features and impressive capabilities.

One of the most notable features of the HD-A2WKU is its support for the HD DVD format, which offers a high-quality video resolution of 1080p. This resolution allows for a significantly enhanced viewing experience compared to standard DVDs, delivering sharper images, more vibrant colors, and improved detail. The player is equipped with HDMI output, allowing it to connect seamlessly to HD televisions and ensure optimal signal transfer for superior picture quality.

In addition to its HD DVD capabilities, the Toshiba HD-A2WKU offers backward compatibility, meaning users can enjoy standard DVDs without sacrificing quality. The player employs advanced upscaling technology, enhancing the resolution of regular DVDs to near HD quality. This ensures that even older movie collections can be enjoyed with improved clarity and detail.

The HD-A2WKU features an integrated audio processing system, supporting advanced surround sound formats such as Dolby Digital and DTS. The player can decode these audio formats, delivering a rich and immersive sound experience that complements its stunning visuals. This makes it an excellent choice for movie enthusiasts who prioritize both audio and video quality.

Another key characteristic of the Toshiba HD-A2WKU is its user-friendly interface, designed to make navigation straightforward and intuitive. The remote control offers easy access to playback functions and special features, such as scene selection and subtitle options. Additionally, the player supports interactive features found on HD DVDs, enhancing viewer engagement with additional content and extras.

Finally, the compact design of the HD-A2WKU fits comfortably within any home entertainment setup, making it an attractive option for those looking to upgrade their viewing experience. With its blend of advanced technology, high-definition capabilities, and user-friendly features, the Toshiba HD-A2WKU remains a notable player in the evolution of home media systems.