Internet connection setting procedure (Outline)

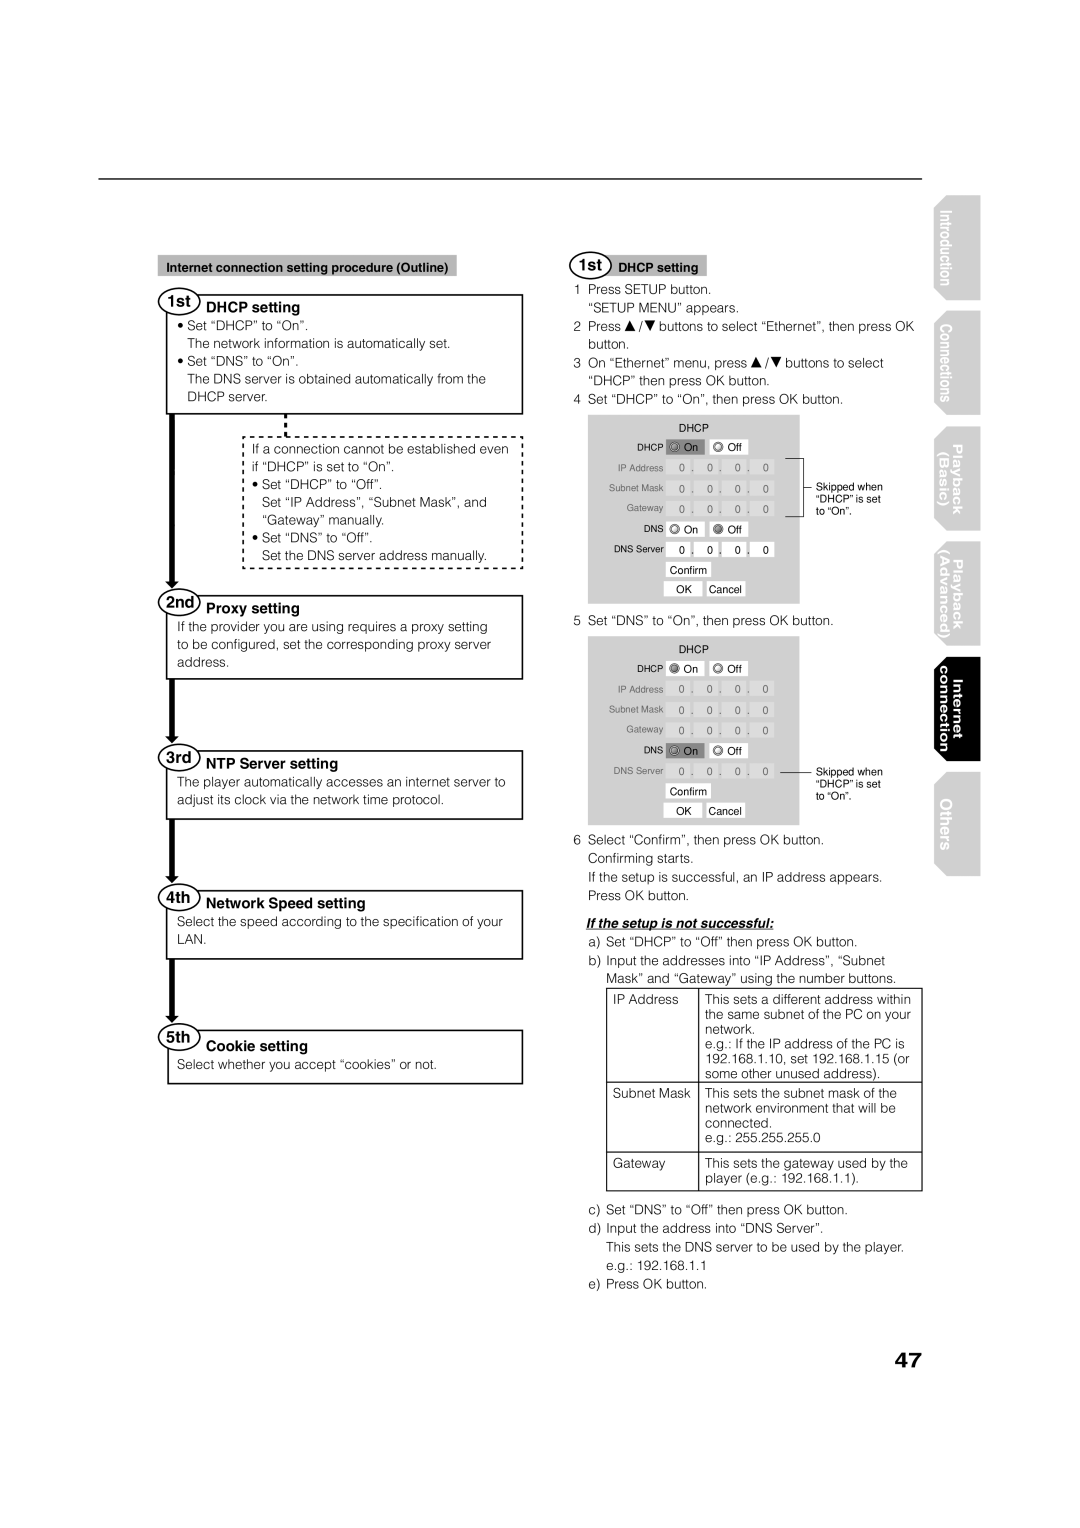
1st DHCP setting

Set “DHCP” to “On”.

The network information is automatically set.

Set “DNS” to “On”.

The DNS server is obtained automatically from the DHCP server.

1st DHCP setting

1Press SETUP button. “SETUP MENU” appears.

2Press / buttons to select “Ethernet”, then press OK button.

3On “Ethernet” menu, press / buttons to select “DHCP” then press OK button.

4Set “DHCP” to “On”, then press OK button.

Introduction Connections

If a connection cannot be established even if “DHCP” is set to “On”.

Set “DHCP” to “Off”.

Set “IP Address”, “Subnet Mask”, and “Gateway” manually.

Set “DNS” to “Off”.

Set the DNS server address manually.

2nd Proxy setting


DHCP


DHCP

On


Off


IP Address

0

.


0

.

0

.

0


Subnet Mask


0

.


0

.

0

.

0


Gateway


0

.


0

.

0

.

0


DNS


On


Off


DNS Server


0

.


0

.

0

.

0


Confirm


OK

Cancel


Skipped when “DHCP” is set to “On”.

(Basic)

Playback

(Advanced)

Playback

If the provider you are using requires a proxy setting to be confi gured, set the corresponding proxy server address.

3rd NTP Server setting

The player automatically accesses an internet server to adjust its clock via the network time protocol.

4th Network Speed setting

Select the speed according to the specification of your LAN.

5th

Cookie setting

Select whether you accept “cookies” or not.

5 Set “DNS” to “On”, then press OK button.


DHCP


DHCP

On


Off


IP Address

0

.


0

.

0

.

0


Subnet Mask


0

.


0

.

0

.

0


Gateway


0

.


0

.

0

.

0


DNS


On


Off


DNS Server


0

.


0

.

0

.

0


Skipped when


“DHCP” is set


Confirm


to “On”.


OK

Cancel


6Select “Confi rm”, then press OK button. Confi rming starts.

If the setup is successful, an IP address appears. Press OK button.

If the setup is not successful:

a)Set “DHCP” to “Off” then press OK button.

b)Input the addresses into “IP Address”, “Subnet Mask” and “Gateway” using the number buttons.

IP Address

This sets a different address within


the same subnet of the PC on your


network.


e.g.: If the IP address of the PC is


192.168.1.10, set 192.168.1.15 (or


some other unused address).

Subnet Mask

This sets the subnet mask of the


network environment that will be


connected.


e.g.: 255.255.255.0


Gateway

This sets the gateway used by the


player (e.g.: 192.168.1.1).


c)Set “DNS” to “Off” then press OK button.

d)Input the address into “DNS Server”.

This sets the DNS server to be used by the player. e.g.: 192.168.1.1

e)Press OK button.

Internet connection

Others

47

Page 47
Image 47
Toshiba HD-XE1 manual 5th

HD-XE1 specifications

The Toshiba HD-XE1 is a high-definition multimedia player that emerged as one of the pioneering devices in the HD DVD format, launched to the market in 2006. Recognized for its advanced features and robust performance, the HD-XE1 gained significant attention amidst the format war between HD DVD and Blu-ray.

At the heart of the Toshiba HD-XE1 is its exceptional video processing technology. The device supports a resolution of up to 1080p, ensuring stunning visuals that bring movies to life on compatible displays. It utilizes Toshiba's advanced video scaling technology, which enhances standard-definition content to near-HD quality, making it an attractive option for those with extensive DVD collections.

Audio performance is another strong point of the HD-XE1, as it is equipped with a high-quality audio processor. The player supports various high-definition audio formats, including Dolby TrueHD and DTS-HD Master Audio, delivering rich and immersive soundscapes that enhance the viewing experience. This commitment to audio fidelity ensures that users can enjoy their favorite films as intended by the filmmakers.

The HD-XE1 also features an intuitive user interface designed for seamless navigation. It includes HDMI outputs, providing a single cable connection for high-quality video and audio transfer to compatible televisions and receivers. Furthermore, the player is backward compatible with standard DVDs, allowing users to enjoy their existing media without compromising on quality.

Another standout feature of the Toshiba HD-XE1 is its built-in Ethernet port, which enables users to access online content and firmware updates. This connectivity comes in handy for fans of supplemental features and packages often found on discs, allowing them to dive deeper into the filmmaking process and special features.

In terms of build quality, the HD-XE1 boasts a solid and sleek design, reflecting Toshiba's commitment to aesthetics as well as functionality. The device is relatively compact, making it easy to integrate into existing home theater setups. With its array of features, including multiple output options and support for advanced audio and video codecs, the Toshiba HD-XE1 exemplifies the capabilities of early high-definition players while remaining a notable option for enthusiasts even in today's digital landscape.