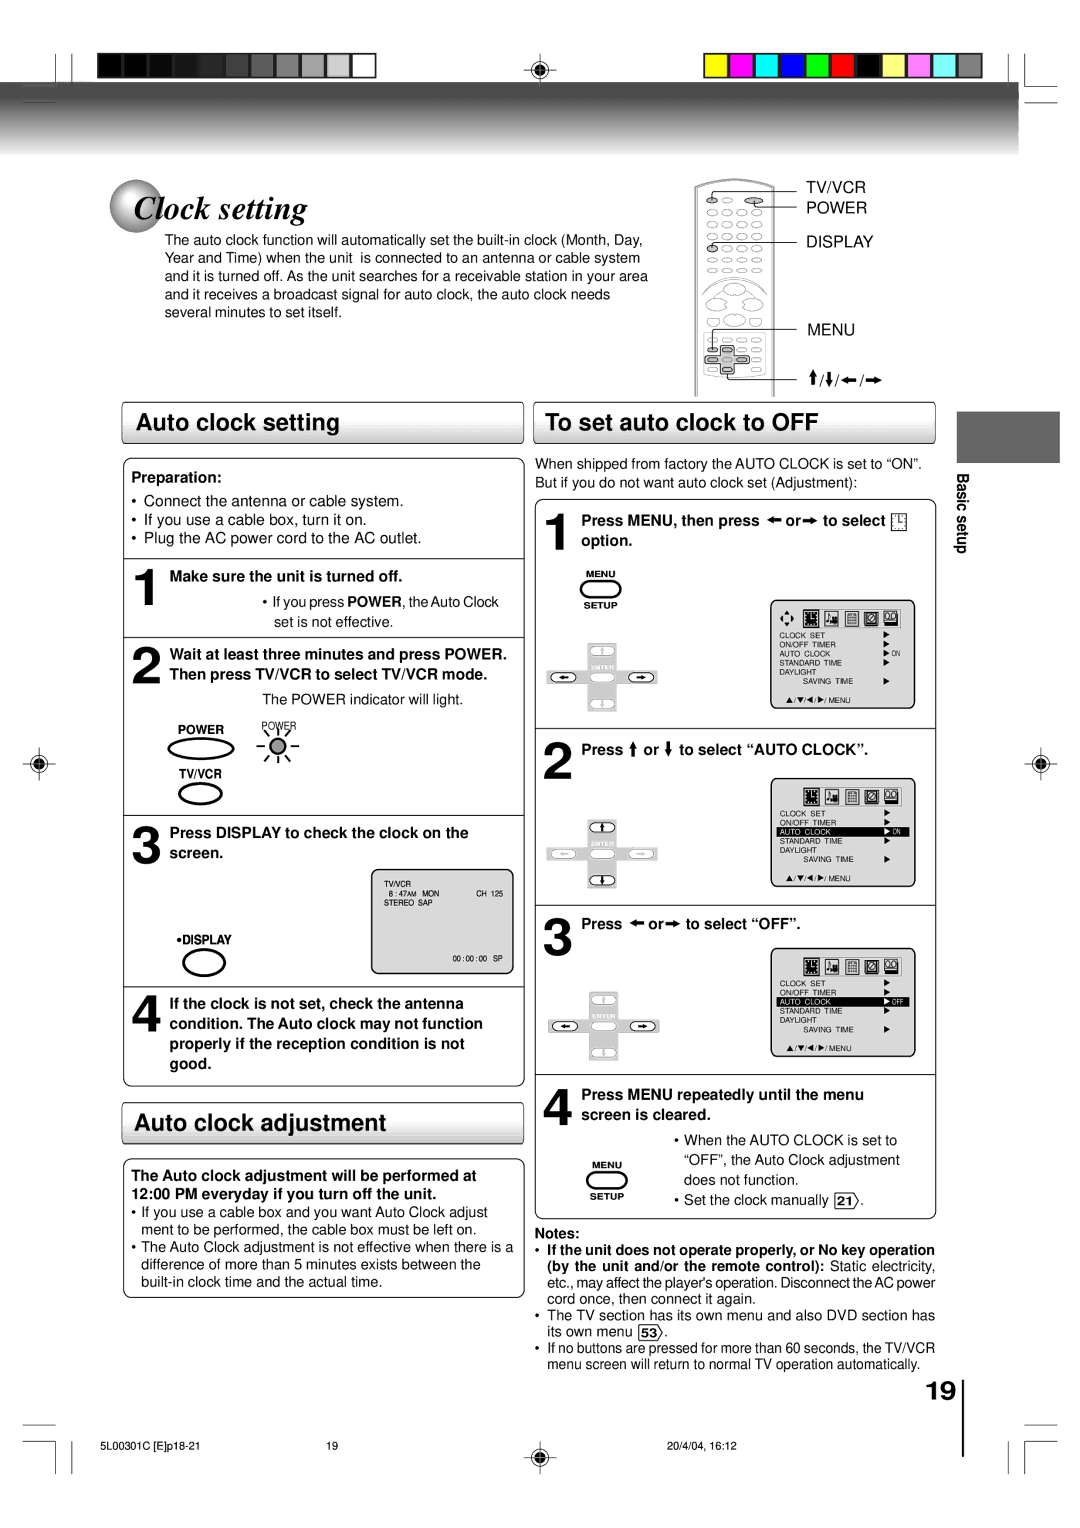
Clock setting

The auto clock function will automatically set the built-in clock (Month, Day, Year and Time) when the unit is connected to an antenna or cable system and it is turned off. As the unit searches for a receivable station in your area and it receives a broadcast signal for auto clock, the auto clock needs several minutes to set itself.

TV/VCR POWER

DISPLAY

MENU

// /

Auto clock setting

To set auto clock to OFF

Preparation:

Connect the antenna or cable system.

If you use a cable box, turn it on.

Plug the AC power cord to the AC outlet.

1Make sure the unit is turned off.

If you press POWER, the Auto Clock set is not effective.

2Wait at least three minutes and press POWER. Then press TV/VCR to select TV/VCR mode.

The POWER indicator will light.

POWER POWER

TV/VCR

3 Press DISPLAY to check the clock on the screen.

TV/VCR

8 : 47AM MON CH 125 STEREO SAP

When shipped from factory the AUTO CLOCK is set to “ON”. But if you do not want auto clock set (Adjustment):

1 Press MENU, then press or to select option.

MENU

SETUP

CLOCK SET


ON/OFF TIMER


AUTO CLOCK

ON

STANDARD TIME


ENTER


DAYLIGHT


SAVING TIME


/ / / / MENU


2 Press or to select “AUT O CLOCK”.


CLOCK SET


ON/OFF TIMER


AUTO CLOCK

ON

ENTER

STANDARD TIME


DAYLIGHT


SAVING TIME


/ / / / MENU


Basic setup

DISPLAY

00 :00 :00 SP

4 If the clock is not set, check the antenna condition. The Auto clock may not function properly if the reception condition is not good.

Auto clock adjustment

The Auto clock adjustment will be performed at 12:00 PM everyday if you turn off the unit.

If you use a cable box and you want Auto Clock adjust ment to be performed, the cable box must be left on.

The Auto Clock adjustment is not effective when there is a difference of more than 5 minutes exists between the built-in clock time and the actual time.

3 Press or to select “OFF” .


CLOCK SET


ON/OFF TIMER


AUTO CLOCK

OFF

ENTER

STANDARD TIME


DAYLIGHT


SAVING TIME


/ / / / MENU


4 Press MENU repeatedly until the menu screen is cleared.


• When the AUTO CLOCK is set to

MENU

“OFF”, the Auto Clock adjustment


does not function.

SETUP

• Set the clock manually 21 .


Notes:

If the unit does not operate properly, or No key operation (by the unit and/or the remote control): Static electricity, etc., may affect the player's operation. Disconnect the AC power cord once, then connect it again.

The TV section has its own menu and also DVD section has its own menu 53 .

If no buttons are pressed for more than 60 seconds, the TV/VCR menu screen will return to normal TV operation automatically.

19

5L00301C [E]p18-21

19

20/4/04, 16:12

Page 19
Image 19
Toshiba MW24FP3, MW20FP3 owner manual Clock setting, Auto clock setting To set auto clock to OFF, Auto clock adjustment

MW20FP3, MW24FP3 specifications

The Toshiba MW24FP3 and MW20FP3 are compact microwave ovens that provide exceptional performance and convenience, making them ideal for both everyday cooking and reheating tasks. These models are designed with user-friendly features and innovative technologies, ensuring that they cater to a wide range of culinary needs.

One of the standout features of the Toshiba MW24FP3 and MW20FP3 is their impressive cooking power. Both models are equipped with powerful microwave generators that deliver evenly cooked dishes in a fraction of the time compared to traditional ovens. The MW24FP3 boasts a capacity of 24 liters, while the MW20FP3 has a slightly smaller capacity of 20 liters. Despite their compact sizes, both models are spacious enough to accommodate a variety of dishes, making them perfect for small kitchens or even as secondary cooking appliances.

The microwave ovens come with a variety of pre-programmed settings that simplify cooking. These settings cover numerous food categories, including popcorn, pizza, and frozen vegetables. Users can easily select the desired food category, and the microwave will automatically adjust the cooking time and power level for optimal results. This feature not only saves time but also eliminates the guesswork that often comes with cooking in a microwave.

In terms of technology, both models are equipped with advanced inverter technology, which ensures consistent cooking and reheating. Unlike conventional microwaves that cycle on and off, inverter technology provides a steady power supply, allowing for more precise temperature control. This results in evenly cooked meals, even when dealing with delicate items like fish or custards.

The Toshiba MW24FP3 and MW20FP3 are also designed with user-friendly interfaces. The digital control panels are intuitive and easy to navigate, featuring clearly labeled buttons and an easy-to-read display. The ovens come with a turntable system, promoting even cooking and heat distribution. Moreover, their sleek and modern design makes them an attractive addition to any kitchen.

Safety is another important aspect, and both microwave ovens come with a range of safety features, including child lock functions to prevent accidental operation. This ensures that the units are family-friendly, allowing peace of mind when used in homes with children.

Overall, the Toshiba MW24FP3 and MW20FP3 microwave ovens represent a blend of functionality, efficiency, and modern technology. With their advanced features and compact designs, they are perfect for anyone looking to simplify their cooking experience without compromising on quality.