STEP 1 Piping Check and Roughing-in
In order for your new TOTO toilet to fit correctly, check the
Turn the PVC outlet connection upside down. Firmly press a new wax seal onto the circular recess around the outlet opening.
Turn the outlet connection upright and lower it into position over closet flange. With the unit properly
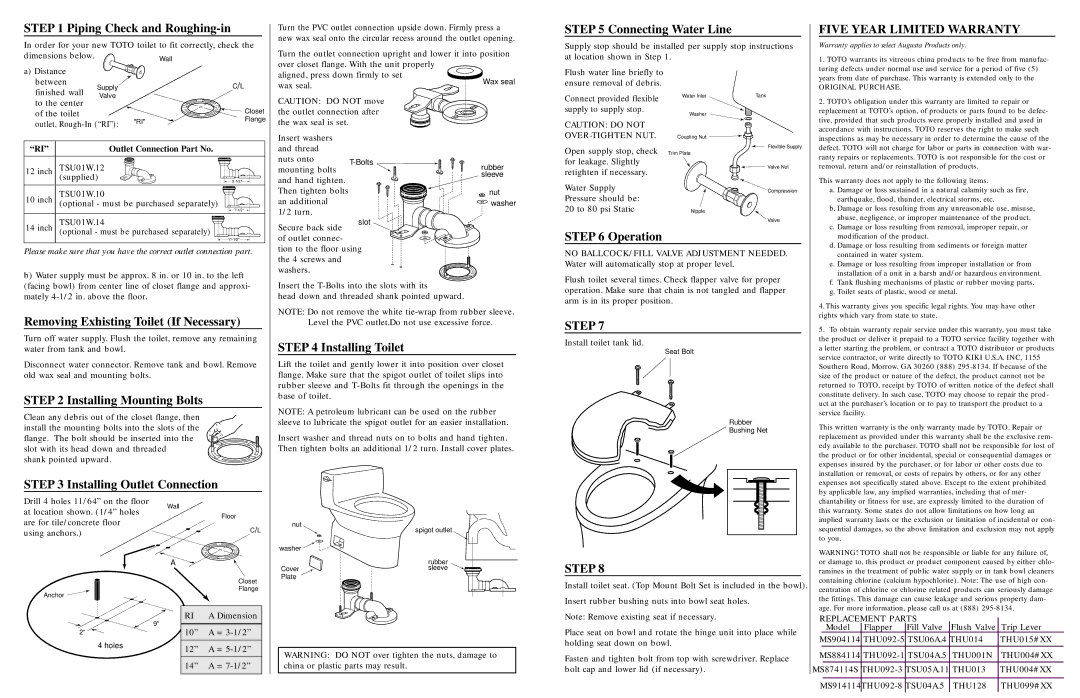
STEP 5 Connecting Water Line
Supply stop should be installed per supply stop instructions at location shown in Step 1.
FIVE YEAR LIMITED WARRANTY
Warranty applies to select Augusta Products only.
1. TOTO warrants its vitreous china products to be free from manufac- |
turing defects under normal use and service for a period of five (5) |
| a) Distance | | | |
| between | Supply | | C/L |
| finished wall | |
| Valve | | |
| to the center | | | Closet |
| of the toilet | | |
| | "RI" | Flange |
| outlet, Rough-In (“RI”): |
| |
| | |
aligned, press down firmly to set wax seal.
CAUTION: DO NOT move the outlet connection after the wax seal is set.
Flush water line briefly to ensure removal of debris.
Connect provided flexible supply to supply stop.
CAUTION: DO NOT
years from date of purchase. This warranty is extended only to the |
ORIGINAL PURCHASE. |
2. TOTO’s obligation under this warranty are limited to repair or |
replacement at TOTO’s option, of products or parts found to be defec- |
tive, provided that such products were properly installed and used in |
accordance with instructions. TOTO reserves the right to make such |
“RI” | Outlet Connection Part No. | |
12 inch | TSU01W.12 | |
| (supplied) | 9 -1/2 " |
10 inch | TSU01W.10 | |
(optional - must be purchased separately) | 7-1/2 " |
| |
| TSU01W.14 | |
Insert washers | |
and thread | |
nuts onto | T-Bolts |
mounting bolts | |
and hand tighten. | |
Then tighten bolts | |
an additional | |
1/2 turn. | |
slot
 nut
nut  washer
OVER-TIGHTEN NUT.
Open supply stop, check for leakage. Slightly retighten if necessary.
Water Supply Pressure should be: 20 to 80 psi Static
Coupling Nut
Flexible Supply
Trim Plate

 Valve Nut
Compression
Nipple
Valve
inspections as may be necessary in order to determine the cause of the |
defect. TOTO will not charge for labor or parts in connection with war- |
ranty repairs or replacements. TOTO is not responsible for the cost or |
removal, return and/or reinstallation of products. |
This warranty does not apply to the following items.
a. Damage or loss sustained in a natural calamity such as fire, earthquake, flood, thunder, electrical storms, etc.
b. Damage or loss resulting from any unreasonable use, misuse, abuse, negligence, or improper maintenance of the product.
14 inch (optional - must be purchased separately) |
11-1/2" |
Please make sure that you have the correct outlet connection part.
b)Water supply must be approx. 8 in. or 10 in. to the left (facing bowl) from center line of closet flange and approxi- mately 4-1/2 in. above the floor.
Secure back side of outlet connec- tion to the floor using the 4 screws and washers.
Insert the T-Bolts into the slots with its
head down and threaded shank pointed upward.
STEP 6 Operation
NO BALLCOCK/FILL VALVE ADJUSTMENT NEEDED. Water will automatically stop at proper level.
Flush toilet several times. Check flapper valve for proper operation. Make sure that chain is not tangled and flapper arm is in its proper position.
c. Damage or loss resulting from removal, improper repair, or |
modification of the product. |
d. Damage or loss resulting from sediments or foreign matter |
contained in water system. |
e. Damage or loss resulting from improper installation or from |
installation of a unit in a harsh and/or hazardous environment. |
f. Tank flushing mechanisms of plastic or rubber moving parts. |
g. Toilet seats of plastic, wood or metal. |
4. This warranty gives you specific legal rights. You may have other |
Removing Exhisting Toilet (If Necessary)
Turn off water supply. Flush the toilet, remove any remaining water from tank and bowl.
Disconnect water connector. Remove tank and bowl. Remove old wax seal and mounting bolts.
STEP 2 Installing Mounting Bolts
Clean any debris out of the closet flange, then install the mounting bolts into the slots of the flange. The bolt should be inserted into the slot with its head down and threaded
shank pointed upward.
| STEP 3 Installing Outlet Connection | |
| Drill 4 holes 11/64” on the floor | Wall |
| at location shown. (1/4” holes |
| Floor |
| are for tile/concrete floor |
| / |
| using anchors.) | C L |
| |
A
Closet
Flange
Anchor 
| | 9" | RI | A Dimension |
2" | | 10” | A = 3-1/2” |
| |
| 4 holes | | 12” | A = 5-1/2” |
| | |
| | | 14” | A = 7-1/2” |
| | | | |
NOTE: Do not remove the white tie-wrap from rubber sleeve. Level the PVC outlet.Do not use excessive force.
STEP 4 Installing Toilet
Lift the toilet and gently lower it into position over closet flange. Make sure that the spigot outlet of toilet slips into rubber sleeve and T-Bolts fit through the openings in the base of toilet.
NOTE: A petroleum lubricant can be used on the rubber sleeve to lubricate the spigot outlet for an easier installation.
Insert washer and thread nuts on to bolts and hand tighten. Then tighten bolts an additional 1/2 turn. Install cover plates.
nut
spigot outlet
washer 
rubber
Cover  sleeve Plate
WARNING: DO NOT over tighten the nuts, damage to china or plastic parts may result.
STEP 7
Install toilet tank lid.
Seat Bolt
Rubber
Bushing Net
STEP 8
Install toilet seat. (Top Mount Bolt Set is included in the bowl).
Insert rubber bushing nuts into bowl seat holes.
Note: Remove existing seat if necessary.
Place seat on bowl and rotate the hinge unit into place while holding seat down on bowl.
Fasten and tighten bolt from top with screwdriver. Replace bolt cap and lower lid (if necessary).
rights which vary from state to state. |
5. To obtain warranty repair service under this warranty, you must take |
the product or deliver it prepaid to a TOTO service facility together with |
a letter starting the problem, or contract a TOTO distributor or products |
service contractor, or write directly to TOTO KIKI U.S.A. INC, 1155 |
Southern Road, Morrow, GA 30260 (888) 295-8134. If because of the |
size of the product or nature of the defect, the product cannot not be |
returned to TOTO, receipt by TOTO of written notice of the defect shall |
constitute delivery. In such case, TOTO may choose to repair the prod- |
uct at the purchaser’s location or to pay to transport the product to a |
service facility. |
This written warranty is the only warranty made by TOTO. Repair or replacement as provided under this warranty shall be the exclusive rem- edy available to the purchaser. TOTO shall not be responsible for lost of the product or for other incidental, special or consequential damages or expenses insured by the purchaser, or for labor or other costs due to installation or removal, or costs of repairs by others, or for any other expenses not specifically stated above. Except to the extent prohibited by applicable law, any implied warranties, including that of mer- chantability or fitness for use, are expressly limited to the duration of this warranty. Some states do not allow limitations on how long an implied warranty lasts or the exclusion or limitation of incidental or con- sequential damages, so the above limitation and exclusion may not apply to you.
WARNING! TOTO shall not be responsible or liable for any failure of, or damage to, this product or product component caused by either chlo- ramines in the treatment of public water supply or in tank bowl cleaners containing chlorine (calcium hypochlorite). Note: The use of high con- centration of chlorine or chlorine related products can seriously damage the fittings. This damage can cause leakage and serious property dam- age. For more information, please call us at (888) 295-8134.
REPLACEMENT PARTS | Trip Lever |
Model Flapper | Fill Valve Flush Valve |
MS904114 THU092-5 | TSU06A.4 THU014 | THU015#XX |
MS884114 THU092-1 | TSU04A.5 THU001N | THU004#XX |
MS874114S THU092-3 TSU05A.11 THU013 | THU004#XX |