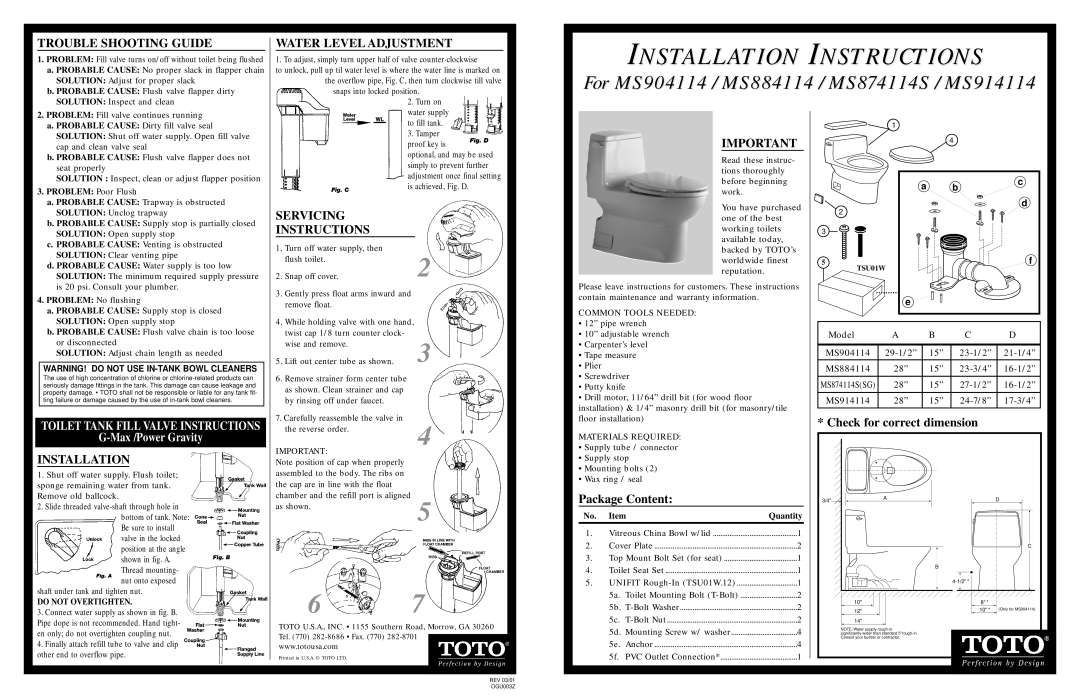
Toto MS884114 warranty Trouble Shooting Guide, Water Level Adjustment, Servicing Instructions

Models: MS914114 MS904114 MS884114 MS874114S

1 2
Download 2 pages 48.76 Kb
Page 1
Image 1
TROUBLE SHOOTING GUIDE

TROUBLE SHOOTING GUIDE

1. PROBLEM:

Fill valve turns on/off without toilet being flushed

a. PROBABLE CAUSE:

No proper slack in flapper chain

SOLUTION:


Adjust for proper slack

b. PROBABLE CAUSE:

Flush valve flapper dirty

WATER LEVEL ADJUSTMENT

1. To adjust, simply turn upper half of valve counter-clockwise

to unlock, pull up til water level is where the water line is marked on the overflow pipe, Fig. C, then turn clockwise till valve

snaps into locked position.

INSTALLATION INSTRUCTIONS

For MS904114 / MS884114 / MS874114S / MS914114

SOLUTION:

Inspect and clean

2. PROBLEM:

Fill valve continues running

a. PROBABLE CAUSE:

Dirty fill valve seal

SOLUTION:


Shut off water supply. Open fill valve

cap and clean valve seal

b. PROBABLE CAUSE:

Flush valve flapper does not

seat properly

Inspect, clean or adjust flapper position

SOLUTION :


3. PROBLEM:

Poor Flush

a. PROBABLE CAUSE:

Trapway is obstructed

SOLUTION:


Unclog trapway

b. PROBABLE CAUSE:

Supply stop is partially closed

SOLUTION:


Open supply stop

c. PROBABLE CAUSE:

Venting is obstructed

SOLUTION:


Clear venting pipe

d. PROBABLE CAUSE:

Water supply is too low

SOLUTION:


The minimum required supply pressure

is 20 psi. Consult your plumber.

4. PROBLEM:

No flushing

a. PROBABLE CAUSE:

Supply stop is closed

2. Turn on water supply to fill tank.

3. Tamper proof key is

optional, and may be used simply to prevent further adjustment once final setting is achieved, Fig. D.

SERVICING

INSTRUCTIONS

1.

Turn off water supply, then

2


flush toilet.

2.

Snap off cover.

3.

Gently press float arms inward and


remove float.


IMPORTANT

Read these instruc- tions thoroughly before beginning work.

You have purchased one of the best working toilets available today, backed by TOTO’s worldwide finest reputation.

Please leave instructions for customers. These instructions contain maintenance and warranty information.

COMMON TOOLS NEEDED:

1

2

3

5

TSU01W


4


a

b

c


d


f

e


SOLUTION:

Open supply stop

b. PROBABLE CAUSE:

Flush valve chain is too loose

or disconnected

SOLUTION:

Adjust chain length as needed

WARNING! DO NOT USE IN-TANK BOWL CLEANERS

The use of high concentration of chlorine or chlorine-related products can seriously damage fittings in the tank. This damage can cause leakage and property damage. • TOTO shall not be responsible or liable for any tank fit- ting failure or damage caused by the use of in-tank bowl cleaners.

TOILET TANK FILL VALVE INSTRUCTIONS

G-Max /Power Gravity

INSTALLATION

1.Shut off water supply. Flush toilet; sponge remaining water from tank. Remove old ballcock.

2.Slide threaded valve-shaft through hole in bottom of tank. Note: Be sure to install valve in the locked position at the angle shown in fig. A. Thread mounting- nut onto exposed

shaft under tank and tighten nut.

DO NOT OVERTIGHTEN.

3.Connect water supply as shown in fig. B. Pipe dope is not recommended. Hand tight- en only; do not overtighten coupling nut.

4.Finally attach refill tube to valve and clip other end to overflow pipe.

4.

While holding valve with one hand,


twist cap 1/8 turn counter clock-

3


wise and remove.

5.

Lift out center tube as shown.

6.

Remove strainer form center tube


as shown. Clean strainer and cap


by rinsing off under faucet.


7. Carefully reassemble the valve in

the reverse order.

4

IMPORTANT:


Note position of cap when properly


assembled to the body. The ribs on


the cap are in line with the float


chamber and the refill port is aligned

5

as shown.


6 7

TOTO U.S.A., INC. • 1155 Southern Road, Morrow, GA 30260 Tel. (770) 282-8686 • Fax. (770) 282-8701 www.totousa.com

Printed in U.S.A. © TOTO LTD.

REV 03/01

OGU003Z

12” pipe wrench

10” adjustable wrench

Carpenter’s level

Tape measure

Plier

Screwdriver

Putty knife

Drill motor, 11/64” drill bit (for wood floor installation) & 1/4” masonry drill bit (for masonry/tile floor installation)

MATERIALS REQUIRED:

Supply tube / connector

Supply stop

Mounting bolts (2)

Wax ring / seal

Package Content:


No.

Item


Quantity

1.

Vitreous China Bowl w/lid

1

2.

Cover Plate

2

3.

Top Mount Bolt Set (for seat)

1

4.

Toilet Seat Set

1

5.

UNIFIT Rough-In (TSU01W.12)

1


5a.

Toilet Mounting Bolt (T-Bolt)

2


5b.

T-Bolt Washer

2


5c.

T-Bolt Nut

2


5d.

Mounting Screw w/ washer

4


5e.

Anchor

4


5f.

PVC Outlet Connection*

1

Model

A

B

C

D


MS904114

29-1/2”

15”

23-1/2”

21-1/4”

MS884114

28”

15”

23-3/4”

16-1/2”


MS874114S(SG)

28”

15”

27-1/2”

16-1/2”


MS914114

28”

15”

24-7/8”

17-3/4”

* Check for correct dimension

3/4"

A


D


C


B


4-1/2" *


10"

8" *


12"

10" *

(Only for MS904114)


14"


NOTE: Water supply rough-in

significantly wider than standard 5"rough-in. Consult your builder or contractor.

Page 1
Image 1
Toto MS884114, MS874114S warranty Trouble Shooting Guide, Water Level Adjustment, Servicing Instructions, Installation

FAQ

How do I troubleshoot the fill valve turning on/off without flushing?

Adjust the flapper chain for proper slack and inspect/clean the flush valve flapper.

What should I do if the fill valve continues running?

Inspect and clean the fill valve seal, and check if the flush valve flapper seats properly.

What are the common tools and materials needed for installation?

Common tools include pipe wrench, adjustable wrench, carpenters level, tape measure, pliers, screwdriver, and more. Materials required include supply tube, connector, wax ring, mounting bolts, and more.