Section 4: Operation

A

B

C

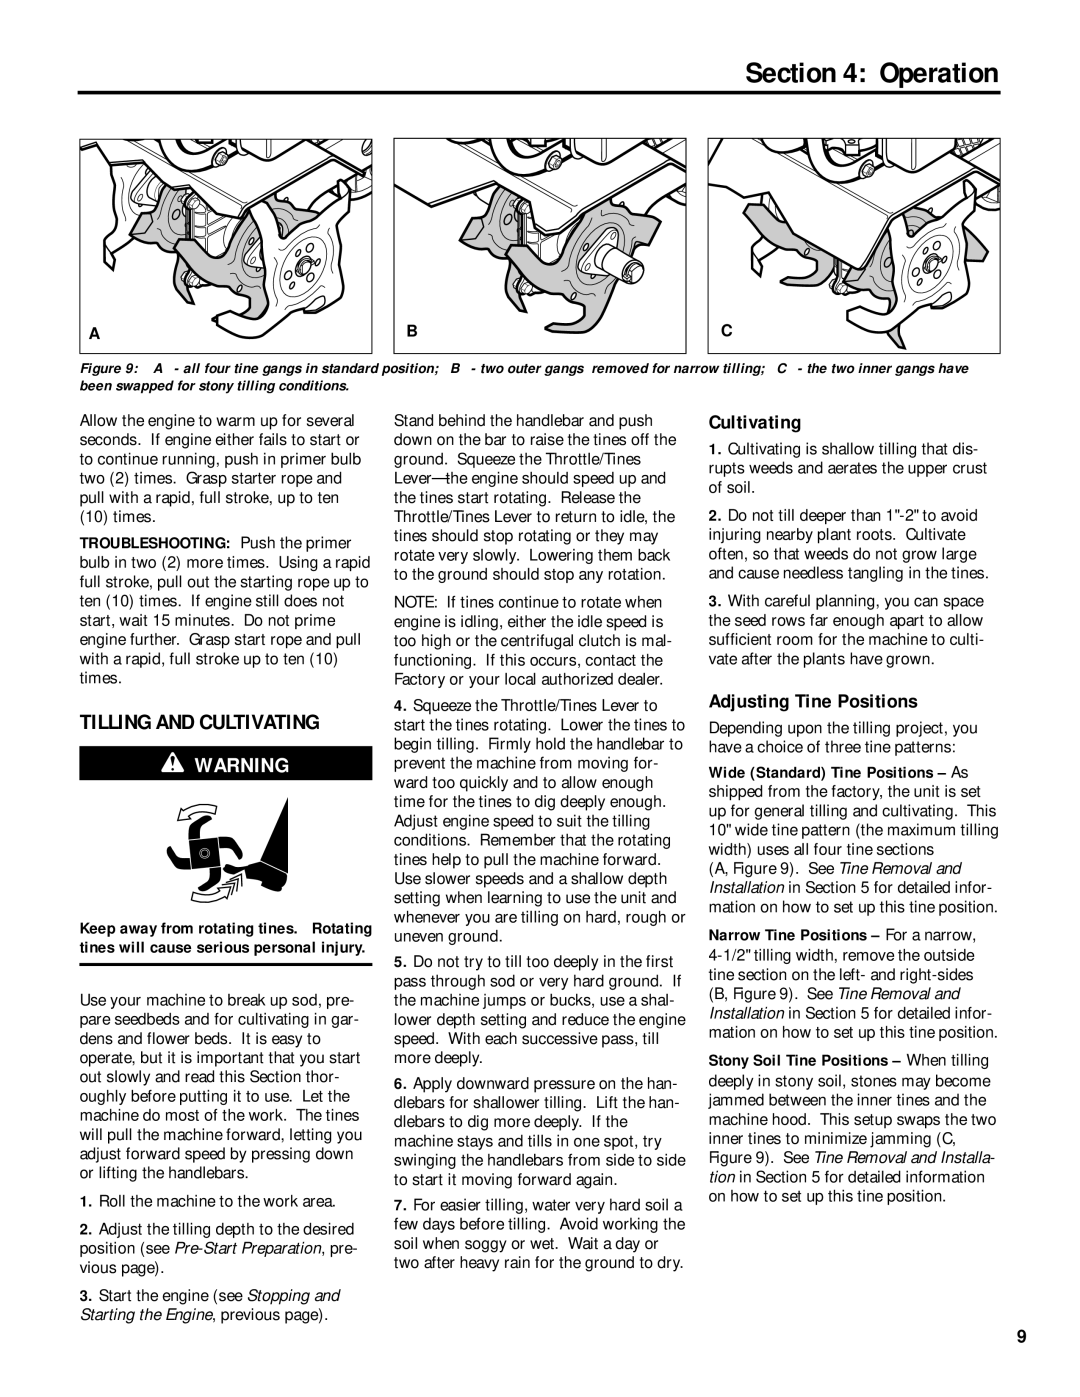
Figure 9: “A” - all four tine gangs in standard position; “B” - two outer gangs removed for narrow tilling; “C” - the two inner gangs have been swapped for stony tilling conditions.

Allow the engine to warm up for several seconds. If engine either fails to start or to continue running, push in primer bulb two (2) times. Grasp starter rope and pull with a rapid, full stroke, up to ten (10) times.

TROUBLESHOOTING: Push the primer bulb in two (2) more times. Using a rapid full stroke, pull out the starting rope up to ten (10) times. If engine still does not start, wait 15 minutes. Do not prime engine further. Grasp start rope and pull with a rapid, full stroke up to ten (10) times.

TILLING AND CULTIVATING

WARNING

Keep away from rotating tines. Rotating tines will cause serious personal injury.

Use your machine to break up sod, pre- pare seedbeds and for cultivating in gar- dens and flower beds. It is easy to operate, but it is important that you start out slowly and read this Section thor- oughly before putting it to use. Let the machine do most of the work. The tines will pull the machine forward, letting you adjust forward speed by pressing down or lifting the handlebars.

1.Roll the machine to the work area.

2.Adjust the tilling depth to the desired position (see Pre-Start Preparation, pre- vious page).

3.Start the engine (see Stopping and Starting the Engine, previous page).

Stand behind the handlebar and push down on the bar to raise the tines off the ground. Squeeze the Throttle/Tines Lever– the engine should speed up and the tines start rotating. Release the Throttle/Tines Lever to return to idle, the tines should stop rotating or they may rotate very slowly. Lowering them back to the ground should stop any rotation.

NOTE: If tines continue to rotate when engine is idling, either the idle speed is too high or the centrifugal clutch is mal- functioning. If this occurs, contact the Factory or your local authorized dealer.

4.Squeeze the Throttle/Tines Lever to start the tines rotating. Lower the tines to begin tilling. Firmly hold the handlebar to prevent the machine from moving for- ward too quickly and to allow enough time for the tines to dig deeply enough. Adjust engine speed to suit the tilling conditions. Remember that the rotating tines help to pull the machine forward. Use slower speeds and a shallow depth setting when learning to use the unit and whenever you are tilling on hard, rough or uneven ground.

5.Do not try to till too deeply in the first pass through sod or very hard ground. If the machine jumps or bucks, use a shal- lower depth setting and reduce the engine speed. With each successive pass, till more deeply.

6.Apply downward pressure on the han- dlebars for shallower tilling. Lift the han- dlebars to dig more deeply. If the machine stays and tills in one spot, try swinging the handlebars from side to side to start it moving forward again.

7.For easier tilling, water very hard soil a few days before tilling. Avoid working the soil when soggy or wet. Wait a day or two after heavy rain for the ground to dry.

Cultivating

1.Cultivating is shallow tilling that dis- rupts weeds and aerates the upper crust of soil.

2.Do not till deeper than 1"-2" to avoid injuring nearby plant roots. Cultivate often, so that weeds do not grow large and cause needless tangling in the tines.

3.With careful planning, you can space the seed rows far enough apart to allow sufficient room for the machine to culti- vate after the plants have grown.

Adjusting Tine Positions

Depending upon the tilling project, you have a choice of three tine patterns:

Wide (Standard) Tine Positions – As shipped from the factory, the unit is set up for general tilling and cultivating. This 10" wide tine pattern (the maximum tilling width) uses all four tine sections

(A, Figure 9). See Tine Removal and Installation in Section 5 for detailed infor- mation on how to set up this tine position.

Narrow Tine Positions – For a narrow, 4-1/2" tilling width, remove the outside tine section on the left- and right-sides (B, Figure 9). See Tine Removal and Installation in Section 5 for detailed infor- mation on how to set up this tine position.

Stony Soil Tine Positions – When tilling deeply in stony soil, stones may become jammed between the inner tines and the machine hood. This setup swaps the two inner tines to minimize jamming (C, Figure 9). See Tine Removal and Installa- tion in Section 5 for detailed information on how to set up this tine position.

9

Page 9
Image 9
Troy-Bilt 12215 owner manual Operation, Tilling and Cultivating, Adjusting Tine Positions

12215 specifications

Troy-Bilt has long been recognized for its commitment to quality outdoor power equipment, and the Troy-Bilt 12215 lawn mower is a prime example of their innovation and durability. This functional and reliable mower is designed to give homeowners a powerful tool for maintaining their lawns while simplifying the mowing process.

One of the standout features of the Troy-Bilt 12215 is its robust, reliable engine. Equipped with a 159cc OHV engine, it provides ample power for tackling various grass types and sizes of yards. Its recoil start system ensures quick and easy ignition, allowing users to get started without any hassle.

Another notable characteristic is the mower’s cutting deck. The 12215 boasts a 21-inch steel deck, which ensures durability and longevity. Its design allows for a clean, precise cut across a wide swath, improving mowing efficiency and reducing the frequency of passes required to achieve a well-manicured lawn.

The Troy-Bilt 12215 also offers a 3-in-1 cutting system, giving users the versatility to mulch, side discharge, or bag clippings based on preference and lawn conditions. The inclusion of a rear bagging system makes it easy to collect clippings, while the mulching option helps fertilize the lawn naturally, reducing the need for additional lawn care products.

Comfort is crucial when it comes to lawn mowers, and Troy-Bilt enhances the user experience with an adjustable seat. The mower features a comfortable handle with a soft grip which reduces vibration and fatigue during longer mowing sessions. The easy height adjustment allows users to select their desired grass length, accommodating various mowing preferences.

The Troy-Bilt 12215 is also designed with safety in mind. It includes features such as a blade brake, which automatically stops the blade when the user releases the handle, ensuring that the mower is safe to use when not in operation.

Lastly, this mower is remarkably easy to maintain due to its accessible components. Whether changing oil, cleaning the air filter, or tuning the mower, owners will find these processes straightforward, contributing to a longer lifespan for the machine.

In summary, the Troy-Bilt 12215 lawn mower combines reliable performance, innovative features, and user-friendly design. These characteristics make it a popular choice among homeowners seeking efficiency and quality in their lawn care routine.