3 ![]()
![]()
![]()
![]()
![]()
![]()
![]()
![]()
![]()
![]()
![]() �
�
Setup and
Adjustment
�
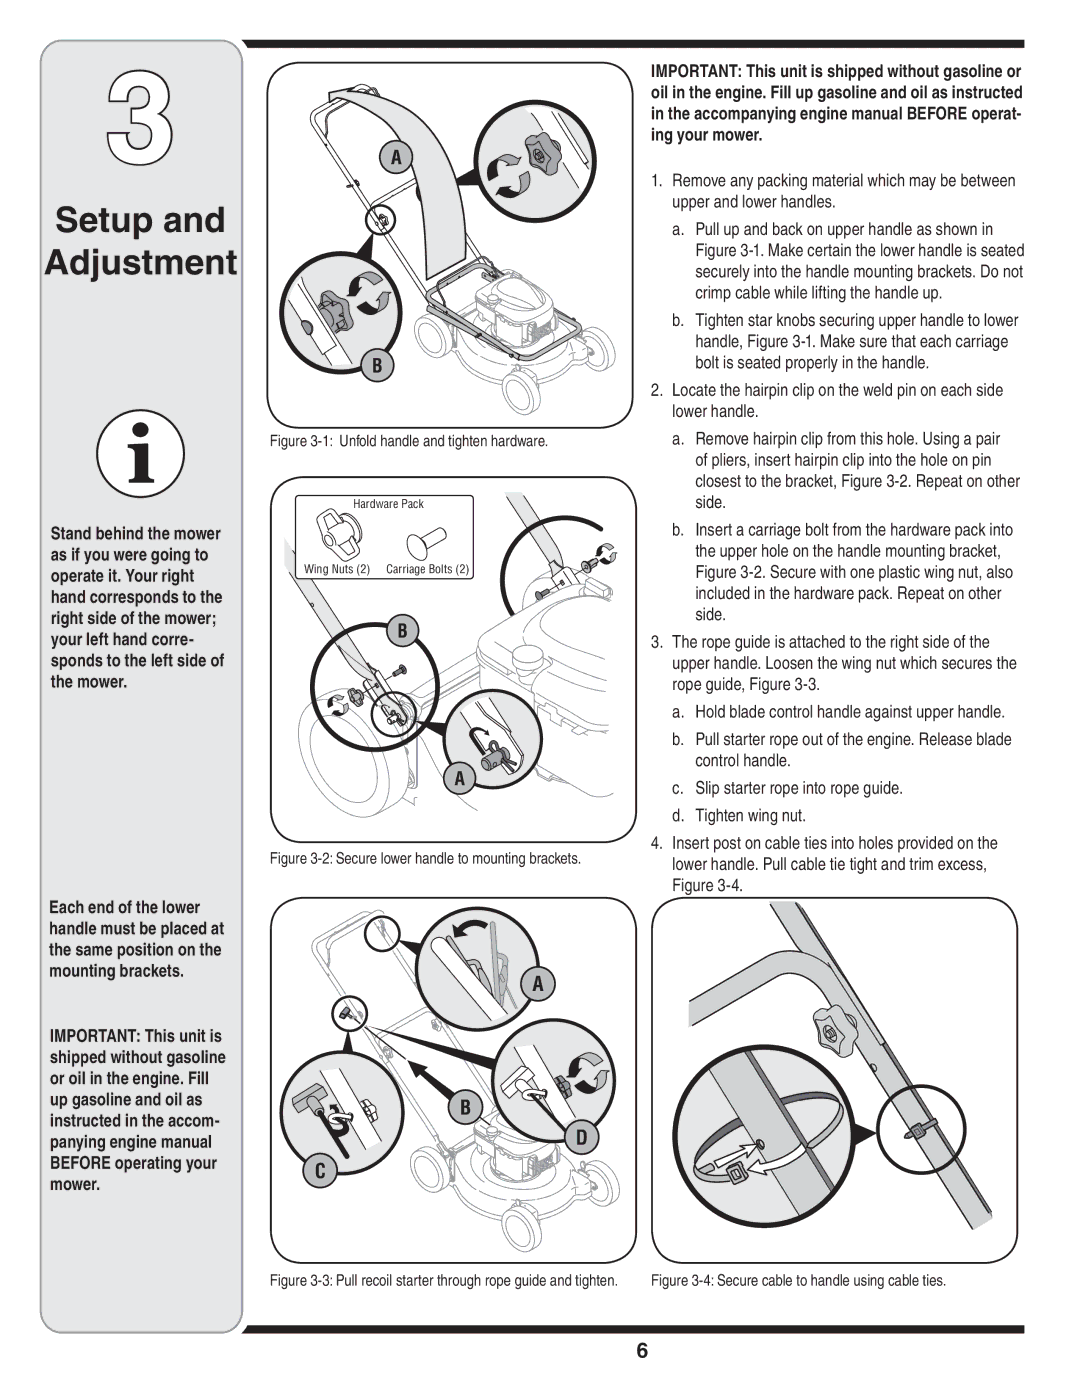
IMPORTANT: This unit is shipped without gasoline or oil in the engine. Fill up gasoline and oil as instructed in the accompanying engine manual BEFORE operat- ing your mower.
1. | Remove any packing material which may be between |
| upper and lower handles. |
| a. Pull up and back on upper handle as shown in |
| Figure |
| securely into the handle mounting brackets. Do not |
| crimp cable while lifting the handle up. |
| b. Tighten star knobs securing upper handle to lower |
| handle, Figure |
| bolt is seated properly in the handle. |
2. | Locate the hairpin clip on the weld pin on each side |
| lower handle. |
Stand behind the mower as if you were going to operate it. Your right hand corresponds to the right side of the mower; your left hand corre- sponds to the left side of the mower.
Figure 3-1: Unfold handle and tighten hardware.
�������������
������������� ������������������
�
�
Figure 3-2: Secure lower handle to mounting brackets.
a. | Remove hairpin clip from this hole. Using a pair |
| of pliers, insert hairpin clip into the hole on pin |
| closest to the bracket, Figure |
| side. |
b. Insert a carriage bolt from the hardware pack into | |
| the upper hole on the handle mounting bracket, |
| Figure |
| included in the hardware pack. Repeat on other |
| side. |
3. The rope guide is attached to the right side of the | |
upper handle. Loosen the wing nut which secures the | |
rope guide, Figure | |
a. | Hold blade control handle against upper handle. |
b. Pull starter rope out of the engine. Release blade | |
| control handle. |
c. | Slip starter rope into rope guide. |
d. | Tighten wing nut. |
4. Insert post on cable ties into holes provided on the | |
lower handle. Pull cable tie tight and trim excess, | |
Figure | |
Each end of the lower |
| |
handle must be placed at |
| |
the same position on the |
| |
mounting brackets. | � | |
| ||
IMPORTANT: This unit is |
| |
shipped without gasoline |
| |
or oil in the engine. Fill |
| |
up gasoline and oil as | � | |
instructed in the accom- | ||
� | ||
panying engine manual | ||
BEFORE operating your | � | |
mower. | ||
|
Figure | Figure |
6