Attaching the Hopper Assembly

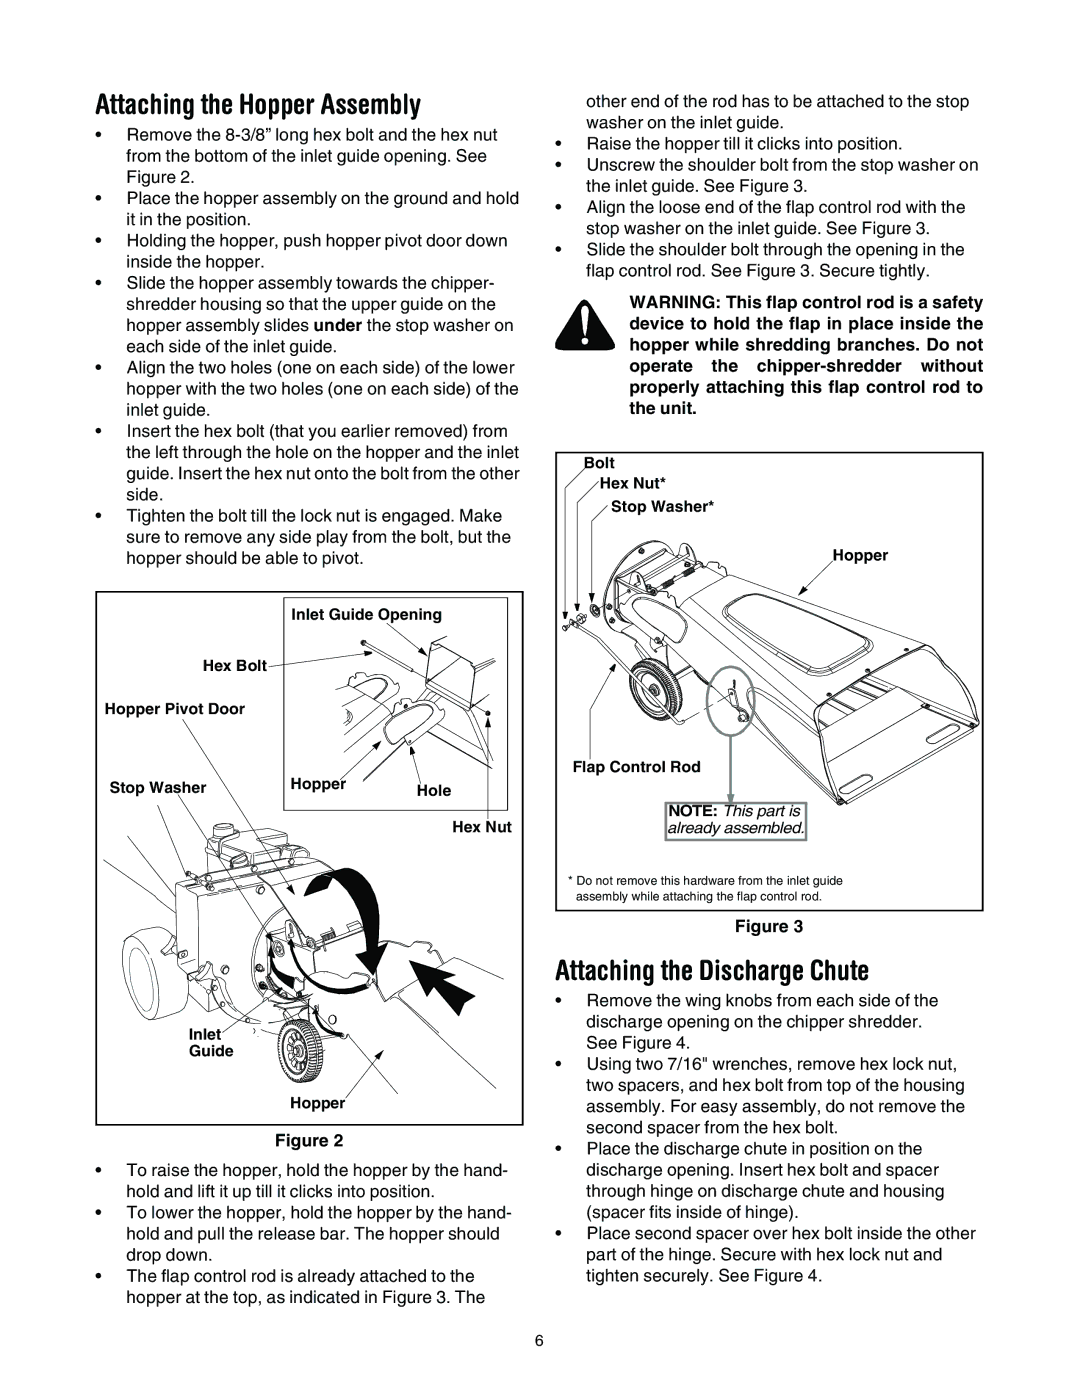
Remove the 8-3/8” long hex bolt and the hex nut from the bottom of the inlet guide opening. See Figure 2.

Place the hopper assembly on the ground and hold it in the position.

Holding the hopper, push hopper pivot door down inside the hopper.

Slide the hopper assembly towards the chipper- shredder housing so that the upper guide on the hopper assembly slides under the stop washer on each side of the inlet guide.

Align the two holes (one on each side) of the lower hopper with the two holes (one on each side) of the inlet guide.

Insert the hex bolt (that you earlier removed) from the left through the hole on the hopper and the inlet guide. Insert the hex nut onto the bolt from the other side.

Tighten the bolt till the lock nut is engaged. Make sure to remove any side play from the bolt, but the hopper should be able to pivot.


Inlet Guide Opening

Hex Bolt


Hopper Pivot Door


Stop Washer

Hopper

Hole


Hex Nut

Inlet


Guide


Hopper


Figure 2

To raise the hopper, hold the hopper by the hand- hold and lift it up till it clicks into position.

To lower the hopper, hold the hopper by the hand- hold and pull the release bar. The hopper should drop down.

The flap control rod is already attached to the hopper at the top, as indicated in Figure 3. The

other end of the rod has to be attached to the stop washer on the inlet guide.

Raise the hopper till it clicks into position.

Unscrew the shoulder bolt from the stop washer on the inlet guide. See Figure 3.

Align the loose end of the flap control rod with the stop washer on the inlet guide. See Figure 3.

Slide the shoulder bolt through the opening in the flap control rod. See Figure 3. Secure tightly.

WARNING: This flap control rod is a safety device to hold the flap in place inside the hopper while shredding branches. Do not operate the chipper-shredder without properly attaching this flap control rod to the unit.

Bolt

Hex Nut*

Stop Washer*

Hopper

Flap Control Rod

NOTE: This part is already assembled.

*Do not remove this hardware from the inlet guide assembly while attaching the flap control rod.

Figure 3

Attaching the Discharge Chute

Remove the wing knobs from each side of the discharge opening on the chipper shredder. See Figure 4.

Using two 7/16" wrenches, remove hex lock nut, two spacers, and hex bolt from top of the housing assembly. For easy assembly, do not remove the second spacer from the hex bolt.

Place the discharge chute in position on the discharge opening. Insert hex bolt and spacer through hinge on discharge chute and housing (spacer fits inside of hinge).

Place second spacer over hex bolt inside the other part of the hinge. Secure with hex lock nut and tighten securely. See Figure 4.

6

Page 6
Image 6
Troy-Bilt 494 manual Attaching the Hopper Assembly, Attaching the Discharge Chute

494 specifications

The Troy-Bilt 494 is a powerful and versatile garden tiller designed to make soil preparation an efficient and straightforward task. With its sturdy construction and innovative features, it is a favored choice among both gardening enthusiasts and professional landscapers.

At the heart of the Troy-Bilt 494 is its robust engine that delivers reliable power and performance. The tiller is equipped with a powerful four-cycle engine that ensures consistent torque and efficiency. This engine provides ample power to break up tough soil, allowing users to tackle any gardening project with ease.

One of the standout features of the Troy-Bilt 494 is its counter-rotating tines. This technology allows the tines to rotate in the opposite direction of the tiller, effectively cutting through hard soil and mixing in organic matter like compost and mulch. The counter-rotating action helps to aerate the soil better, promoting healthier root growth and improving overall soil quality.

The tiller's adjustable tilling width is another significant characteristic. Users have the flexibility to choose between different widths, allowing for versatile use in various garden sizes and layouts. This feature makes it easy to navigate around plants and other obstacles, ensuring that every inch of the garden can be cultivated effectively.

User comfort is also a priority with the Troy-Bilt 494. The tiller comes with soft-grip handles that reduce fatigue during extended use, making it comfortable for gardeners of all experience levels. Additionally, its lightweight design enhances maneuverability, ensuring that users can navigate tight spaces easily.

The durability of the Troy-Bilt 494 cannot be understated. Built with high-quality materials, it can withstand the rigors of frequent use and demanding gardening tasks. Its heavy-duty frame is designed to handle tough working conditions while providing stability and control during operation.

In terms of maintenance, the Troy-Bilt 494 is designed for ease of use. With accessible components, regular maintenance tasks such as oil changes and spark plug replacements can be performed without hassle. This commitment to user-friendly design ensures that gardeners spend more time tilling and less time on upkeep.

Whether you're preparing a new garden bed, mixing in compost, or cultivating between rows, the Troy-Bilt 494 tiller combines power, efficiency, and user-friendly features, making it an essential tool for anyone serious about gardening.