20Section 5: Maintenance

WARNING

Before inspecting, cleaning or servicing the machine, shut off engine, wait for all moving parts to come to a complete stop, disconnect spark plug wire and move wire away from spark plug. Remove the key from the keyswitch on units so equipped.

Failure to follow these instructions can result in serious personal injury or property damage.

WHEEL GEAR CABLE ADJUSTMENT

OFF SEASON STORAGE

When the Wheel Gear Lever is in DISEN-

When the tiller won’t be used for

GAGE, the wheels will roll freely (free-

extended periods, prepare it for storage

wheel). The wheels should not roll freely

as follows:

when the lever is in ENGAGE. If the

1. Clean the tiller and engine.

wheels roll freely when the Wheel Gear

2. Do routine tiller lubrication and check

Lever is in ENGAGE, the wheel gear cable

for loose parts and hardware.

needs to be adjusted as described below.

3. Protect the engine and perform recom-

1. With the engine shut off and the spark

mended engine maintenance by following

plug wire disconnected, put the Wheel

the engine storage instructions found in

Gear Lever in ENGAGE.

the separate Engine Owner’s Manual.

2. Loosen the top adjustment nut (A,

NOTE: Be sure to protect the fuel lines,

Figure 5-4) on the wheel gear cable

carburetor and fuel tank from gum

bracket that is located on the left side rear

deposits by removing fuel or by treating

of the transmission.

fuel with a fuel stabilizer (follow engine

3. Push the wheel gear cable (B) down

manufacturer’s recommendations).

and roll the tiller slightly forward or back-

4. On electric start units, follow “Battery

ward until the eccentric lever (C) engages

Storage” instructions in this Section.

(locks) the wheels. Hold the cable in that

5. Store unit in a clean, dry area.

position and tighten the top (A) and

6. Never store the tiller with fuel in the

bottom (D) adjustment nuts.

4. Move the Wheel Gear Lever to

fuel tank in an enclosed area where gas

fumes could reach an open flame or

ENGAGE and DISENGAGE several times

spark, or where ignition sources are

to check the adjustment. The wheels

present (space heaters, hot water heaters,

should not roll when the lever is in

furnaces, etc.).

ENGAGE, but they should roll when the


lever is in DISENGAGE. Readjust the

BOLO TINES

cable as required.


The tines will wear with use and should


be inspected at the beginning of each

B

tilling season and after every 30 operating

hours. Tines can be replaced individually


A

or as a complete set. Never inspect or

service the tines unless the engine is


D

stopped, the spark plug wire is discon-


nected, and the ignition key is removed

C

on electric start models.

A. Tine Inspection:


Figure 5-4: Wheel gear cable assembly.

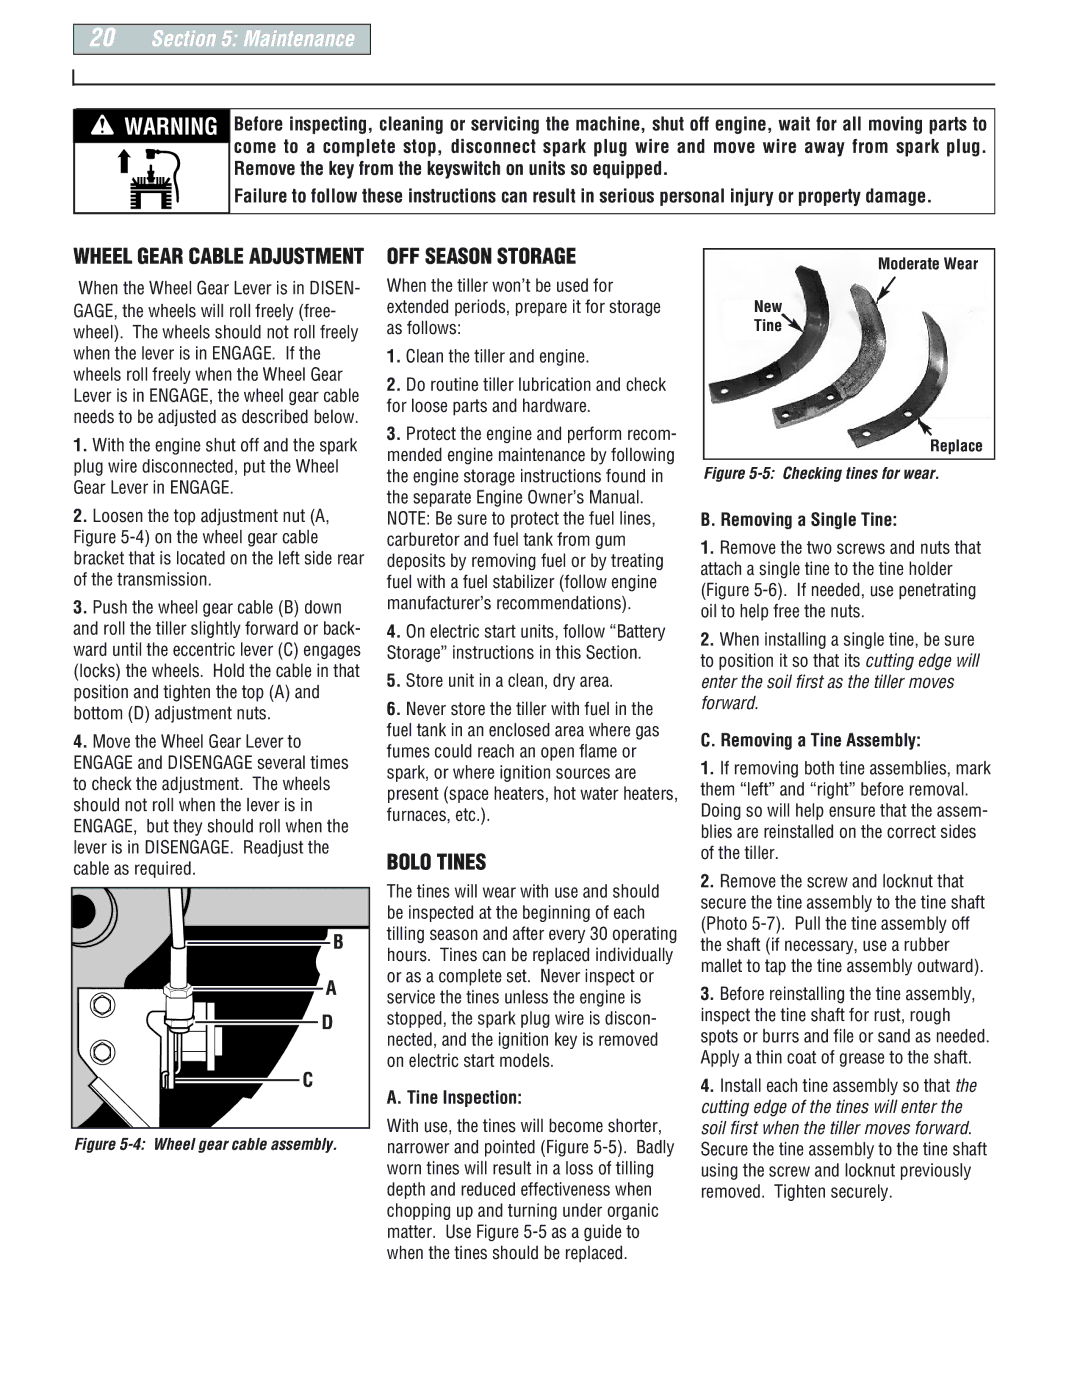
With use, the tines will become shorter,

narrower and pointed (Figure 5-5). Badly


worn tines will result in a loss of tilling


depth and reduced effectiveness when


chopping up and turning under organic


matter. Use Figure 5-5 as a guide to


when the tines should be replaced.

Moderate Wear

New

Tine

Replace

Figure 5-5: Checking tines for wear.

B. Removing a Single Tine:

1.Remove the two screws and nuts that attach a single tine to the tine holder (Figure 5-6). If needed, use penetrating oil to help free the nuts.

2.When installing a single tine, be sure to position it so that its cutting edge will enter the soil first as the tiller moves forward.

C. Removing a Tine Assembly:

1.If removing both tine assemblies, mark them “left” and “right” before removal. Doing so will help ensure that the assem- blies are reinstalled on the correct sides of the tiller.

2.Remove the screw and locknut that secure the tine assembly to the tine shaft (Photo 5-7). Pull the tine assembly off the shaft (if necessary, use a rubber mallet to tap the tine assembly outward).

3.Before reinstalling the tine assembly, inspect the tine shaft for rust, rough spots or burrs and file or sand as needed. Apply a thin coat of grease to the shaft.

4.Install each tine assembly so that the cutting edge of the tines will enter the soil first when the tiller moves forward. Secure the tine assembly to the tine shaft using the screw and locknut previously removed. Tighten securely.

Page 20
Image 20
Troy-Bilt E66M PonyES, 665B Pro-line, 664Dpony manual OFF Season Storage, Bolo Tines, Wheel Gear Cable Adjustment

E66M PonyES, 664Dpony, 665B Pro-line specifications

The Troy-Bilt E66M PonyES, 665B Pro-line, and 664D Pony represent a trio of robust lawn care solutions tailored for those seeking efficiency, durability, and cutting-edge features in their outdoor equipment. Each model is designed to tackle the unique challenges of yard maintenance while providing users with a comfortable and flexible experience.

The Troy-Bilt E66M PonyES stands out with its compact design, making it an ideal choice for residential lawns and tight spaces. Equipped with a reliable engine, this model offers exceptional power while maintaining fuel efficiency. The E66M features a 66-inch cutting deck that ensures a wide cutting path, significantly reducing mowing time. Its electric start capability adds convenience, allowing users to quickly get to work without the hassle of a pull cord. Additionally, the PonyES is designed with adjustable cutting heights, providing versatility for various grass types and conditions, ensuring a neat cut every time.

Next in line is the 665B Pro-line, engineered for more demanding tasks. This model is ideal for professional landscapers and homeowners with larger properties. The 665B boasts a more robust engine and enhanced durability, enabling it to handle challenging terrains with ease. With a significant cutting deck size of 66 inches, this model is optimized for speed and efficiency. The Pro-line features a heavy-duty transmission and a superior suspension system, which not only enhances maneuverability but also ensures a smooth ride over bumpy lawns. Its ergonomic design includes a comfortable seat and user-friendly controls, allowing operators to work for extended periods without fatigue.

Lastly, the 664D Pony offers a blend of power and versatility. Designed for those who appreciate performance without compromising on ease of use, this model features a 64-inch cutting deck that adeptly navigates various landscapes. The 664D is built with a high-performance engine, ensuring consistent power and reliability. Its durable construction and advanced cutting technology help to achieve a precise, professional-quality cut. The model also incorporates features like easy height adjustments and user-friendly handling, making it a favorite among both casual mowers and serious landscapers.

In summary, the Troy-Bilt E66M PonyES, 665B Pro-line, and 664D Pony are exemplary models that cater to a wide range of mowing needs. Each machine leverages innovative technologies, powerful engines, and thoughtful designs, ensuring that users experience efficiency and quality with every mowing session. Whether for a small garden or vast landscapes, these models are equipped to deliver exceptional performance and ease of use.