INTRODUCTION
Thank you for purchasing our BébéSounds® Digital Baby Scale. As you know, it is important to moni- tor the progress of your baby's physical development. Our Digital Baby Scale will enable you to track your baby's growth by accurately measuring her weight and length.
We have included two growth charts published by the National Center for Health
BATTERY INSTALLATION (requires 4 AAA alkaline batteries, included)
Use only AAA alkaline batteries. Always replace all batteries at the same time. Do not mix new and old batteries. For long periods of
1. Remove the battery compartment cover on the bottom of the scale.
2. Insert four (4) AAA alkaline batteries matching positive (+) to positive (+) and negative
3. Replace the battery cover.
4. Replace the batteries when the low battery indicator appears |
|
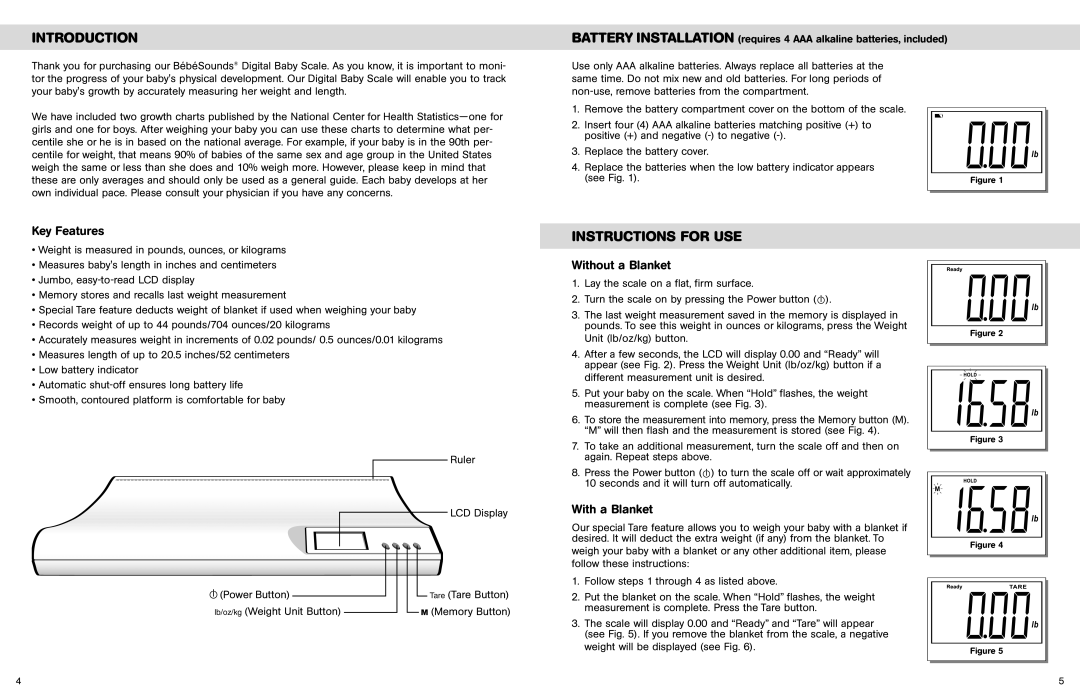
(see Fig. 1). | Figure 1 |
Key Features
•Weight is measured in pounds, ounces, or kilograms
•Measures baby's length in inches and centimeters
•Jumbo,
•Memory stores and recalls last weight measurement
•Special Tare feature deducts weight of blanket if used when weighing your baby
•Records weight of up to 44 pounds/704 ounces/20 kilograms
•Accurately measures weight in increments of 0.02 pounds/ 0.5 ounces/0.01 kilograms
•Measures length of up to 20.5 inches/52 centimeters
•Low battery indicator
•Automatic
•Smooth, contoured platform is comfortable for baby
Ruler
LCD Display
|
|
|
|
|
|
|
|
|
|
|
|
|
|
|
|
|
|
|
|
|
|
|
|
|
|
|
|
|
|
|
|
|
|
|
|
|
|
|
|
|
|
|
|
|
|
|
|
|
|
|
|
|
|
|
|
|
|
|
|
|
|
|
|
|
|
|
|
|
|
|
|
|
|
|
|
|
|
|
|
|
|
|
|
|
|
|
|
|
|
|
| (Power Button) |
|
|
|
|
|
|
|
|
| Tare (Tare Button) | |
|
|
|
|
|
|
|
|
|
| |||
|
|
|
|
|
|
|
|
|
| |||
| lb/oz/kg (Weight Unit Button) |
|
|
|
|
|
| M (Memory Button) | ||||
|
|
|
|
|
|
| ||||||
INSTRUCTIONS FOR USE
Without a Blanket
1. Lay the scale on a flat, firm surface.
2. Turn the scale on by pressing the Power button ( ).
3.The last weight measurement saved in the memory is displayed in pounds. To see this weight in ounces or kilograms, press the Weight Unit (lb/oz/kg) button.
4.After a few seconds, the LCD will display 0.00 and “Ready” will appear (see Fig. 2). Press the Weight Unit (lb/oz/kg) button if a different measurement unit is desired.
5.Put your baby on the scale. When “Hold” flashes, the weight measurement is complete (see Fig. 3).
6.To store the measurement into memory, press the Memory button (M). “M” will then flash and the measurement is stored (see Fig. 4).
7.To take an additional measurement, turn the scale off and then on again. Repeat steps above.
8. Press the Power button ( ) to turn the scale off or wait approximately 10 seconds and it will turn off automatically.
With a Blanket
Our special Tare feature allows you to weigh your baby with a blanket if desired. It will deduct the extra weight (if any) from the blanket. To
weigh your baby with a blanket or any other additional item, please follow these instructions:
1.Follow steps 1 through 4 as listed above.
2.Put the blanket on the scale. When “Hold” flashes, the weight measurement is complete. Press the Tare button.
3.The scale will display 0.00 and “Ready” and “Tare” will appear (see Fig. 5). If you remove the blanket from the scale, a negative weight will be displayed (see Fig. 6).
Figure 2
Figure 3
M
Figure 4
Figure 5
4 | 5 |
