Operating Instructions For
1 Introduction | 4 Button Functions |
STEP3 Point the remote control toward the Component and enter the
STEP2 Line up the
TM
*Note : 10 blinks represents the number zero.
Example :One blink, (pause), eight blinks, ( pause) and three blinks, indicates code number 183.
STEP2 Press the [VOL ] button.
STEP3 Press the [TV] button again. The Component
CLIKR™-5
Cable Remote Control
UR5L-8520L
Universal Remote Control, Inc.
www.universalremote.com
The
CABLE : Cable Converters | TV : Televisions | |
VCR | : VCRs and TV/VCRs | DVD: DVD Players |
AUX | : Audio Receivers and DVRs, etc. | |
2Replacing Batteries
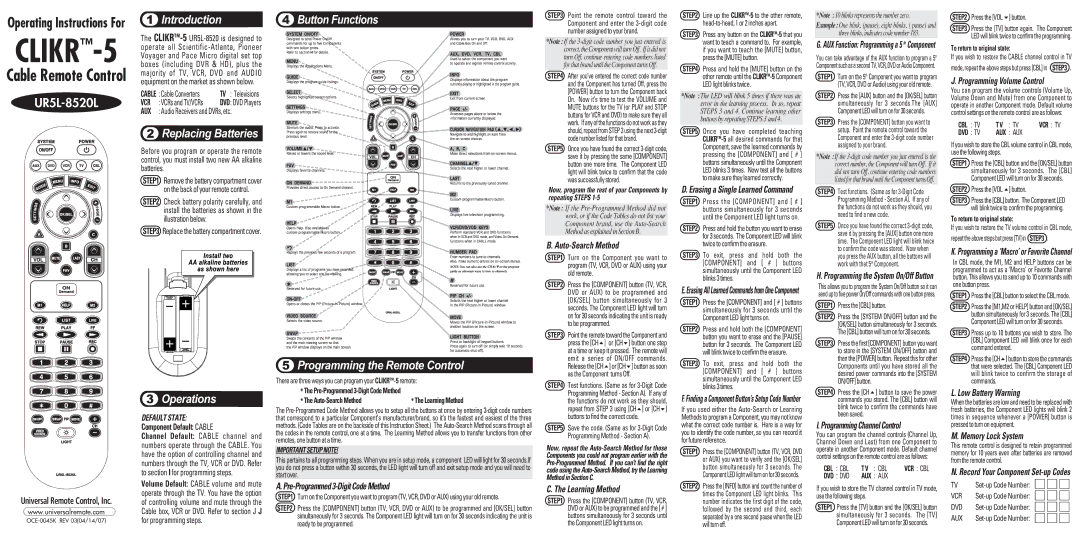
Before you program or operate the remote control, you must install two new AA alkaline batteries.
STEP1 Remove the battery compartment cover on the back of your remote control.
STEP2 Check battery polarity carefully, and install the batteries as shown in the illustration below.
STEP3 Replace the battery compartment cover.
3Operations
DEFAULT STATE:
Component Default: CABLE
Channel Default: CABLE channel and numbers operate through the CABLE. You have the option of controlling channel and numbers through the TV, VCR or DVD. Refer to section I for programming steps.
Volume Default: CABLE volume and mute operate through the TV. You have the option of controlling volume and mute through the Cable box, VCR or DVD. Refer to section J J for programming steps.
5Programming the Remote Control
There are three ways you can program your
* The |
|
* The | * The Learning Method |
The
IMPORTANT SETUP NOTE!
This pertains to all programming steps. When you are in setup mode, a component LED will light for 30 seconds.If you do not press a button within 30 seconds, the LED light will turn off and exit setup mode and you will need to start over.
A. Pre-Programmed 3-Digit Code Method
STEP1 Turn on the Component you want to program (TV, VCR, DVD or AUX) using your old remote.
STEP2 Press the [COMPONENT] button (TV, VCR, DVD or AUX) to be programmed and [OK/SEL] button simultaneously for 3 seconds. The Component LED light will turn on for 30 seconds indicating the unit is ready to be programmed.
*Note : If the
STEP4 After you’ve entered the correct code number and the Component has turned Off, press the [POWER] button to turn the Component back On. Now it’s time to test the VOLUME and MUTE buttons for the TV (or PLAY and STOP buttons for VCR and DVD) to make sure they all work. If any of the functions do not work as they should, repeat from STEP 3 using the next
STEP5 Once you have found the correct
Now, program the rest of your Components by repeating STEPS
*Note : If the
B. Auto-Search Method
STEP1 Turn on the Component you want to program (TV, VCR, DVD or AUX) using your old remote.
STEP2 Press the [COMPONENT] button (TV, VCR, DVD or AUX) to be programmed and [OK/SEL] button simultaneously for 3 seconds. The Component LED light will turn on for 30 seconds indicating the unit is ready to be programmed.
STEP3 Point the remote toward the Component and press the [CH ] or [CH ] button one step at a time or keep it pressed. The remote will emit a series of ON/OFF commands. Release the [CH ] or [CH ] button as soon as the Component turns Off.
STEP4 Test functions. (Same as for
STEP5 Save the code. (Same as for
Now, repeat the
C. The Learning Method
STEP1 Press the [COMPONENT] button (TV, VCR, DVD or AUX) to be programmed and the [ # ] buttons simultaneously for 3 seconds until the Component LED light turns on.
STEP3 Press any button on the CLIKR
STEP4 Press and hold the [MUTE] button on the other remote until the
*Note : The LED will blink 5 times if there was an error in the learning process. In so, repeat STEPS 3 and 4. Continue learning other buttons by repeating STEPS 3 and 4.
STEP5 Once you have completed teaching
D. Erasing a Single Learned Command
STEP1 Press the [COMPONENT] and [ # ] buttons simultaneously for 3 seconds until the Component LED light turns on.
STEP2 Press and hold the button you want to erase for 3 seconds. The Component LED will blink twice to confirm the erasure.
STEP3 To exit, press and hold both the [COMPONENT] and [ # ] buttons simultaneously until the Component LED blinks 3 times.
E. Erasing All Learned Commands from One Component
STEP1 Press the [COMPONENT] and [ # ] buttons simultaneously for 3 seconds until the Component LED light turns on.
STEP2 Press and hold both the [COMPONENT] button you want to erase and the [PAUSE] button for 3 seconds. The Component LED will blink twice to confirm the erasure.
STEP3 To exit, press and hold both the [COMPONENT] and [ # ] buttons simultaneously until the Component LED blinks 3 times.
F. Finding a Component Button’s Setup Code Number
If you used either the
STEP1 Press the [COMPONENT] button (TV, VCR, DVD or AUX) you want to verify and the [OK/SEL] button simultaneously for 3 seconds. The Component LED light will turn on for 30 seconds.
STEP2 Press the [INFO] button and count the number of times the Component LED light blinks. This number indicates the first digit of the code, followed by the second and third, each separated by a one second pause when the LED will turn off.
G. AUX Function: Programming a 5 th Component
You can take advantage of the AUX function to program a 5th Component such as a second TV, VCR, DVD or Audio Component.
STEP1 Turn on the 5th Component you want to program (TV, VCR, DVD or Audio) using your old remote.
STEP2 Press the [AUX] button and the [OK/SEL] button simultaneously for 3 seconds.The [AUX] Component LED will turn on for 30 seconds.
STEP3 Press the [COMPONENT] button you want to setup. Point the remote control toward the Component and enter the
*Note : If the
STEP4 Test functions. (Same as for
STEP5 Once you have found the correct
H. Programming the System On/Off Button
This allows you to program the System On/Off button so it can send up to five power On/Off commands with one button press.
STEP1 Press the [CBL] button.
STEP2 Press the [SYSTEM ON/OFF] button and the [OK/SEL] button simultaneously for 3 seconds. The [CBL] button will turn on for 30 seconds.
STEP3 Press the first [COMPONENT] button you want to store in the [SYSTEM ON/OFF] button and then the [POWER] button. Repeat this for other Components until you have stored all the desired power commands into the [SYSTEM ON/OFF] button.
STEP4 Press the [CH ] button to save the power commands you stored. The [CBL] button will blink twice to confirm the commands have been saved.
I. Programming Channel Control
You can program the channel controls (Channel Up, Channel Down and Last) from one Component to operate in another Component mode. Default channel control settings on the remote control are as follows:
CBL : CBL | T V | : | CBL | VCR : CBL |
DVD : DVD | AUX | : | AUX |
|
If you wish to store the TV channel control in TV mode, use the following steps.
STEP1 Press the [TV] button and the [OK/SEL] button simultaneously for 3 seconds. The [TV] Component LED will turn on for 30 seconds.
LED will blink twice to confirm the programming.
To return to original state:
If you wish to restore the CABLE channel control in TV mode, repeat the above steps but press [CBL] in STEP3 .
J. Programming Volume Control
You can program the volume controls (Volume Up, Volume Down and Mute) from one Component to operate in another Component mode. Default volume control settings on the remote control are as follows:
CBL : TV | T V | : | TV | VCR : TV |
DVD : TV | AUX | : | AUX |
|
If you wish to store the CBL volume control in CBL mode, use the following steps.
STEP1 Press the [CBL] button and the [OK/SEL] button simultaneously for 3 seconds. The [CBL] Component LED will turn on for 30 seconds.
STEP2 Press the [VOL ] button.
STEP3 Press the [CBL] button. The Component LED will blink twice to confirm the programming.
To return to original state:
If you wish to restore the TV volume control in CBL mode, repeat the above steps but press [TV] in STEP3 .
K. Programming a ‘Macro’ or Favorite Channel
In CBL mode, the M1, M2 and HELP buttons can be programmed to act as a ‘Macro’ or Favorite Channel button. This allows you to send up to 10 commands with one button press.
STEP1 Press the [CBL] button to select the CBL mode.
STEP2 Press the [M1,M2 or HELP] button and [OK/SEL] button simultaneously for 3 seconds. The [CBL] Component LED will turn on for 30 seconds.
STEP3 Press up to 10 buttons you wish to store. The [CBL] Component LED will blink once for each command entered.
STEP4 Press the [CH ] button to store the commands that were selected. The [CBL] Component LED will blink twice to confirm the storage of commands.
L. Low Battery Warning
When the batteries are low and need to be replaced with fresh batteries, the Component LED lights will blink 2 times in sequence whenever a [POWER] button is pressed to turn on equipment.
M. Memory Lock System
This remote control is designed to retain programmed memory for 10 years even after batteries are removed from the remote control.
N. Record Your Component
TV | |
VCR | |
DVD | |
AUX |