IMPORTANT!

DO NOT DISCARD THE SHIP KIT LOCATED ON TOP OF THE DECK AND BELT. ALL NECESSARY COMPONENTS NEEDED TO

COMPLETE THE INSTALLATION ARE LOCATED IN THE SHIP KIT AND BASE TRAY.

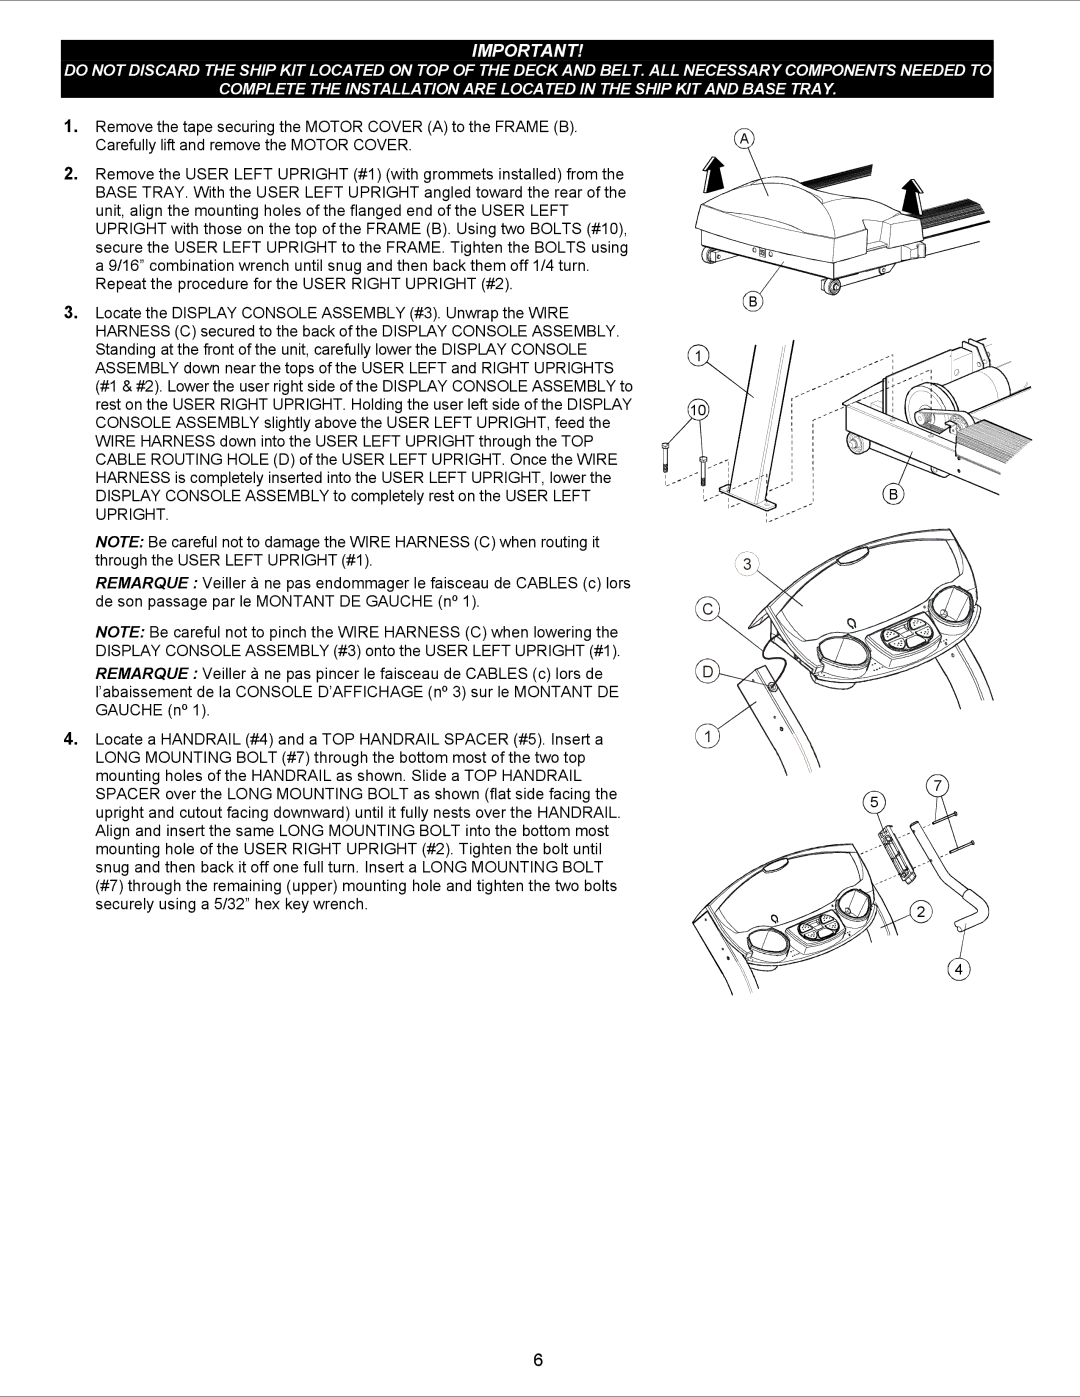
1.Remove the tape securing the MOTOR COVER (A) to the FRAME (B). Carefully lift and remove the MOTOR COVER.

2.Remove the USER LEFT UPRIGHT (#1) (with grommets installed) from the BASE TRAY. With the USER LEFT UPRIGHT angled toward the rear of the unit, align the mounting holes of the flanged end of the USER LEFT UPRIGHT with those on the top of the FRAME (B). Using two BOLTS (#10), secure the USER LEFT UPRIGHT to the FRAME. Tighten the BOLTS using a 9/16” combination wrench until snug and then back them off 1/4 turn. Repeat the procedure for the USER RIGHT UPRIGHT (#2).

3.Locate the DISPLAY CONSOLE ASSEMBLY (#3). Unwrap the WIRE HARNESS (C) secured to the back of the DISPLAY CONSOLE ASSEMBLY. Standing at the front of the unit, carefully lower the DISPLAY CONSOLE ASSEMBLY down near the tops of the USER LEFT and RIGHT UPRIGHTS (#1 & #2). Lower the user right side of the DISPLAY CONSOLE ASSEMBLY to rest on the USER RIGHT UPRIGHT. Holding the user left side of the DISPLAY CONSOLE ASSEMBLY slightly above the USER LEFT UPRIGHT, feed the WIRE HARNESS down into the USER LEFT UPRIGHT through the TOP CABLE ROUTING HOLE (D) of the USER LEFT UPRIGHT. Once the WIRE HARNESS is completely inserted into the USER LEFT UPRIGHT, lower the DISPLAY CONSOLE ASSEMBLY to completely rest on the USER LEFT UPRIGHT.

NOTE: Be careful not to damage the WIRE HARNESS (C) when routing it through the USER LEFT UPRIGHT (#1).

REMARQUE : Veiller à ne pas endommager le faisceau de CABLES (c) lors de son passage par le MONTANT DE GAUCHE (nº 1).

NOTE: Be careful not to pinch the WIRE HARNESS (C) when lowering the DISPLAY CONSOLE ASSEMBLY (#3) onto the USER LEFT UPRIGHT (#1).

REMARQUE : Veiller à ne pas pincer le faisceau de CABLES (c) lors de l’abaissement de la CONSOLE D’AFFICHAGE (nº 3) sur le MONTANT DE GAUCHE (nº 1).

4.Locate a HANDRAIL (#4) and a TOP HANDRAIL SPACER (#5). Insert a LONG MOUNTING BOLT (#7) through the bottom most of the two top mounting holes of the HANDRAIL as shown. Slide a TOP HANDRAIL SPACER over the LONG MOUNTING BOLT as shown (flat side facing the upright and cutout facing downward) until it fully nests over the HANDRAIL. Align and insert the same LONG MOUNTING BOLT into the bottom most mounting hole of the USER RIGHT UPRIGHT (#2). Tighten the bolt until snug and then back it off one full turn. Insert a LONG MOUNTING BOLT (#7) through the remaining (upper) mounting hole and tighten the two bolts securely using a 5/32” hex key wrench.

A

B

1

10

B

3

C

D

1

7

5

2

4

6

Page 6
Image 6
Univex T35 manual

T35 specifications

The Univex T35 is a versatile and robust kitchen machine designed for commercial and industrial food preparation. With its powerful motor and a variety of attachments, the T35 caters to the needs of both professional chefs and culinary enthusiasts, making it an essential tool in any busy kitchen.

One of the standout features of the Univex T35 is its heavy-duty construction. Built with high-quality materials, the machine is designed to withstand the rigors of daily use in commercial kitchens. Its durable design ensures longevity, making it a worthwhile investment for restaurants, catering businesses, and bakeries.

The T35 comes equipped with a powerful motor that delivers impressive mixing capabilities. This efficiency allows it to handle large volumes of dough and batter with ease, making it ideal for businesses that require the preparation of high quantities of food. Furthermore, the motor is designed to maintain consistent speed and torque, ensuring optimal mixing results every time.

Another notable feature of the Univex T35 is its user-friendly controls. The machine includes intuitive settings that allow users to adjust the speed and mixing time according to their specific needs. This flexibility facilitates the creation of a wide range of culinary items, from light and airy batters to dense doughs.

The T35 also boasts a range of attachments, enhancing its versatility further. This includes a dough hook, flat beater, and wire whip, each designed for specific mixing tasks. Additionally, the machine may support optional attachments, such as food processors and shredders, providing even greater functionality.

Safety is a key consideration in the design of the Univex T35. The machine is equipped with safety features, such as a safety guard and a non-slip base, ensuring that it remains stable during operation. These measures prevent accidents and contribute to a secure working environment.

In summary, the Univex T35 is a powerful and reliable kitchen machine that is highly regarded in the culinary world. With its heavy-duty construction, powerful motor, user-friendly controls, and a variety of attachments, it caters to the diverse needs of professional kitchens. Its focus on safety and efficiency makes it a valuable asset for any food service establishment looking to enhance productivity and streamline food preparation processes.