Instalación rápida

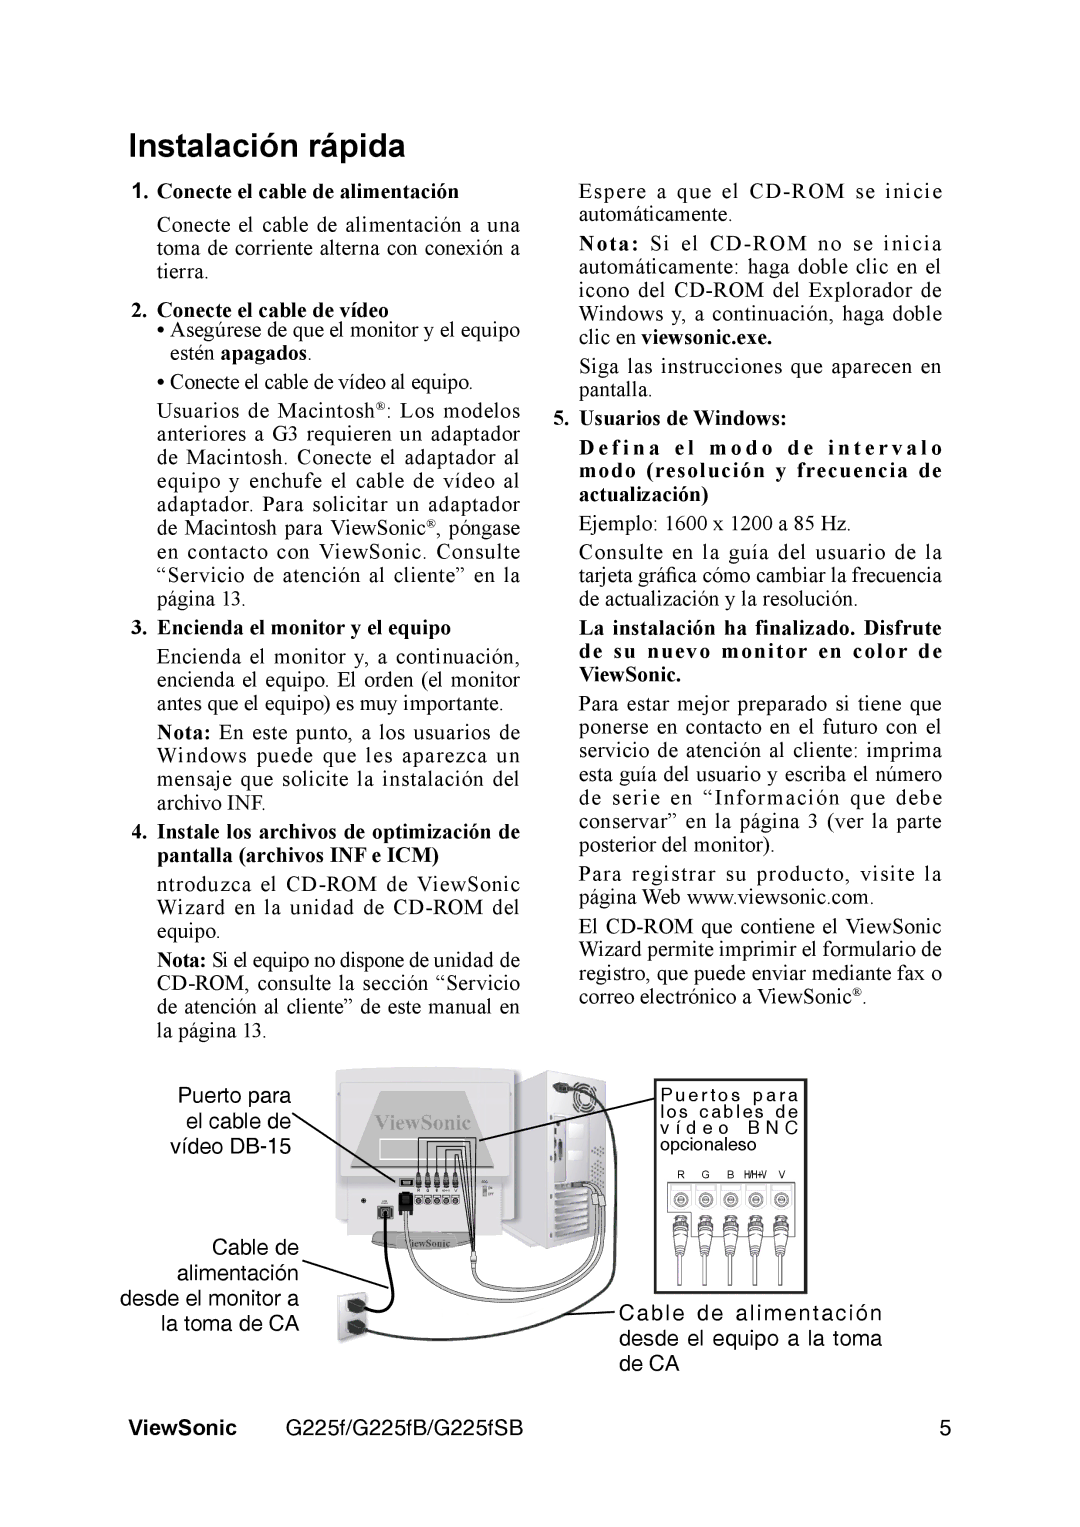
1. Conecte el cable de alimentación

Conecte el cable de alimentación a una toma de corriente alterna con conexión a tierra.

2.Conecte el cable de vídeo

Asegúrese de que el monitor y el equipo estén apagados.

Conecte el cable de vídeo al equipo.

Usuarios de Macintosh®: Los modelos anteriores a G3 requieren un adaptador de Macintosh. Conecte el adaptador al equipo y enchufe el cable de vídeo al adaptador. Para solicitar un adaptador de Macintosh para ViewSonic®, póngase en contacto con ViewSonic. Consulte “Servicio de atención al cliente” en la página 13.

3.Encienda el monitor y el equipo

Encienda el monitor y, a continuación, encienda el equipo. El orden (el monitor antes que el equipo) es muy importante.

Nota: En este punto, a los usuarios de Windows puede que les aparezca un mensaje que solicite la instalación del archivo INF.

4.Instale los archivos de optimización de pantalla (archivos INF e ICM)

ntroduzca el CD-ROM de ViewSonic Wizard en la unidad de CD-ROM del equipo.

Nota: Si el equipo no dispone de unidad de CD-ROM, consulte la sección “Servicio de atención al cliente” de este manual en

Espere a que el CD-ROM se inicie automáticamente.

Nota: Si el CD-ROM no se inicia

automáticamente: haga doble clic en el icono del CD-ROM del Explorador de Windows y, a continuación, haga doble

clic en viewsonic.exe.

Siga las instrucciones que aparecen en pantalla.

5. Usuarios de Windows:

D e f i n a e l m o d o d e i n t e r v a l o modo (resolución y frecuencia de actualización)

Ejemplo: 1600 x 1200 a 85 Hz.

Consulte en la guía del usuario de la tarjeta gráfica cómo cambiar la frecuencia de actualización y la resolución.

La instalación ha finalizado. Disfrute de su nuevo monitor en color de ViewSonic.

Para estar mejor preparado si tiene que ponerse en contacto en el futuro con el servicio de atención al cliente: imprima esta guía del usuario y escriba el número de serie en “Información que debe conservar” en la página 3 (ver la parte posterior del monitor).

Para registrar su producto, visite la página Web www.viewsonic.com.

El CD-ROM que contiene el ViewSonic Wizard permite imprimir el formulario de registro, que puede enviar mediante fax o correo electrónico a ViewSonic®.

la página 13.

Puerto para el cable de vídeo DB-15

LINE

INPUT


SOG

R

G

B H/H+V

V

ON

OFF


P u e r t o s p a r a los cables de v í d e o B N C opcionaleso

RG B H/H+V V

Cable de

ViewSonic


alimentación


desde el monitor a


la toma de CA


ViewSonic G225f/G225fB/G225fSB

Cable de alimentación desde el equipo a la toma de CA

5

Page 8
Image 8
ViewSonic VS11135 Instalación rápida, Conecte el cable de alimentación, Conecte el cable de vídeo, Clic en viewsonic.exe

VS11135 specifications

ViewSonic VS11135 is a versatile and high-performing display engineered to meet the needs of modern users in various environments such as education, business, and home entertainment. This projector stands out with its impressive features, cutting-edge technologies, and user-friendly characteristics.

One of the key features of the VS11135 is its ability to deliver stunning image quality. With a native resolution of 1920 x 1080 pixels, also known as Full HD, users can enjoy sharp and vibrant visuals. The projector boasts a high brightness level, often exceeding 3000 ANSI lumens, which makes it suitable for well-lit spaces. The high contrast ratio further enhances the image quality by delivering deeper blacks and brighter whites, ensuring a clearer and more immersive viewing experience.

The VS11135 incorporates advanced color technology, allowing for accurate and vivid colors. By utilizing a range of color modes, users can customize their viewing experience based on content type, whether they are watching movies, giving presentations, or playing video games. The projector also features a 3D mode, providing an exciting option for 3D content enthusiasts.

Connectivity is another area where the ViewSonic VS11135 excels. It offers multiple input options, including HDMI, VGA, and USB ports, making it compatible with various devices such as laptops, Blu-ray players, and gaming consoles. The addition of wireless capabilities also allows for seamless screen mirroring from smartphones and tablets, enhancing the convenience for users on the go.

User-friendliness is a hallmark of the VS11135 design. It features a straightforward interface, making setup and operation effortless even for those who are not tech-savvy. The projector's lightweight and compact design enhance portability, enabling users to easily transport it to different locations as needed.

In terms of durability and maintenance, the ViewSonic VS11135 comes with a long lamp life, often exceeding 15,000 hours in eco mode, which reduces the frequency of replacements and maintenance costs. This makes it an economical choice for both personal and professional use.

Overall, the ViewSonic VS11135 is a solid choice for anyone looking for a reliable projector that combines high-quality performance, extensive connectivity options, and ease of use. Whether for presenting in a conference room, enjoying movie nights, or delivering educational content, the VS11135 stands out as a capable and efficient solution.