Door & Drawer Removal (cont.)
Installation
Replace Doors and Hinges
1.Assemble the parts for the top hinge as shown in Top Hinge graphic. DO NOT tighten the screws completely.
2.Replace the parts for the bottom hinge as shown in Bottom Hinge graphic. Tighten screws. Replace the refrigerator door.
Note: Provide additional support for the refrigerator door while the hinges are being moved. DO NOT depend on the door gasket magnets to hold the door in place while you are working.
3.Align the door so that the bottom of the refrigerator door aligns evenly with the top of the freezer drawer. Tighten all screws.
4.Reconnect the wiring plug on top of the left- hand side refrigerator door.
5.Reconnect the water lines by firmly pushing one line inside the other. Slide the black locking collar fully forward.
OR
5a.Reconnect the water line by pulling back the
locking collar ring while firmly pushing the water line into the connector.
6.While holding the tabbed section of the waterline, turn the locking collar counterclockwise until you hear a “click.”
Note: The arrow on the tabbed section should align with the two bars on the locking collar.
7.Check for leaks. Replace the top hinge covers.
Remove and Replace Freezer Drawer
IMPORTANT:Two people may be required to remove and replace the freezer drawer.
Remove Drawer Front
1.Open the freezer drawer to full extension.
2.Loosen the four screws attaching the drawer glides to the drawer front. See Drawer Front Removal graphic.
Note: Loosen screws three to four turns. Keep the screws in the drawer front.
3.Lift drawer front upward and off the screws. See Drawer Front Removal graphic.
Replace Drawer Front
1.Slide the drawer glides out of the freezer compartment. Insert the screws in the top of the drawer front into the slots in the drawer brackets. See Drawer Front Replacement graphic.
2.Pull the drawer brackets toward you to position the two screws in the bottom of the drawer front into the brackets. See Drawer Front Replacement graphic.
3.Completely tighten the four screws.
Drawer Front Removal
A![]()
A. Loosen 4 Door Bracket Screws
Drawer Front Replacement
Water Supply Requirements
Gather the required tools and parts before starting installation. Read and follow the instructions provided with any tools listed here.
TOOLS NEEDED:
•
•7/16" and 1/2"
•1/4" Nut driver
•1/4" Drill bit
•Cordless drill
IMPORTANT:
•All installations must meet local plumbing code requirements.
•DO NOT use a
3/16" (4.76 mm) saddle valve which reduces water flow and clogs more easily.
•Use copper tubing and check for leaks. Install copper tubing only in areas where the household temperatures will remain above freezing.
Connect the Water Supply
IMPORTANT: If you turn the refrigerator on before the water line is connected, turn the ice maker OFF.
Connect to Water Line
1.Unplug refrigerator or disconnect power.
2.Turn OFF main water supply. Turn ON nearest faucet long enough to clear line of water.
3.Locate a 1/2" to
IMPORTANT:
•Make sure it is a cold water pipe.
•Horizontal pipe will work, but drill on the top side of the pipe, not the bottom. This will help keep water away from the drill and normal sediment from collecting in the valve.
4.Determine the length of copper tubing you need. Measure from the connection on the rear of the refrigerator to the water pipe.
Add 7 ft (2.1 m) to allow for cleaning. Use 1/4" (6.35 mm) O.D. (outside diameter) copper tubing. Be sure both ends of copper tubing are cut square.
5.Using a cordless drill, drill a 1/4" hole in the cold water pipe you have selected.
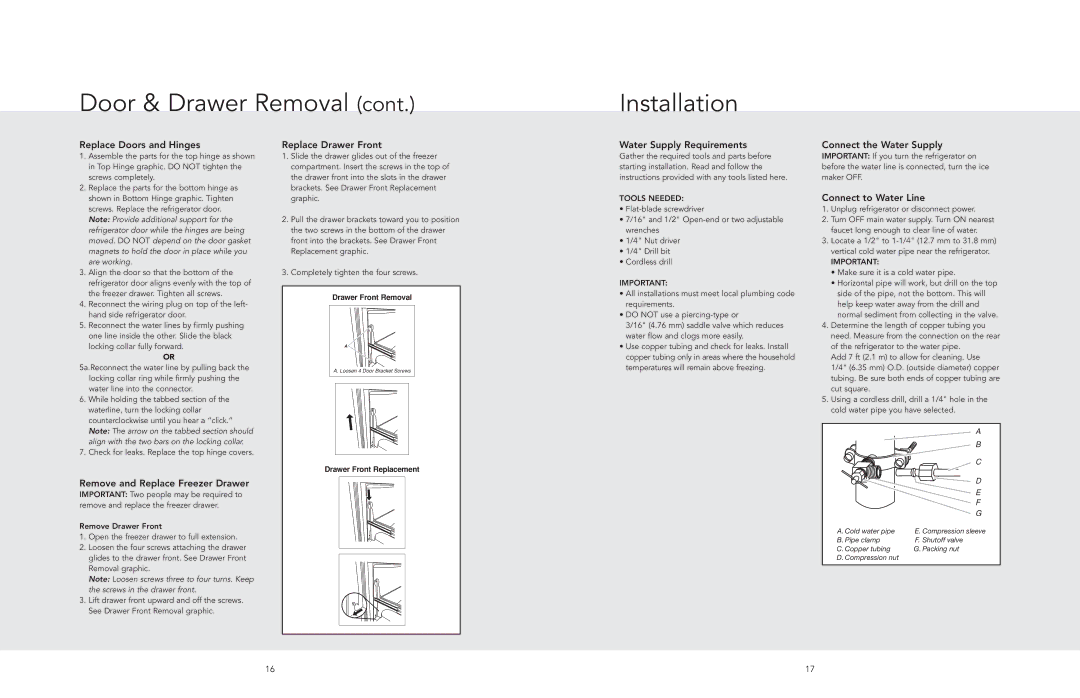
| A |
| B |
| C |
| D |
| E |
| F |
| G |
A. Cold water pipe | E. Compression sleeve |
B. Pipe clamp | F. Shutoff valve |
C. Copper tubing | G. Packing nut |
D. Compression nut |
|
16 | 17 |