Before starting the
1. Remove the oven racks, rack supports, and any other items/utensils |
from the oven. The high heat generated during the cleaning cycle |
can discolor, warp, and damage these items. Do not use foil or |
liners in the oven. During the |
and damage the oven surface. |
Replacing Interior Oven Lights
CAUTION: DISCONNECT THE ELECTRIC POWER AT THE MAIN FUSE OR CIRCUIT BREAKER BEFORE REPLACING BULB. Do not touch bulb with bare hands. Clean any signs of oil off of the bulb and handle with a soft cloth.
2. | Wipe off any large spills from the oven bottom and sides. Never |
| use oven cleaners inside a |
| of the door. |
3. | Some areas of the oven must be cleaned by hand before the cycle |
| begins. Soil in these areas will be baked on and very difficult to |
| clean if not removed first. Clean the door up to the gasket, the |
| door frame, and up to two inches inside the frame with detergent |
| and hot water. Rinse thoroughly and dry. |
To start the
1. | Close the oven door completely. |
2. | Turn the Oven Function selector knob clockwise to the |
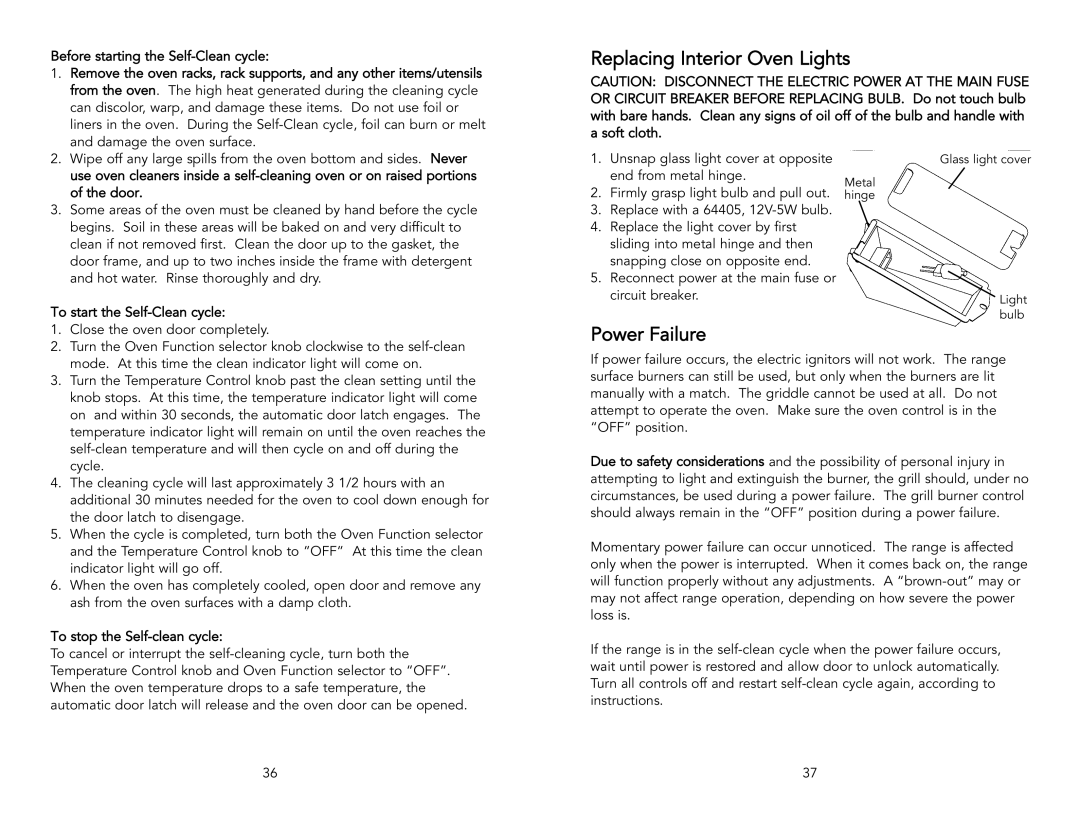
1.Unsnap glass light cover at opposite end from metal hinge.
2.Firmly grasp light bulb and pull out.
3.Replace with a 64405,
4.Replace the light cover by first sliding into metal hinge and then snapping close on opposite end.
5.Reconnect power at the main fuse or circuit breaker.
Power Failure
Metal hinge
Glass light cover
Light bulb
| mode. At this time the clean indicator light will come on. |
3. | Turn the Temperature Control knob past the clean setting until the |
| knob stops. At this time, the temperature indicator light will come |
| on and within 30 seconds, the automatic door latch engages. The |
| temperature indicator light will remain on until the oven reaches the |
| |
| cycle. |
4. | The cleaning cycle will last approximately 3 1/2 hours with an |
| additional 30 minutes needed for the oven to cool down enough for |
| the door latch to disengage. |
5. | When the cycle is completed, turn both the Oven Function selector |
| and the Temperature Control knob to ”OFF” At this time the clean |
| indicator light will go off. |
6. | When the oven has completely cooled, open door and remove any |
| ash from the oven surfaces with a damp cloth. |
To stop the
To cancel or interrupt the
If power failure occurs, the electric ignitors will not work. The range surface burners can still be used, but only when the burners are lit manually with a match. The griddle cannot be used at all. Do not attempt to operate the oven. Make sure the oven control is in the “OFF” position.
Due to safety considerations and the possibility of personal injury in attempting to light and extinguish the burner, the grill should, under no circumstances, be used during a power failure. The grill burner control should always remain in the “OFF” position during a power failure.
Momentary power failure can occur unnoticed. The range is affected only when the power is interrupted. When it comes back on, the range will function properly without any adjustments. A
If the range is in the
36 | 37 |