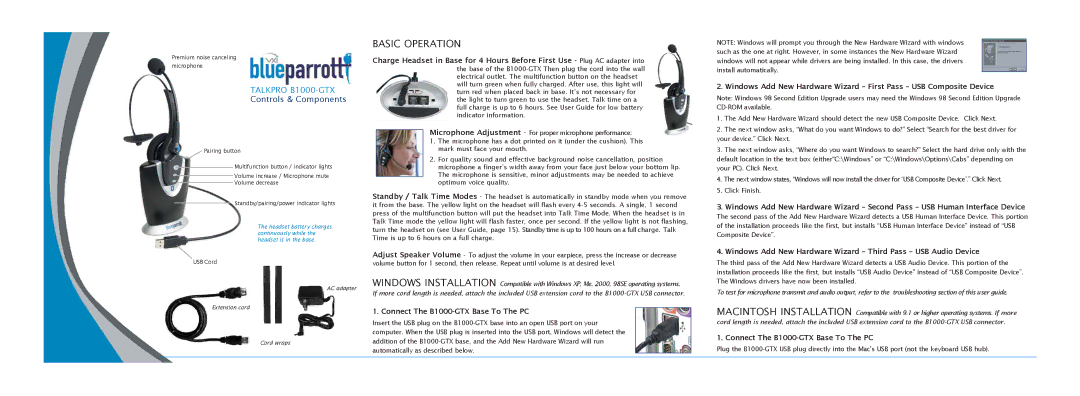
Premium noise canceling microphone

TALKPRO B1000-GTX

Controls & Components

Pairing button

Multifunction button / indicator lights

Volume increase / Microphone mute

Volume decrease

Standby/pairing/power indicator lights

The headset battery charges continuously while the headset is in the base.

USB Cord

AC adapter

Extension cord

Cord wraps

BASIC OPERATION

Charge Headset in Base for 4 Hours Before First Use - Plug AC adapter into the base of the B1000-GTX Then plug the cord into the wall electrical outlet. The multifunction button on the headset will turn green when fully charged. After use, this light will turn red when placed back in base. It’s not necessary for the light to turn green to use the headset. Talk time on a full charge is up to 6 hours. See User Guide for low battery indicator information.

Microphone Adjustment - For proper microphone performance:

1.The microphone has a dot printed on it (under the cushion). This mark must face your mouth.

2.For quality sound and effective background noise cancellation, position microphone a finger’s width away from your face just below your bottom lip. The microphone is sensitive, minor adjustments may be needed to achieve optimum voice quality.

Standby / Talk Time Modes - The headset is automatically in standby mode when you remove it from the base. The yellow light on the headset will flash every 4-5 seconds. A single, 1 second press of the multifunction button will put the headset into Talk Time Mode. When the headset is in Talk Time mode the yellow light will flash faster, once per second. If the yellow light is not flashing, turn the headset on (see User Guide, page 15). Standby time is up to 100 hours on a full charge. Talk Time is up to 6 hours on a full charge.

Adjust Speaker Volume - To adjust the volume in your earpiece, press the increase or decrease volume button for 1 second, then release. Repeat until volume is at desired level.

WINDOWS INSTALLATION Compatible with Windows XP, Me, 2000, 98SE operating systems. If more cord length is needed, attach the included USB extension cord to the B1000-GTX USB connector.

1. Connect The B1000-GTX Base To The PC

Insert the USB plug on the B1000-GTX base into an open USB port on your computer. When the USB plug is inserted into the USB port, Windows will detect the addition of the B1000-GTX base, and the Add New Hardware Wizard will run automatically as described below.

NOTE: Windows will prompt you through the New Hardware Wizard with windows such as the one at right. However, in some instances the New Hardware Wizard windows will not appear while drivers are being installed. In this case, the drivers install automatically.

2. Windows Add New Hardware Wizard – First Pass – USB Composite Device

Note: Windows 98 Second Edition Upgrade users may need the Windows 98 Second Edition Upgrade CD-ROM available.

1.The Add New Hardware Wizard should detect the new USB Composite Device. Click Next.

2.The next window asks, “What do you want Windows to do?” Select “Search for the best driver for your device.” Click Next.

3.The next window asks, “Where do you want Windows to search?” Select the hard drive only with the default location in the text box (either“C:\Windows” or “C:\Windows\Options\Cabs” depending on your PC). Click Next.

4.The next window states, “Windows will now install the driver for ‘USB Composite Device’.” Click Next.

5.Click Finish.

3.Windows Add New Hardware Wizard – Second Pass – USB Human Interface Device

The second pass of the Add New Hardware Wizard detects a USB Human Interface Device. This portion of the installation proceeds like the first, but installs “USB Human Interface Device" instead of “USB Composite Device”.

4.Windows Add New Hardware Wizard – Third Pass – USB Audio Device

The third pass of the Add New Hardware Wizard detects a USB Audio Device. This portion of the installation proceeds like the first, but installs “USB Audio Device" instead of “USB Composite Device”. The Windows drivers have now been installed.

To test for microphone transmit and audio output, refer to the troubleshooting section of this user guide.

MACINTOSH INSTALLATION Compatible with 9.1 or higher operating systems. If more cord length is needed, attach the included USB extension cord to the B1000-GTX USB connector.

1. Connect The B1000-GTX Base To The PC

Plug the B1000-GTX USB plug directly into the Mac's USB port (not the keyboard USB hub).

Page 1
Image 1
VXI manual Basic Operation, Connect The B1000-GTX Base To The PC

B1000-GTX specifications

The VXI B1000-GTX is an advanced, high-performance test system that represents a cutting-edge solution for a variety of applications in the electronics testing market. Designed for flexibility, modularity, and ease of use, this system is well-suited for engineers looking to streamline their testing processes while maintaining rigorous accuracy in results.

At the heart of the VXI B1000-GTX lies its exceptional modular architecture. This architecture enables users to easily expand or customize the system based on their specific testing needs. The platform supports a diverse range of modules, including digital, analog, and mixed-signal configurations, making it highly adaptable for various testing scenarios. This modularity allows for easy upgrades, which extends the lifespan of the investment and ensures that the system can evolve with advancing technology.

One of the standout features of the B1000-GTX is its high-speed data acquisition capabilities. Designed to handle high-frequency signals, it supports sampling rates that reach several gigahertz, ensuring precise and rapid measurements. This is particularly beneficial for testing high-performance components, such as radio frequency (RF) devices or high-speed digital circuits. The system also integrates advanced algorithms for signal processing, allowing for real-time data analysis and visualization.

In terms of connectivity, the B1000-GTX is equipped with multiple communication interfaces, including USB, Ethernet, and various serial connections, facilitating integration with other lab equipment and systems. This connectivity enhances collaboration among different systems within the testing environment, enabling a more streamlined workflow.

The VXI B1000-GTX also prioritizes user experience with its intuitive software interface. The accompanying software suite provides a graphical user interface (GUI) that simplifies programming and test scheduling. Users can easily create complex test sequences, monitor ongoing processes, and analyze results without deep technical expertise, making it accessible for both seasoned engineers and newcomers to the field.

Reliability is another key characteristic of the B1000-GTX system. Built with high-quality components and rigorous manufacturing standards, it ensures consistent performance over time, minimizing the likelihood of errors and downtime during critical testing operations.

In conclusion, the VXI B1000-GTX stands out in the electronics testing landscape due to its modular design, high-speed data capabilities, connectivity options, and user-friendly software. These features make it an invaluable tool for professionals looking to enhance their testing efficiency and accuracy while preparing for the demands of future technological advancements.