ALIGN IN PROPER

3 HOLE AND TWIST TO BACK OF TRACK

JAMB

BRACKET

COUNTERBALANCE

ROUND

CABLE

CABLE DRUM

NOTCH


FLAGANGLE


5/16” x 1-5/8”

VERTICAL

LAG SCREW


TRACK

3/8-16 x 3/4”

TRUSS HEAD

BOLT & NUTHORIZONTAL ANGLE

BOTTOM JAMB

CENTER JAMB

BRACKET

BRACKET


BOTTOM

FLAGANGLE

11

VERTICAL TRACK

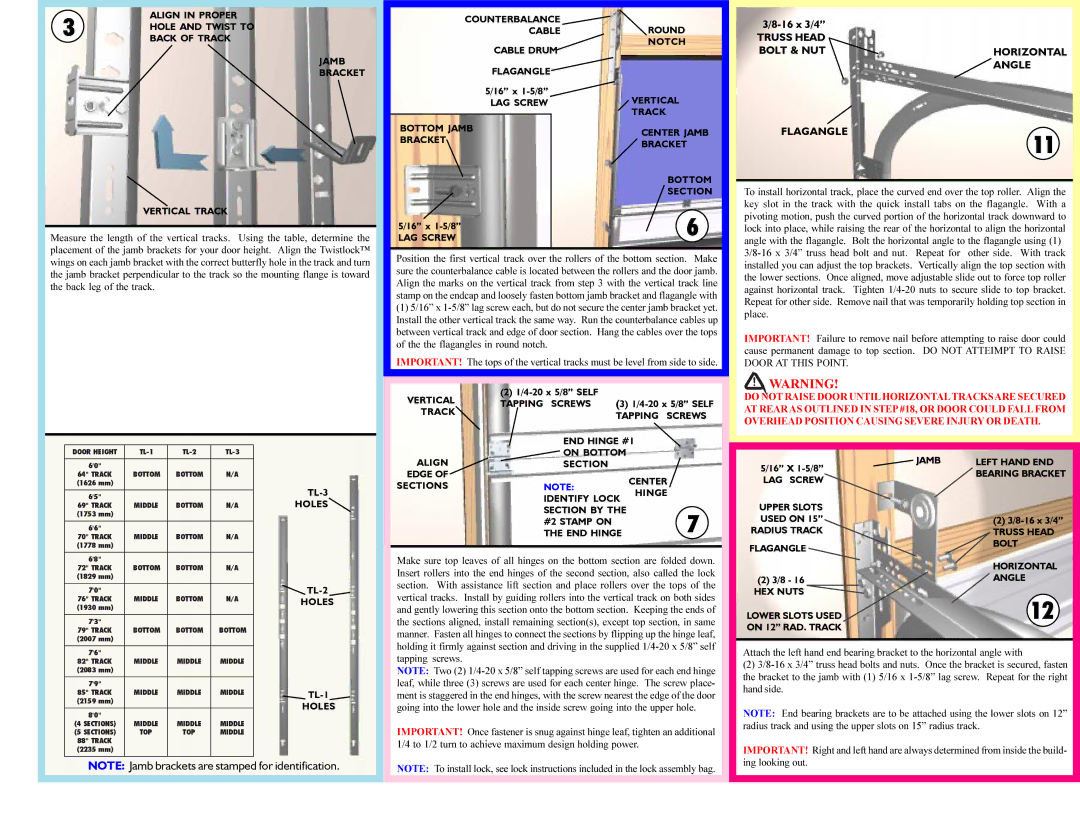
Measure the length of the vertical tracks. Using the table, determine the placement of the jamb brackets for your door height. Align the Twistlock™ wings on each jamb bracket with the correct butterfly hole in the track and turn the jamb bracket perpendicular to the track so the mounting flange is toward the back leg of the track.


SECTION

5/16” x 1-5/8”

6

LAG SCREW

Position the first vertical track over the rollers of the bottom section. Make sure the counterbalance cable is located between the rollers and the door jamb. Align the marks on the vertical track from step 3 with the vertical track line stamp on the endcap and loosely fasten bottom jamb bracket and flagangle with

(1)5/16” x 1-5/8” lag screw each, but do not secure the center jamb bracket yet. Install the other vertical track the same way. Run the counterbalance cables up between vertical track and edge of door section. Hang the cables over the tops of the the flagangles in round notch.

IMPORTANT! The tops of the vertical tracks must be level from side to side.

To install horizontal track, place the curved end over the top roller. Align the key slot in the track with the quick install tabs on the flagangle. With a pivoting motion, push the curved portion of the horizontal track downward to lock into place, while raising the rear of the horizontal to align the horizontal angle with the flagangle. Bolt the horizontal angle to the flagangle using (1) 3/8-16 x 3/4” truss head bolt and nut. Repeat for other side. With track installed you can adjust the top brackets. Vertically align the top section with the lower sections. Once aligned, move adjustable slide out to force top roller against horizontal track. Tighten 1/4-20 nuts to secure slide to top bracket. Repeat for other side. Remove nail that was temporarily holding top section in place.

IMPORTANT! Failure to remove nail before attempting to raise door could cause permanent damage to top section. DO NOT ATTEIMPT TO RAISE DOOR AT THIS POINT.

DOOR HEIGHT

TL-1

TL-2

TL-3


6'0"


64" TRACK

BOTTOM

BOTTOM

N/A


(1626 mm)


TL-3


6'5"


HOLES

69" TRACK

MIDDLE

BOTTOM

N/A

(1753 mm)


6'6"


70" TRACK

MIDDLE

BOTTOM

N/A


(1778 mm)


VERTICAL TRACK

ALIGN

EDGE OF

SECTIONS

(2) 1/4-20 x 5/8” SELF

TAPPING SCREWS (3) 1/4-20 x 5/8” SELF TAPPING SCREWS

END HINGE #1

ON BOTTOM SECTION

NOTE: CENTER IDENTIFY LOCK HINGE SECTION BY THE

#2 STAMP ON7 THE END HINGE

WARNING!

DO NOT RAISE DOOR UNTIL HORIZONTALTRACKS ARE SECURED AT REAR AS OUTLINED IN STEP #18, OR DOOR COULD FALL FROM OVERHEAD POSITION CAUSING SEVERE INJURY OR DEATH.

5/16” X 1-5/8”

JAMB

LEFT HAND END


BEARING BRACKET

LAG SCREW


UPPER SLOTS


USED ON 15”


(2) 3/8-16 x 3/4”

RADIUS TRACK


TRUSS HEAD

FLAGANGLE


BOLT


6'8"


72" TRACK

BOTTOM

BOTTOM

N/A


(1829 mm)


TL-2

7'0"


76" TRACK

MIDDLE

BOTTOM

N/A

HOLES

(1930 mm)


7'3"


79" TRACK

BOTTOM

BOTTOM

BOTTOM


(2007 mm)


7'6"


82" TRACK

MIDDLE

MIDDLE

MIDDLE


(2083 mm)


7'9"


85" TRACK

MIDDLE

MIDDLE

MIDDLE

TL-1

(2159 mm)


HOLES

8'0"


(4 SECTIONS)

MIDDLE

MIDDLE

MIDDLE


(5 SECTIONS)

TOP

TOP

MIDDLE


88" TRACK


(2235 mm)


NOTE: Jamb brackets are stamped for identification.

Make sure top leaves of all hinges on the bottom section are folded down. Insert rollers into the end hinges of the second section, also called the lock section. With assistance lift section and place rollers over the tops of the vertical tracks. Install by guiding rollers into the vertical track on both sides and gently lowering this section onto the bottom section. Keeping the ends of the sections aligned, install remaining section(s), except top section, in same manner. Fasten all hinges to connect the sections by flipping up the hinge leaf, holding it firmly against section and driving in the supplied 1/4-20 x 5/8” self tapping screws.

NOTE: Two (2) 1/4-20 x 5/8” self tapping screws are used for each end hinge leaf, while three (3) screws are used for each center hinge. The screw place- ment is staggered in the end hinges, with the screw nearest the edge of the door going into the lower hole and the inside screw going into the upper hole.

IMPORTANT! Once fastener is snug against hinge leaf, tighten an additional 1/4 to 1/2 turn to achieve maximum design holding power.

NOTE: To install lock, see lock instructions included in the lock assembly bag.


HORIZONTAL

(2) 3/8 - 16

ANGLE

HEX NUTS

12

LOWER SLOTS USED

ON 12” RAD. TRACK


Attach the left hand end bearing bracket to the horizontal angle with

(2)3/8-16 x 3/4” truss head bolts and nuts. Once the bracket is secured, fasten the bracket to the jamb with (1) 5/16 x 1-5/8” lag screw. Repeat for the right hand side.

NOTE: End bearing brackets are to be attached using the lower slots on 12” radius track and using the upper slots on 15” radius track.

IMPORTANT! Right and left hand are always determined from inside the build- ing looking out.

Page 5
Image 5
Wayne-Dalton 9600 Thermoguard, 9200 Foamcore, 9900 Thermowayne Truss Head Bolt & Nuthorizontal Angle, Flagangle

9600 Thermoguard, 9900 Thermowayne, 9200 Foamcore specifications

Wayne-Dalton offers a range of high-performance garage doors designed for durability, insulation, and aesthetic appeal. Among their standout products are the 9200 Foamcore, 9900 Thermowayne, and 9600 Thermoguard models. Each of these doors is engineered to meet various needs, combining advanced technologies with attractive designs.

The Wayne-Dalton 9200 Foamcore door features a unique construction that integrates a polyurethane foam core, providing excellent thermal insulation while minimizing weight. This door is ideal for homeowners looking for energy efficiency, as the polyurethane foam offers an R-value of up to 16.9. The 9200’s steel exterior is available in a variety of colors and finishes, enabling customization that enhances curb appeal. The door’s low-maintenance surface makes it resistant to dents and scratches, while its construction helps to reduce noise and improve security.

The 9900 Thermowayne is another exceptional model, designed specifically for energy efficiency and functionality. This model features a triple-layer construction combining an outer steel layer, a polyurethane insulation core, and an inner steel layer, resulting in an R-value of up to 18.4. The Thermowayne doors are also equipped with an exclusive 2-inch thick door design that minimizes heat transfer, making it an excellent option for regions with extreme temperatures. The 9900 series comes in numerous panel designs and colors, allowing homeowners to select a configuration that complements their home’s architecture. Additionally, the door is finished with a durable paint that resists fading and is easy to clean.

Finally, the Wayne-Dalton 9600 Thermoguard model takes insulation to the next level with its double-layer construction. This door combines a CFC-free polystyrene core between two layers of steel, providing an exceptional R-value of up to 19. The Thermoguard’s design not only enhances thermal performance but also contributes to sound attenuation, making it suitable for homes located in noisy environments. The 9600 series is available in various styles, ensuring a perfect match for any home. Its weather seals and reinforced structure contribute to its longevity and resistance to the elements.

In summary, Wayne-Dalton’s 9200 Foamcore, 9900 Thermowayne, and 9600 Thermoguard garage doors offer exceptional insulation, durability, and aesthetic options to meet diverse homeowner needs. By integrating advanced technology and high-quality materials, these doors not only enhance energy efficiency but also elevate the overall look of a home.