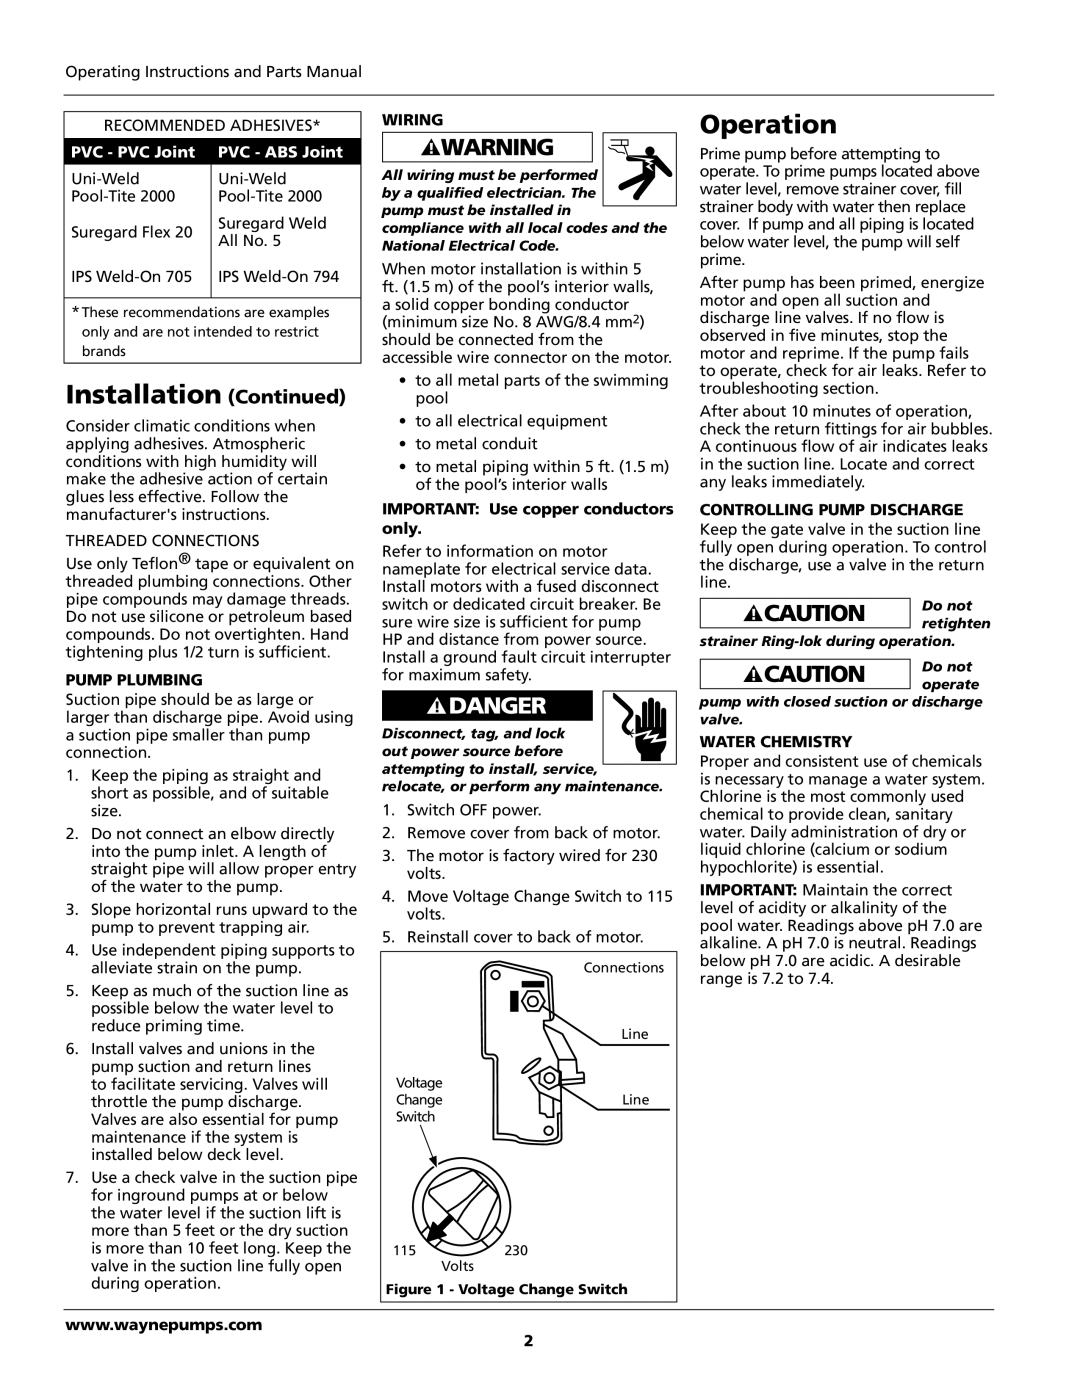
Operating Instructions and Parts Manual |
|
|
|
| ||
RECOMMENDED ADHESIVES* | WIRING |
| Operation | |||
|
|
| ||||
PVC - PVC Joint | PVC - ABS Joint |
|
|
| Prime pump before attempting to | |
All wiring must be performed | operate. To prime pumps located above | |||||
water level, remove strainer cover, fill | ||||||
by a qualified electrician. The | ||||||
strainer body with water then replace | ||||||
| Suregard Weld | pump must be installed in | ||||
Suregard Flex 20 | compliance with all local codes and the | cover. If pump and all piping is located | ||||
All No. 5 | below water level, the pump will self | |||||
| National Electrical Code. | |||||
IPS | IPS | When motor installation is within 5 | prime. | |||
After pump has been primed, energize | ||||||
ft. (1.5 m) of the pool’s interior walls, | ||||||
|
| |||||
* These recommendations are examples | a solid copper bonding conductor | motor and open all suction and | ||||
(minimum size No. 8 AWG/8.4 mm2) | discharge line valves. If no flow is | |||||
only and are not intended to restrict | ||||||
should be connected from the | observed in five minutes, stop the | |||||
brands |
| |||||
| accessible wire connector on the motor. | motor and reprime. If the pump fails | ||||
Installation (Continued) | • to all metal parts of the swimming | to operate, check for air leaks. Refer to | ||||
troubleshooting section. | ||||||
| pool |
| ||||
|
| After about 10 minutes of operation, | ||||
Consider climatic conditions when | • | to all electrical equipment | ||||
check the return fittings for air bubbles. | ||||||
• | to metal conduit | |||||
applying adhesives. Atmospheric | A continuous flow of air indicates leaks | |||||
conditions with high humidity will | • | to metal piping within 5 ft. (1.5 m) | in the suction line. Locate and correct | |||
make the adhesive action of certain |
| of the pool’s interior walls | any leaks immediately. | |||
glues less effective. Follow the | IMPORTANT: Use copper conductors | CONTROLLING PUMP DISCHARGE | ||||
manufacturer's instructions. | ||||||
THREADED CONNECTIONS | only. |
| Keep the gate valve in the suction line | |||
Refer to information on motor | fully open during operation. To control | |||||
Use only Teflon® tape or equivalent on | ||||||
nameplate for electrical service data. | the discharge, use a valve in the return | |||||
threaded plumbing connections. Other | Install motors with a fused disconnect | line. | ||||
pipe compounds may damage threads. | switch or dedicated circuit breaker. Be | Do not | ||||
Do not use silicone or petroleum based | ||||||
sure wire size is sufficient for pump | retighten | |||||
compounds. Do not overtighten. Hand | ||||||
HP and distance from power source. | strainer | |||||
tightening plus 1/2 turn is sufficient. | ||||||
Install a ground fault circuit interrupter | Do not | |||||
|
| |||||
PUMP PLUMBING |
| for maximum safety. | ||||
| operate | |||||
|
|
|
| |||
Suction pipe should be as large or |
|
|
| pump with closed suction or discharge | ||
larger than discharge pipe. Avoid using | Disconnect, tag, and lock | valve. | ||||
a suction pipe smaller than pump | WATER CHEMISTRY | |||||
connection. |
| out power source before | ||||
| Proper and consistent use of chemicals | |||||
1. Keep the piping as straight and | attempting to install, service, | |||||
is necessary to manage a water system. | ||||||
relocate, or perform any maintenance. | ||||||
short as possible, and of suitable | Chlorine is the most commonly used | |||||
1. | Switch OFF power. | |||||
size. |
| chemical to provide clean, sanitary | ||||
2. Do not connect an elbow directly | 2. Remove cover from back of motor. | water. Daily administration of dry or | ||||
into the pump inlet. A length of | 3. The motor is factory wired for 230 | liquid chlorine (calcium or sodium | ||||
straight pipe will allow proper entry |
| volts. |
| hypochlorite) is essential. | ||
of the water to the pump. | 4. Move Voltage Change Switch to 115 | IMPORTANT: Maintain the correct | ||||
3. Slope horizontal runs upward to the | level of acidity or alkalinity of the | |||||
| volts. |
| ||||
pump to prevent trapping air. | 5. Reinstall cover to back of motor. | pool water. Readings above pH 7.0 are | ||||
4. Use independent piping supports to | alkaline. A pH 7.0 is neutral. Readings | |||||
|
|
| ||||
|
|
| below pH 7.0 are acidic. A desirable | |||
alleviate strain on the pump. |
|
| Connections | |||
|
| range is 7.2 to 7.4. | ||||
5. Keep as much of the suction line as |
|
|
| |||
|
|
|
| |||
possible below the water level to |
|
|
|
| ||
reduce priming time. |
|
| Line |
| ||
6. Install valves and unions in the |
|
|
| |||
|
|
|
| |||
pump suction and return lines | Voltage |
|
| |||
to facilitate servicing. Valves will | Line |
| ||||
throttle the pump discharge. | Change |
| ||||
Valves are also essential for pump | Switch |
|
| |||
maintenance if the system is |
|
|
|
| ||
installed below deck level. |
|
|
|
| ||
7. Use a check valve in the suction pipe |
|
|
|
| ||
for inground pumps at or below |
|
|
|
| ||
the water level if the suction lift is |
|
|
|
| ||
more than 5 feet or the dry suction |
|
|
|
| ||
is more than 10 feet long. Keep the | 115 | 230 |
| |||
valve in the suction line fully open |
| Volts |
|
| ||
during operation. | Figure 1 - Voltage Change Switch |
| ||||
|
|
| ||||
www.waynepumps.com |
|
| 2 |
| ||
|
|
|
|
|