SERVICE AND ADJUSTMENTS

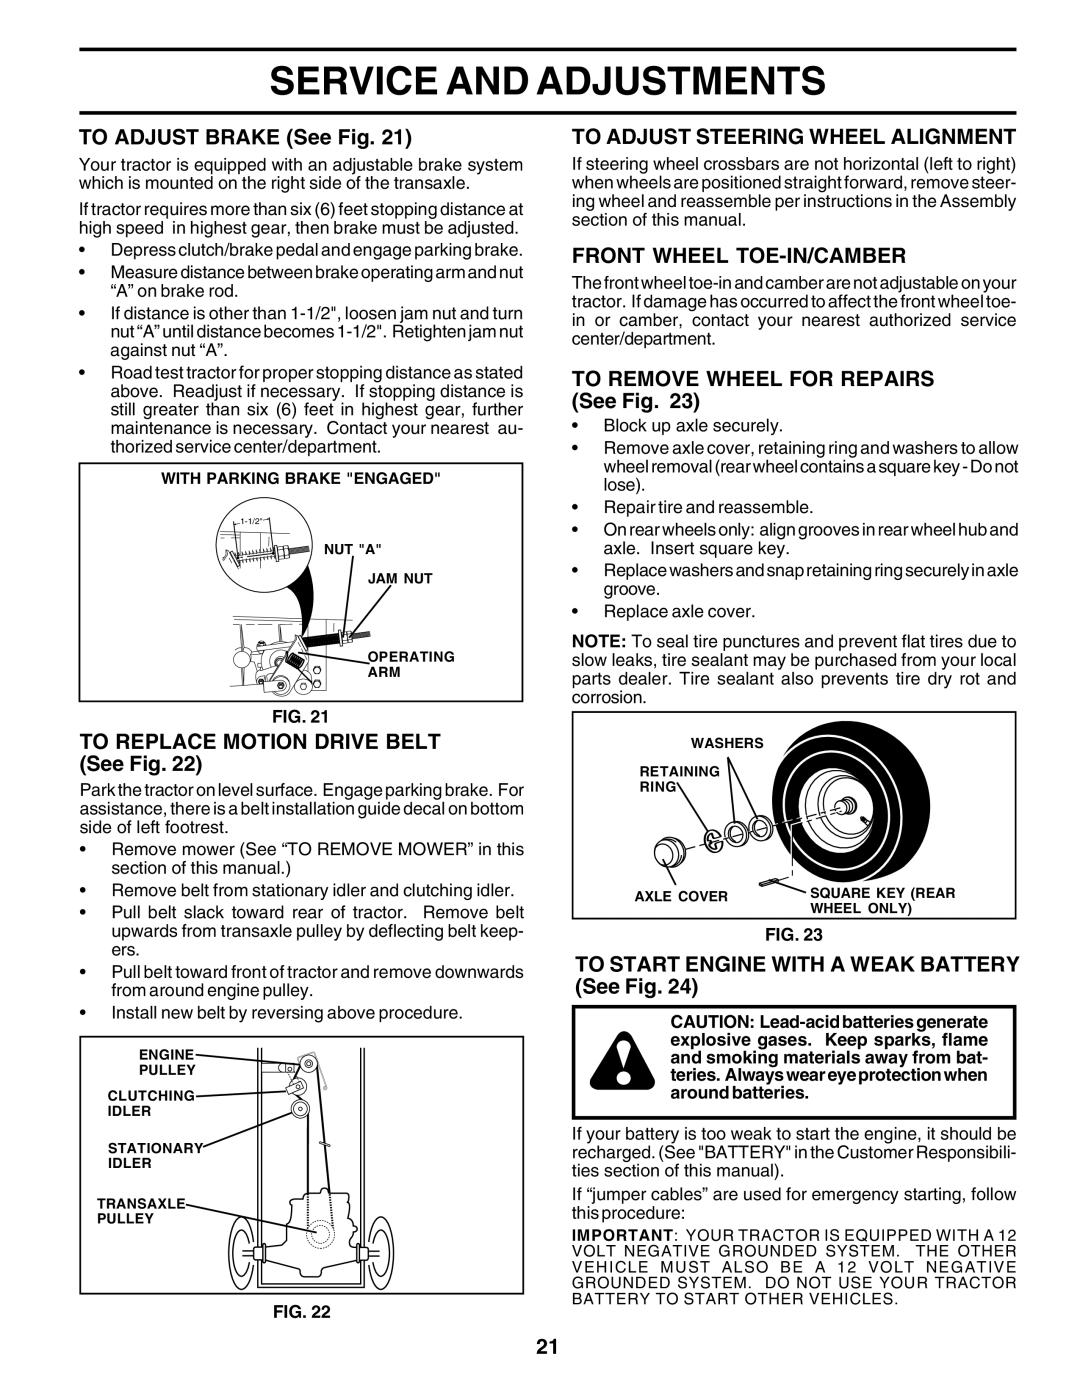
TO ADJUST BRAKE (See Fig. 21)

Your tractor is equipped with an adjustable brake system which is mounted on the right side of the transaxle.

If tractor requires more than six (6) feet stopping distance at high speed in highest gear, then brake must be adjusted.

Depress clutch/brake pedal and engage parking brake.

Measure distance between brake operating arm and nut “A” on brake rod.

If distance is other than 1-1/2", loosen jam nut and turn nut “A” until distance becomes 1-1/2". Retighten jam nut against nut “A”.

Road test tractor for proper stopping distance as stated above. Readjust if necessary. If stopping distance is still greater than six (6) feet in highest gear, further maintenance is necessary. Contact your nearest au- thorized service center/department.

WITH PARKING BRAKE "ENGAGED"

1-1/2"

NUT "A"

JAM NUT

OPERATING

ARM

FIG. 21

TO REPLACE MOTION DRIVE BELT (See Fig. 22)

Park the tractor on level surface. Engage parking brake. For assistance, there is a belt installation guide decal on bottom side of left footrest.

Remove mower (See “TO REMOVE MOWER” in this section of this manual.)

Remove belt from stationary idler and clutching idler.

Pull belt slack toward rear of tractor. Remove belt upwards from transaxle pulley by deflecting belt keep- ers.

Pull belt toward front of tractor and remove downwards from around engine pulley.

Install new belt by reversing above procedure.

ENGINE

PULLEY

CLUTCHING

IDLER

STATIONARY

IDLER

TRANSAXLE

PULLEY

FIG. 22

TO ADJUST STEERING WHEEL ALIGNMENT

If steering wheel crossbars are not horizontal (left to right) when wheels are positioned straight forward, remove steer- ing wheel and reassemble per instructions in the Assembly section of this manual.

FRONT WHEEL TOE-IN/CAMBER

The front wheel toe-in and camber are not adjustable on your tractor. If damage has occurred to affect the front wheel toe- in or camber, contact your nearest authorized service center/department.

TO REMOVE WHEEL FOR REPAIRS (See Fig. 23)

Block up axle securely.

Remove axle cover, retaining ring and washers to allow wheel removal (rear wheel contains a square key - Do not lose).

Repair tire and reassemble.

On rear wheels only: align grooves in rear wheel hub and axle. Insert square key.

Replace washers and snap retaining ring securely in axle groove.

Replace axle cover.

NOTE: To seal tire punctures and prevent flat tires due to slow leaks, tire sealant may be purchased from your local parts dealer. Tire sealant also prevents tire dry rot and corrosion.

WASHERS

RETAINING

RING

AXLE COVER

SQUARE KEY (REAR


WHEEL ONLY)


FIG. 23

TO START ENGINE WITH A WEAK BATTERY (See Fig. 24)

CAUTION: Lead-acid batteries generate explosive gases. Keep sparks, flame and smoking materials away from bat- teries. Always wear eye protection when around batteries.

If your battery is too weak to start the engine, it should be recharged. (See "BATTERY" in the Customer Responsibili- ties section of this manual).

If “jumper cables” are used for emergency starting, follow this procedure:

IMPORTANT: YOUR TRACTOR IS EQUIPPED WITH A 12 VOLT NEGATIVE GROUNDED SYSTEM. THE OTHER VEHICLE MUST ALSO BE A 12 VOLT NEGATIVE GROUNDED SYSTEM. DO NOT USE YOUR TRACTOR BATTERY TO START OTHER VEHICLES.

21

Page 21
Image 21
Weed Eater 176840 owner manual To Adjust Steering Wheel Alignment, Front Wheel TOE-IN/CAMBER

176840 specifications

The Weed Eater 176840 is an exceptional landscaping tool designed to make yard maintenance efficient and effortless. This impressive model stands out in the market for its user-friendly features, advanced technologies, and robust performance, making it a top choice for both homeowners and professional landscapers.

One of the most notable features of the Weed Eater 176840 is its lightweight design. Weighing in at just a few pounds, this trimmer allows users to maneuver it easily around their gardens, avoiding the fatigue often associated with heavier models. The ergonomic handle contributes to ease of use, making it comfortable for extended periods of operation.

The Weed Eater 176840 is equipped with a powerful 2-cycle engine, delivering high speed and performance for tackling various types of vegetation. This engine ensures efficient cutting power, allowing users to trim grass and weeds with precision. The air-filter technology incorporated into the engine enhances performance, enabling optimal air flow while reducing emissions, thus making it environmentally friendly.

Another standout feature is the innovative bump head design, which simplifies line advancement. Users can quickly release more cutting line by tapping the head on the ground, eliminating the need to stop and manually feed the trimmer line. This feature greatly enhances productivity, allowing users to stay focused on their landscaping tasks.

The 176840 model also offers adjustable cutting widths, which provides versatility for different trimming needs. Users can switch between wider and narrower cutting paths according to the requirements of their yard, whether it be edging sidewalks or tackling overgrown areas.

Moreover, the Weed Eater 176840 is designed with durability in mind. Constructed from high-quality materials, it can withstand the rigors of outdoor use while resisting wear and tear. This reliability ensures that users can depend on their trimmer season after season.

Additionally, easy maintenance features, such as accessible air filters and spark plugs, allow for straightforward upkeep, enhancing the longevity of the trimmer. The model is also compatible with various accessories, enabling users to transform their trimmer into a multi-functional tool.

In summary, the Weed Eater 176840 is a strong contender in the world of garden equipment, offering a combination of powerful performance, innovative technologies, and user-friendly characteristics. Whether for residential use or professional landscaping, this trimmer provides everything needed for effective yard management. It represents the ideal solution for maintaining a beautiful and well-groomed outdoor space.