ASSEMBLY

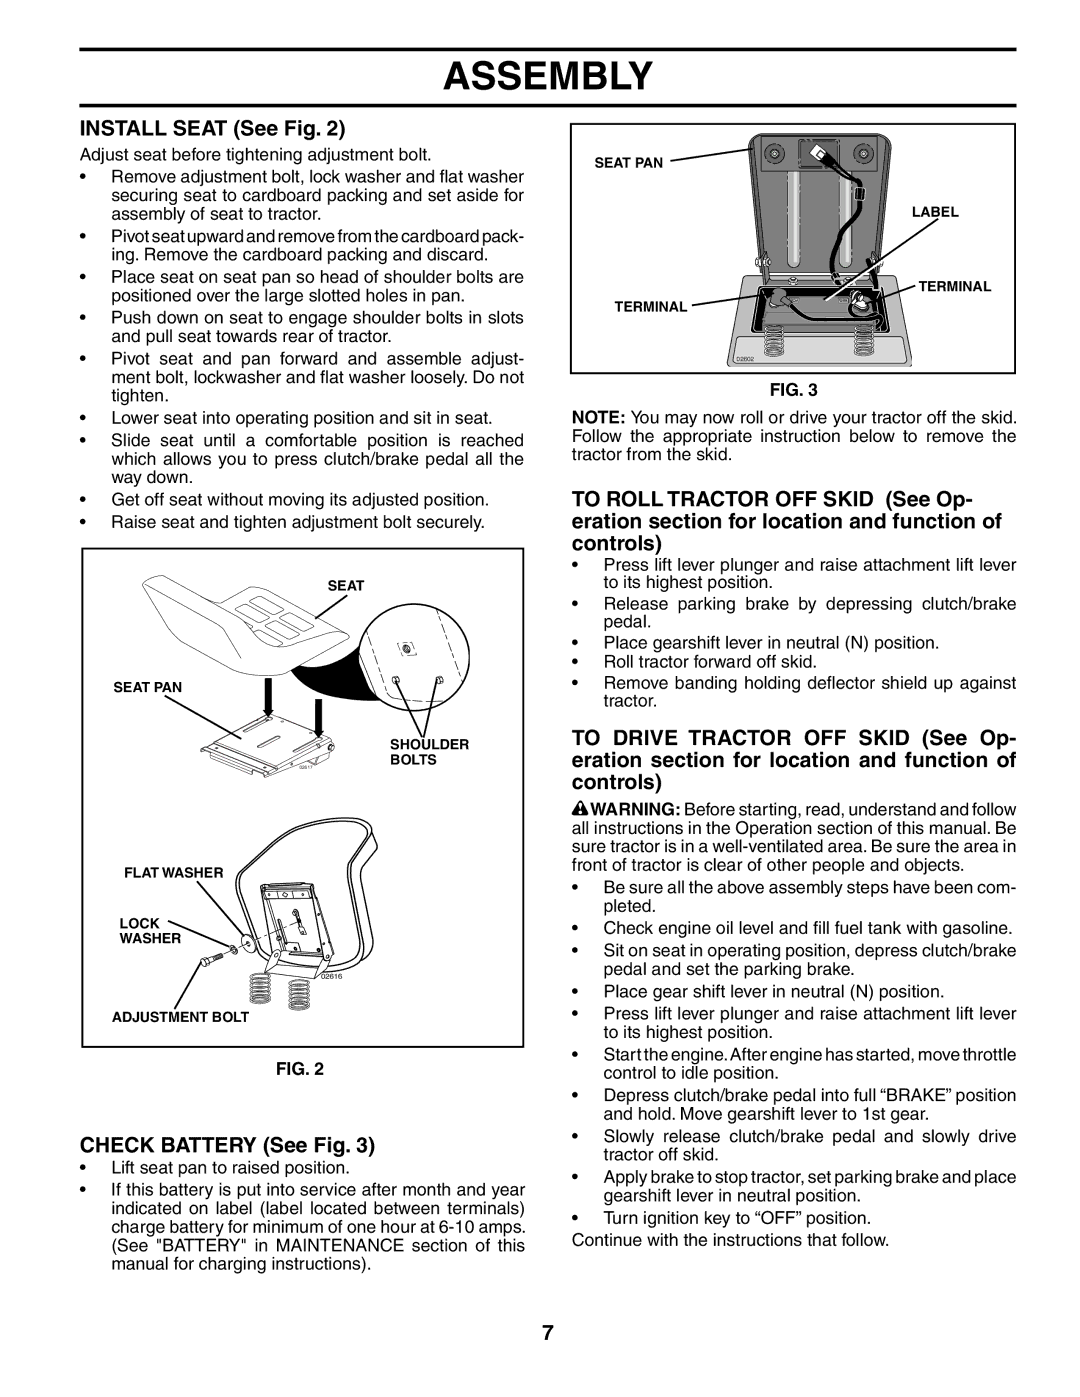
INSTALL SEAT (See Fig. 2)

Adjust seat before tightening adjustment bolt.

Remove adjustment bolt, lock washer and flat washer securing seat to cardboard packing and set aside for assembly of seat to tractor.

Pivot seat upward and remove from the cardboard pack- ing. Remove the cardboard packing and discard.

Place seat on seat pan so head of shoulder bolts are positioned over the large slotted holes in pan.

Push down on seat to engage shoulder bolts in slots and pull seat towards rear of tractor.

Pivot seat and pan forward and assemble adjust- ment bolt, lockwasher and flat washer loosely. Do not tighten.

Lower seat into operating position and sit in seat.

Slide seat until a comfortable position is reached which allows you to press clutch/brake pedal all the way down.

Get off seat without moving its adjusted position.

Raise seat and tighten adjustment bolt securely.

SEAT

SEAT PAN

SHOULDER

BOLTS

02617

FLAT WASHER

LOCK

WASHER

02616

ADJUSTMENT BOLT

FIG. 2

CHECK BATTERY (See Fig. 3)

Lift seat pan to raised position.

If this battery is put into service after month and year indicated on label (label located between terminals) charge battery for minimum of one hour at 6-10 amps. (See "BATTERY" in MAINTENANCE section of this manual for charging instructions).

SEAT PAN

LABEL

TERMINAL

TERMINAL

02602

FIG. 3

NOTE: You may now roll or drive your tractor off the skid. Follow the appropriate instruction below to remove the tractor from the skid.

TO ROLL TRACTOR OFF SKID (See Op- eration section for location and function of controls)

Press lift lever plunger and raise attachment lift lever to its highest position.

Release parking brake by depressing clutch/brake pedal.

Place gearshift lever in neutral (N) position.

Roll tractor forward off skid.

Remove banding holding deflector shield up against tractor.

TO DRIVE TRACTOR OFF SKID (See Op- eration section for location and function of controls)

WARNING: Before starting, read, understand and follow all instructions in the Operation section of this manual. Be sure tractor is in a well-ventilated area. Be sure the area in front of tractor is clear of other people and objects.

Be sure all the above assembly steps have been com- pleted.

Check engine oil level and fill fuel tank with gasoline.

Sit on seat in operating position, depress clutch/brake pedal and set the parking brake.

Place gear shift lever in neutral (N) position.

Press lift lever plunger and raise attachment lift lever to its highest position.

Start the engine.After engine has started, move throttle control to idle position.

Depress clutch/brake pedal into full “BRAKE” position and hold. Move gearshift lever to 1st gear.

Slowly release clutch/brake pedal and slowly drive tractor off skid.

Apply brake to stop tractor, set parking brake and place gearshift lever in neutral position.

Turn ignition key to “OFF” position.

Continue with the instructions that follow.

7

Page 7
Image 7
Weed Eater 191064 manual Install Seat See Fig, Check Battery See Fig

191064 specifications

The Weed Eater 191064 is a powerful and efficient tool designed for both residential and commercial lawn care. This gas-powered string trimmer is known for its robust design and user-friendly features, making it a popular choice among gardening enthusiasts and professionals alike.

One of the standout features of the Weed Eater 191064 is its lightweight construction, which significantly reduces operator fatigue during extended use. The ergonomic design ensures a comfortable grip, allowing users to maneuver around gardens, flower beds, and hard-to-reach areas with ease. The trimmer is equipped with a 28cc two-cycle engine that provides ample power for tackling even the most challenging weeds and overgrowth.

In terms of technology, the Weed Eater 191064 utilizes a bump feed system to release cutting line. This user-friendly feature allows you to simply tap the trimmer head on the ground while in operation to release more line as needed, ensuring uninterrupted work without the hassle of constantly stopping to adjust the line. This mechanism not only boosts productivity but also enhances overall efficiency.

The trimmer boasts a dual line cut, meaning it uses two lines simultaneously, allowing for a wider cutting swath. This feature leads to faster trimming times, making it an ideal choice for large yards or commercial landscaping jobs. Moreover, the Weed Eater 191064 is designed to accept a variety of different cutting attachments, giving users the flexibility to switch between trimming, edging, and even brush cutting as needed.

The engine is also designed with fuel efficiency in mind. The Weed Eater 191064 uses a fuel-efficient two-cycle engine that reduces fuel consumption while still delivering high torque power. This translates to lower running costs and, importantly, a reduced environmental impact compared to some competitors.

The ease of maintenance is another significant characteristic of the Weed Eater 191064. With accessible parts and straightforward assembly, users can quickly perform regular upkeep, ensuring the longevity and performance of the trimmer.

Overall, the Weed Eater 191064 is a versatile and user-friendly trimmer that excels in performance, making it a valuable addition to any landscaping toolkit. Whether for a homeowner wanting to maintain their yard or a professional needing reliable equipment, this trimmer delivers on all fronts.