ing condition of these parts. Failure to do so is a violation of the law. For normal homeowner use, the muffler and spark arresting screen will not require any service. After 50 hours of use, we recommend that your muffler be ser- viced or replaced by your Authorized Service Dealer.

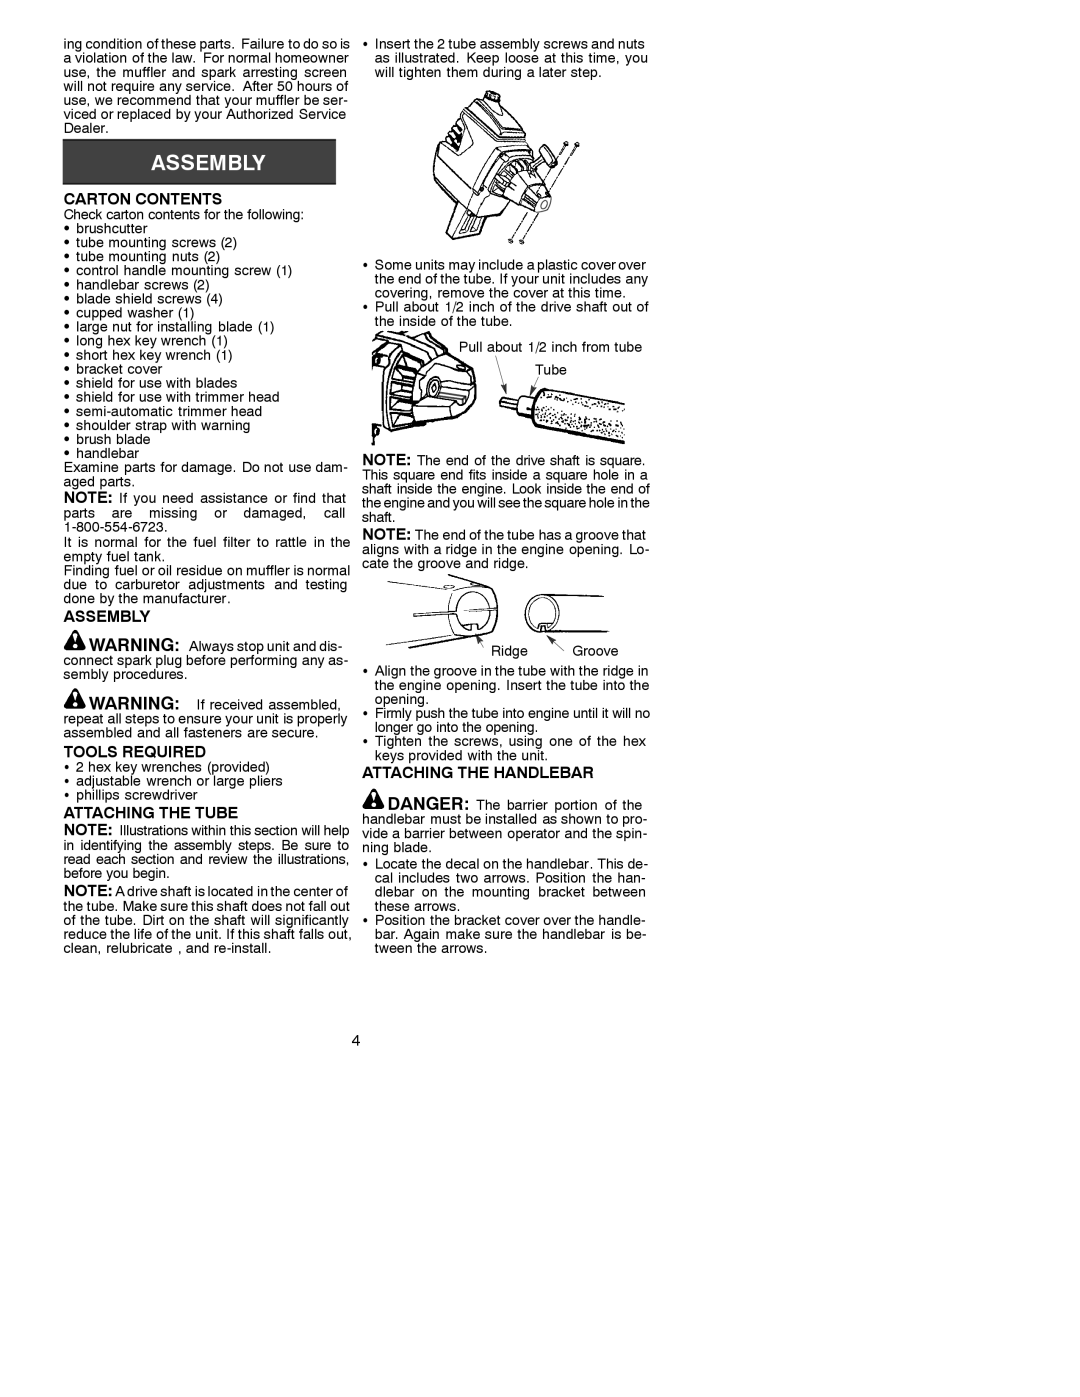
SInsert the 2 tube assembly screws and nuts as illustrated. Keep loose at this time, you will tighten them during a later step.

CARTON CONTENTS

Check carton contents for the following:

Sbrushcutter

Stube mounting screws (2) S tube mounting nuts (2)

S control handle mounting screw (1) S handlebar screws (2)

S blade shield screws (4) S cupped washer (1)

S large nut for installing blade (1) S long hex key wrench (1)

S short hex key wrench (1) S bracket cover

S shield for use with blades

S shield for use with trimmer head S semi-automatic trimmer head S shoulder strap with warning

S brush blade S handlebar

Examine parts for damage. Do not use dam- aged parts.

NOTE: If you need assistance or find that parts are missing or damaged, call 1-800-554-6723.

It is normal for the fuel filter to rattle in the empty fuel tank.

Finding fuel or oil residue on muffler is normal due to carburetor adjustments and testing done by the manufacturer.

ASSEMBLY

WARNING: Always stop unit and dis- connect spark plug before performing any as- sembly procedures.

WARNING: If received assembled, repeat all steps to ensure your unit is properly assembled and all fasteners are secure.

TOOLS REQUIRED

S2 hex key wrenches (provided)

Sadjustable wrench or large pliers S phillips screwdriver

ATTACHING THE TUBE

NOTE: Illustrations within this section will help in identifying the assembly steps. Be sure to read each section and review the illustrations, before you begin.

NOTE: A drive shaft is located in the center of the tube. Make sure this shaft does not fall out of the tube. Dirt on the shaft will significantly reduce the life of the unit. If this shaft falls out, clean, relubricate , and re-install.

SSome units may include a plastic cover over the end of the tube. If your unit includes any covering, remove the cover at this time.

SPull about 1/2 inch of the drive shaft out of the inside of the tube.

Pull about 1/2 inch from tube

Tube

NOTE: The end of the drive shaft is square. This square end fits inside a square hole in a shaft inside the engine. Look inside the end of the engine and you will see the square hole in the shaft.

NOTE: The end of the tube has a groove that aligns with a ridge in the engine opening. Lo- cate the groove and ridge.

Ridge Groove

SAlign the groove in the tube with the ridge in the engine opening. Insert the tube into the

opening.

SFirmly push the tube into engine until it will no longer go into the opening.

S Tighten the screws, using one of the hex keys provided with the unit.

ATTACHING THE HANDLEBAR

DANGER: The barrier portion of the handlebar must be installed as shown to pro- vide a barrier between operator and the spin- ning blade.

SLocate the decal on the handlebar. This de- cal includes two arrows. Position the han- dlebar on the mounting bracket between

these arrows.

SPosition the bracket cover over the handle- bar. Again make sure the handlebar is be- tween the arrows.

4

Page 4
Image 4
Weed Eater 530088776 manual Carton Contents, Assembly Tools Required, Attaching the Tube, Attaching the Handlebar

530088776 specifications

The Weed Eater 530088776 is a powerful and reliable string trimmer designed to help homeowners and professionals maintain their lawns and gardens with ease. Known for its user-friendly features and efficient operations, this model stands out in the crowded market of outdoor power equipment.

One of the main features of the Weed Eater 530088776 is its robust engine, which delivers ample power to tackle overgrown grass and weeds. The two-cycle engine is designed for optimal performance, providing the necessary torque and speed for effective trimming. It is lightweight, making it ideal for extended use without causing fatigue.

Another noteworthy characteristic is the trimmer's rapid reload head. This feature simplifies the process of changing the cutting line, allowing users to quickly load new line without the need for additional tools. This convenience not only saves time but also enhances the user experience, especially for those who frequently use the trimmer.

The Weed Eater 530088776 also incorporates a straight shaft design, which offers better reach and maneuverability, particularly in tight spaces and underbrush. The straight shaft allows users to trim grass and weeds in hard-to-reach areas without straining their backs. This ergonomically designed trimmer is equipped with a comfortable grip, ensuring a secure hold during operation.

In terms of technology, the Weed Eater 530088776 features an anti-vibration system that minimizes user fatigue during extended lawn care sessions. This advanced technology dampens the vibrations produced by the engine, providing a more comfortable trimming experience. Additionally, its lightweight construction enhances portability, making it easy to transport around the yard.

The trimmer is designed with durability in mind, featuring high-quality materials that withstand the rigors of outdoor use. Its efficient fuel consumption also plays a significant role in reducing emissions, making it an environmentally friendly choice for users concerned about their carbon footprint.

In summary, the Weed Eater 530088776 is a versatile and efficient string trimmer that delivers powerful performance for all your yard maintenance needs. With its user-friendly features, ergonomic design, and advanced technologies, it is a valuable addition to any outdoor toolkit, whether for casual homeowners or professional landscapers.