WARNING: If received assembled, review all assembly steps to ensure your unit is properly assembled and all fasteners are secure.

ADJUSTING ASSIST HANDLE

1.Place unit on a flat surface.

2.Loosen and remove wing nut and bolt from assist handle.

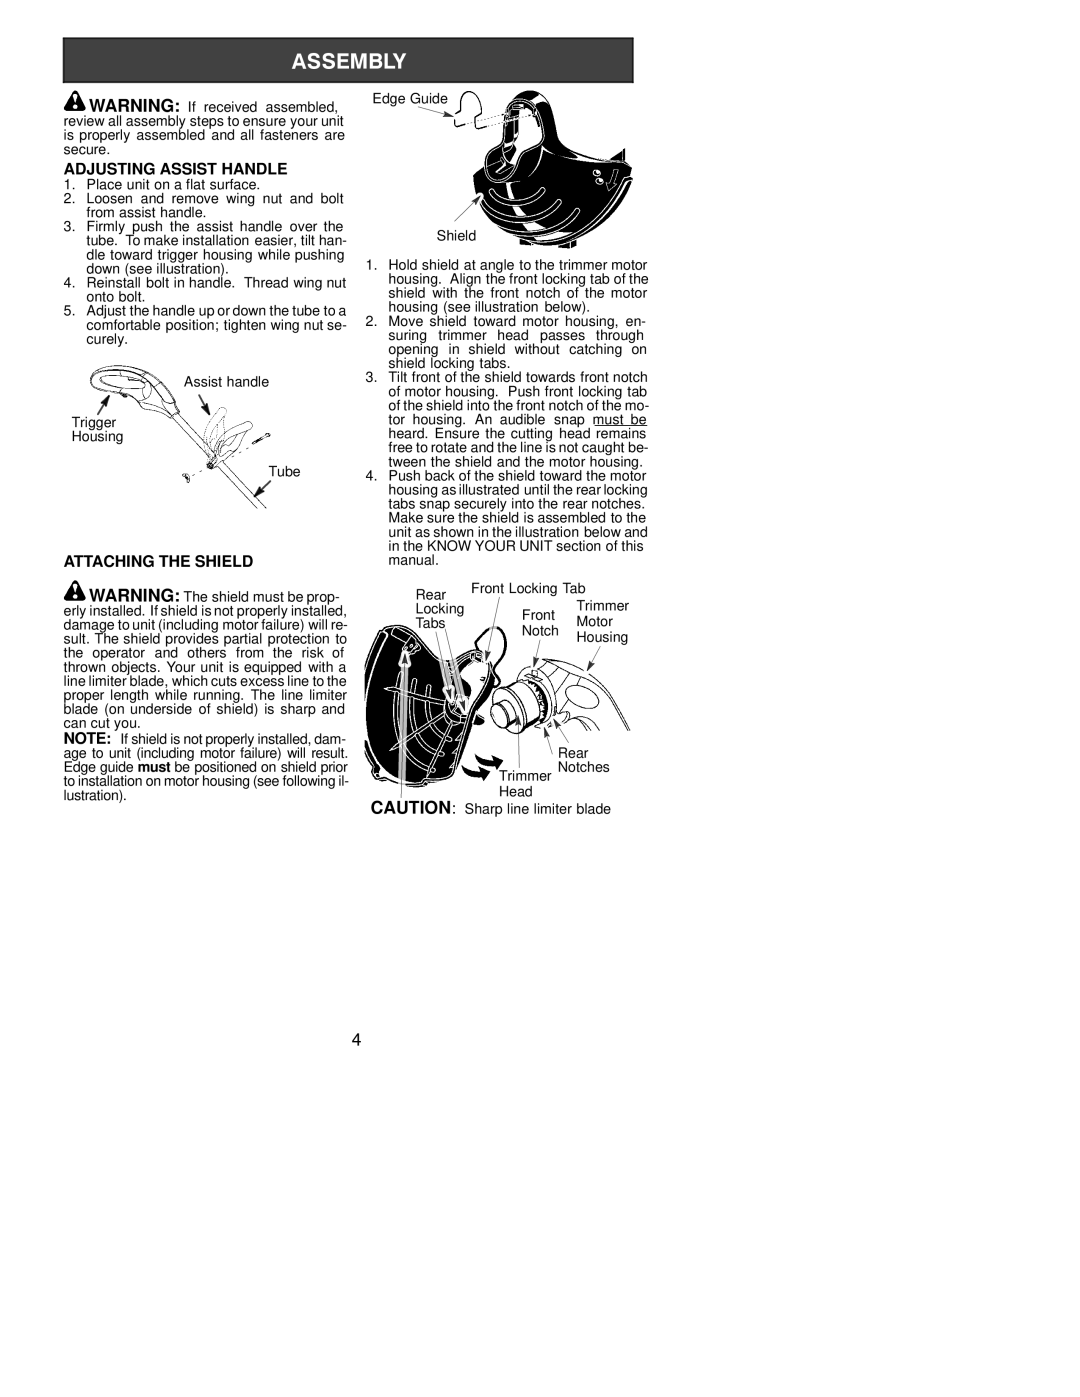
3.Firmly push the assist handle over the tube. To make installation easier, tilt han- dle toward trigger housing while pushing down (see illustration).

4.Reinstall bolt in handle. Thread wing nut onto bolt.

5.Adjust the handle up or down the tube to a comfortable position; tighten wing nut se- curely.

Assist handle

Trigger

Housing

Tube

ATTACHING THE SHIELD

WARNING: The shield must be prop- erly installed. If shield is not properly installed, damage to unit (including motor failure) will re- sult. The shield provides partial protection to the operator and others from the risk of thrown objects. Your unit is equipped with a line limiter blade, which cuts excess line to the proper length while running. The line limiter blade (on underside of shield) is sharp and can cut you.

NOTE: If shield is not properly installed, dam- age to unit (including motor failure) will result. Edge guide must be positioned on shield prior to installation on motor housing (see following il- lustration).

Edge Guide

Shield

1.Hold shield at angle to the trimmer motor housing. Align the front locking tab of the shield with the front notch of the motor housing (see illustration below).

2.Move shield toward motor housing, en- suring trimmer head passes through opening in shield without catching on shield locking tabs.

3.Tilt front of the shield towards front notch of motor housing. Push front locking tab of the shield into the front notch of the mo- tor housing. An audible snap must be heard. Ensure the cutting head remains free to rotate and the line is not caught be- tween the shield and the motor housing.

4.Push back of the shield toward the motor housing as illustrated until the rear locking tabs snap securely into the rear notches. Make sure the shield is assembled to the unit as shown in the illustration below and in the KNOW YOUR UNIT section of this manual.

Rear

Front Locking Tab


Trimmer

Locking


Front

Tabs


Motor


Notch


Housing


Rear

Trimmer Notches

Head

CAUTION: Sharp line limiter blade

4

Page 4
Image 4
Weed Eater RTE114, RTE113, 530086743 instruction manual Adjusting Assist Handle, Attaching the Shield

530086743, RTE114, RTE113 specifications

The Weed Eater RTE113 and RTE114, along with the part number 530086743, are powerful and reliable electric string trimmers designed for homeowners seeking an efficient solution for lawn maintenance. Both models stand out due to their user-friendly features, cutting-edge technologies, and robust design, making yard care tasks easier and more enjoyable.

The RTE113 and RTE114 trimmers are equipped with electric motors that provide consistent performance without the noise and emissions associated with gas-powered models. This makes them an eco-friendly choice for those looking to maintain their gardens while minimizing their environmental impact. The lightweight design of these trimmers ensures easy maneuverability, allowing users to navigate their yards with ease. Weighing in at just a few pounds, both models reduce user fatigue during prolonged use.

One of the standout features of the RTE113 and RTE114 is the automatic line feed system, which eliminates the need for manual line adjustments. This ensures that the cutting line advances effortlessly as needed, helping users maintain an uninterrupted work rhythm. The trimmers are equipped with a dual line system that allows for a wider cutting width, enabling faster trimming and reducing the overall time spent on yard work.

In terms of functionality, the trimmers feature an adjustable telescoping shaft that can accommodate different user heights, enhancing comfort during operation. Additionally, the ergonomic handle design provides a secure grip, making it easier to navigate around flower beds, fences, and other obstacles.

The RTE113 and RTE114 models also incorporate advanced technologies, such as a powerful 13-amp motor, which delivers ample cutting power for tackling tough weeds and grass. The 530086743 part number is crucial for users looking for replacement parts, ensuring that the trimmers can stay in top condition for years to come.

Overall, the Weed Eater RTE113 and RTE114, along with the 530086743 components, are outstanding choices for homeowners seeking effective and environmentally friendly lawn care solutions. Their combination of user-friendly features, powerful motors, and thoughtful design make them excellent tools for keeping your garden tidy and well-maintained.