ASSEMBLY

HOW TO SET UP YOUR TRACTOR

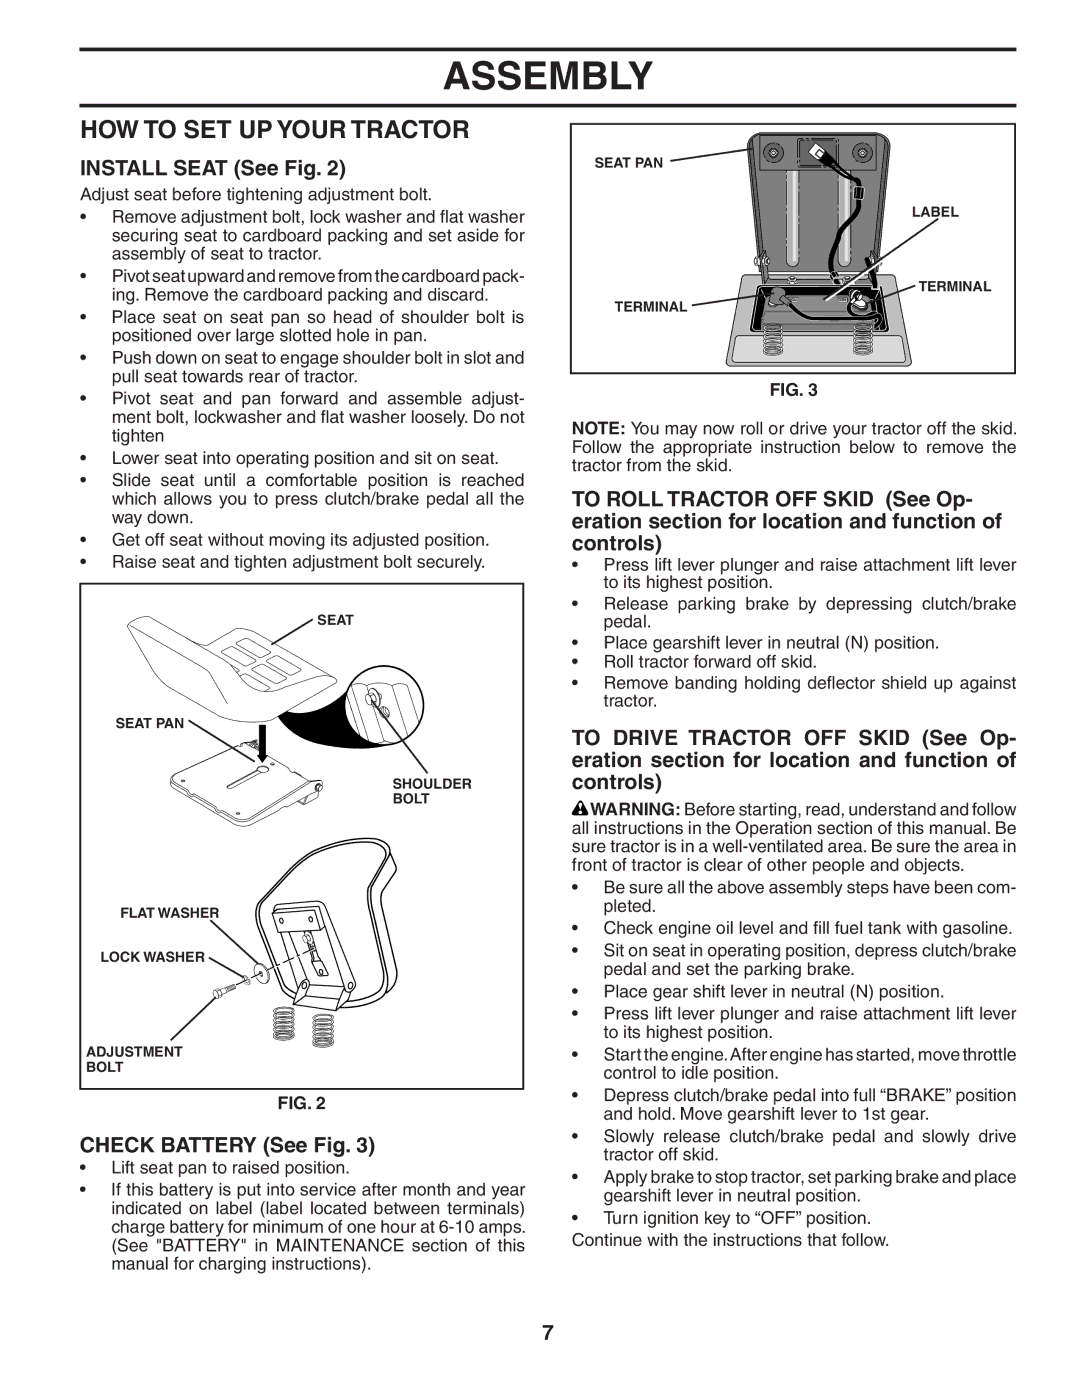
INSTALL SEAT (See Fig. 2)

Adjust seat before tightening adjustment bolt.

Remove adjustment bolt, lock washer and flat washer securing seat to cardboard packing and set aside for assembly of seat to tractor.

Pivot seat upward and remove from the cardboard pack- ing. Remove the cardboard packing and discard.

Place seat on seat pan so head of shoulder bolt is positioned over large slotted hole in pan.

Push down on seat to engage shoulder bolt in slot and pull seat towards rear of tractor.

Pivot seat and pan forward and assemble adjust- ment bolt, lockwasher and flat washer loosely. Do not tighten

Lower seat into operating position and sit on seat.

Slide seat until a comfortable position is reached which allows you to press clutch/brake pedal all the way down.

Get off seat without moving its adjusted position.

Raise seat and tighten adjustment bolt securely.

SEAT

SEAT PAN

SHOULDER

BOLT

FLAT WASHER

LOCK WASHER

ADJUSTMENT

BOLT

FIG. 2

CHECK BATTERY (See Fig. 3)

Lift seat pan to raised position.

If this battery is put into service after month and year indicated on label (label located between terminals) charge battery for minimum of one hour at 6-10 amps. (See "BATTERY" in MAINTENANCE section of this manual for charging instructions).

SEAT PAN

LABEL

TERMINAL

TERMINAL

FIG. 3

NOTE: You may now roll or drive your tractor off the skid. Follow the appropriate instruction below to remove the tractor from the skid.

TO ROLL TRACTOR OFF SKID (See Op- eration section for location and function of controls)

Press lift lever plunger and raise attachment lift lever to its highest position.

Release parking brake by depressing clutch/brake pedal.

Place gearshift lever in neutral (N) position.

Roll tractor forward off skid.

Remove banding holding deflector shield up against tractor.

TO DRIVE TRACTOR OFF SKID (See Op- eration section for location and function of controls)

WARNING: Before starting, read, understand and follow all instructions in the Operation section of this manual. Be sure tractor is in a well-ventilated area. Be sure the area in front of tractor is clear of other people and objects.

Be sure all the above assembly steps have been com- pleted.

Check engine oil level and fill fuel tank with gasoline.

Sit on seat in operating position, depress clutch/brake pedal and set the parking brake.

Place gear shift lever in neutral (N) position.

Press lift lever plunger and raise attachment lift lever to its highest position.

Start the engine.After engine has started, move throttle control to idle position.

Depress clutch/brake pedal into full “BRAKE” position and hold. Move gearshift lever to 1st gear.

Slowly release clutch/brake pedal and slowly drive tractor off skid.

Apply brake to stop tractor, set parking brake and place gearshift lever in neutral position.

Turn ignition key to “OFF” position.

Continue with the instructions that follow.

7

Page 7
Image 7
Weed Eater WE165T42A manual HOW to SET UP Your Tractor, Install Seat See Fig, Check Battery See Fig

WE165T42A specifications

The Weed Eater WE165T42A is a versatile and efficient lawn care tool designed to tackle various tasks in maintaining a tidy garden. This product is particularly favored by homeowners for its durability, ease of use, and impressive performance. One of its standout features is the powerful 16-inch cutting path, which ensures that users can cover large areas quickly. This makes it an ideal choice for those looking to maintain their lawns without spending excessive time on yard work.

A key feature of the WE165T42A is its gas-powered engine, which provides reliable power and performance. This engine allows the trimmer to easily cut through thick grass, weeds, and even light brush, ensuring that your garden remains well-maintained. The unit is designed with a robust build, ensuring it can withstand the rigors of regular use while also being lightweight enough for comfortable handling.

Ease of operation is another significant aspect of the Weed Eater WE165T42A. It includes a simple starting system that makes it easy for users to get the machine running with minimal effort. The adjustable handle adds comfort and flexibility, allowing users to find their ideal operating position, which can help reduce fatigue during extended use.

Another notable technology within the WE165T42A is its dual-line feed head. This feature not only provides improved cutting efficiency but also allows for a wider cutting path, reducing the time spent on each trimming session. The trimmer line automatically feeds out as needed, ensuring that users do not have to stop work to manually adjust the line length.

The Weed Eater WE165T42A is also designed with user safety in mind. It includes protective features such as a debris guard, which deflects all the debris away from the operator for a safer working environment. This is especially important when dealing with tougher growth, which can send rocks and other materials flying.

In conclusion, the Weed Eater WE165T42A stands out in the lawn care market for its combination of power, efficiency, and user-friendly features. Its durable construction, ease of operation, and advanced technologies make it an excellent choice for homeowners who value both performance and practicality in their lawn maintenance tools. Whether tackling a small patio garden or a larger yard, the WE165T42A is up to the task, making lawn care simpler and more efficient.