ENVIRONMENTALLY SAFE BATTERY DISPOSAL
The following toxic and corrosive materials are in the battery used in this battery pack: a toxic material.
![]() WARNING: All toxic materials must be disposed of in a specifi ed manner to prevent contamination of the environment. Dispose of batteries according to local
WARNING: All toxic materials must be disposed of in a specifi ed manner to prevent contamination of the environment. Dispose of batteries according to local
![]() WARNING: If the battery pack cracks or breaks, with or without leaks, do not re- charge it and do not use. Dispose of it and replace with a new battery pack. DO NOT ATTEMPT TO REPAIR IT! To avoid injury and risk of fi re, explosion or electric shock,
WARNING: If the battery pack cracks or breaks, with or without leaks, do not re- charge it and do not use. Dispose of it and replace with a new battery pack. DO NOT ATTEMPT TO REPAIR IT! To avoid injury and risk of fi re, explosion or electric shock,
and to avoid damage to the environment:
•Cover the batterey’s terminals with
•DO NOT attempt to remove or destroy any of the battery pack components.
•DO NOT attempt to open the battery pack.
•If a leak develops, the released electro- lytes are corrosive and toxic. DO NOT get the solution in the eyes or on skin, and do not swallow it.
•DO NOT place this battery in your regu- lar household trash.
•DO NOT dispose of the battery in a fi re. The cell may explode.
•DO NOT place it where it will become part of any waste landfi ll or municipal solid waste stream.
•Take it to a certifi ed recycling or disposal center.
ASSEMBLY
TO REMOVE MOWER FROM CARTON
•Remove all loose parts from carton.
•Remove lawn mower housing with care. Avoid touching blade under housing. Always wear gloves or other protection when working under or lifting mower.
![]() CAUTION: Do not operate this lawn mower without the discharge guard or an entire approved grass catcher in place. These guards are for your protection and are required by the American National Standards Institute and Consumer Products Safety Commission.
CAUTION: Do not operate this lawn mower without the discharge guard or an entire approved grass catcher in place. These guards are for your protection and are required by the American National Standards Institute and Consumer Products Safety Commission.
HOW TO SET UP YOUR LAWN MOWER
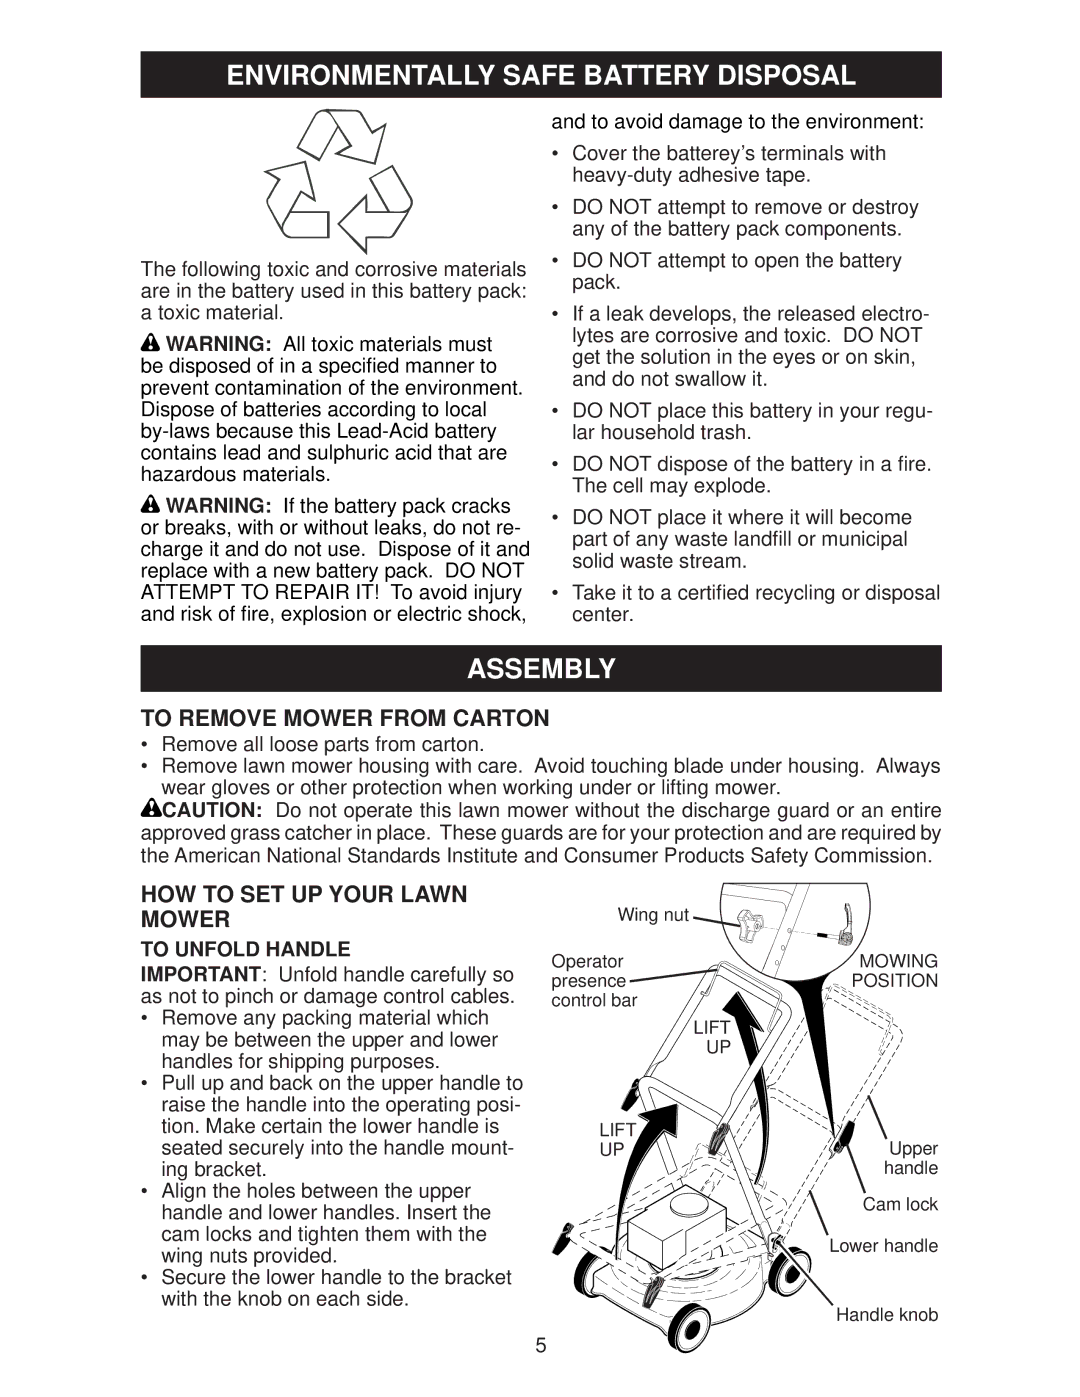
TO UNFOLD HANDLE
IMPORTANT: Unfold handle carefully so as not to pinch or damage control cables.
•Remove any packing material which may be between the upper and lower handles for shipping purposes.
•Pull up and back on the upper handle to raise the handle into the operating posi- tion. Make certain the lower handle is seated securely into the handle mount- ing bracket.
•Align the holes between the upper handle and lower handles. Insert the cam locks and tighten them with the wing nuts provided.
•Secure the lower handle to the bracket with the knob on each side.
Wing nut |
|
Operator | MOWING |
presence | POSITION |
control bar |
|
| LIFT |
| UP |
LIFT | Upper |
UP | |
| handle |
| Cam lock |
| Lower handle |
| Handle knob |
5
