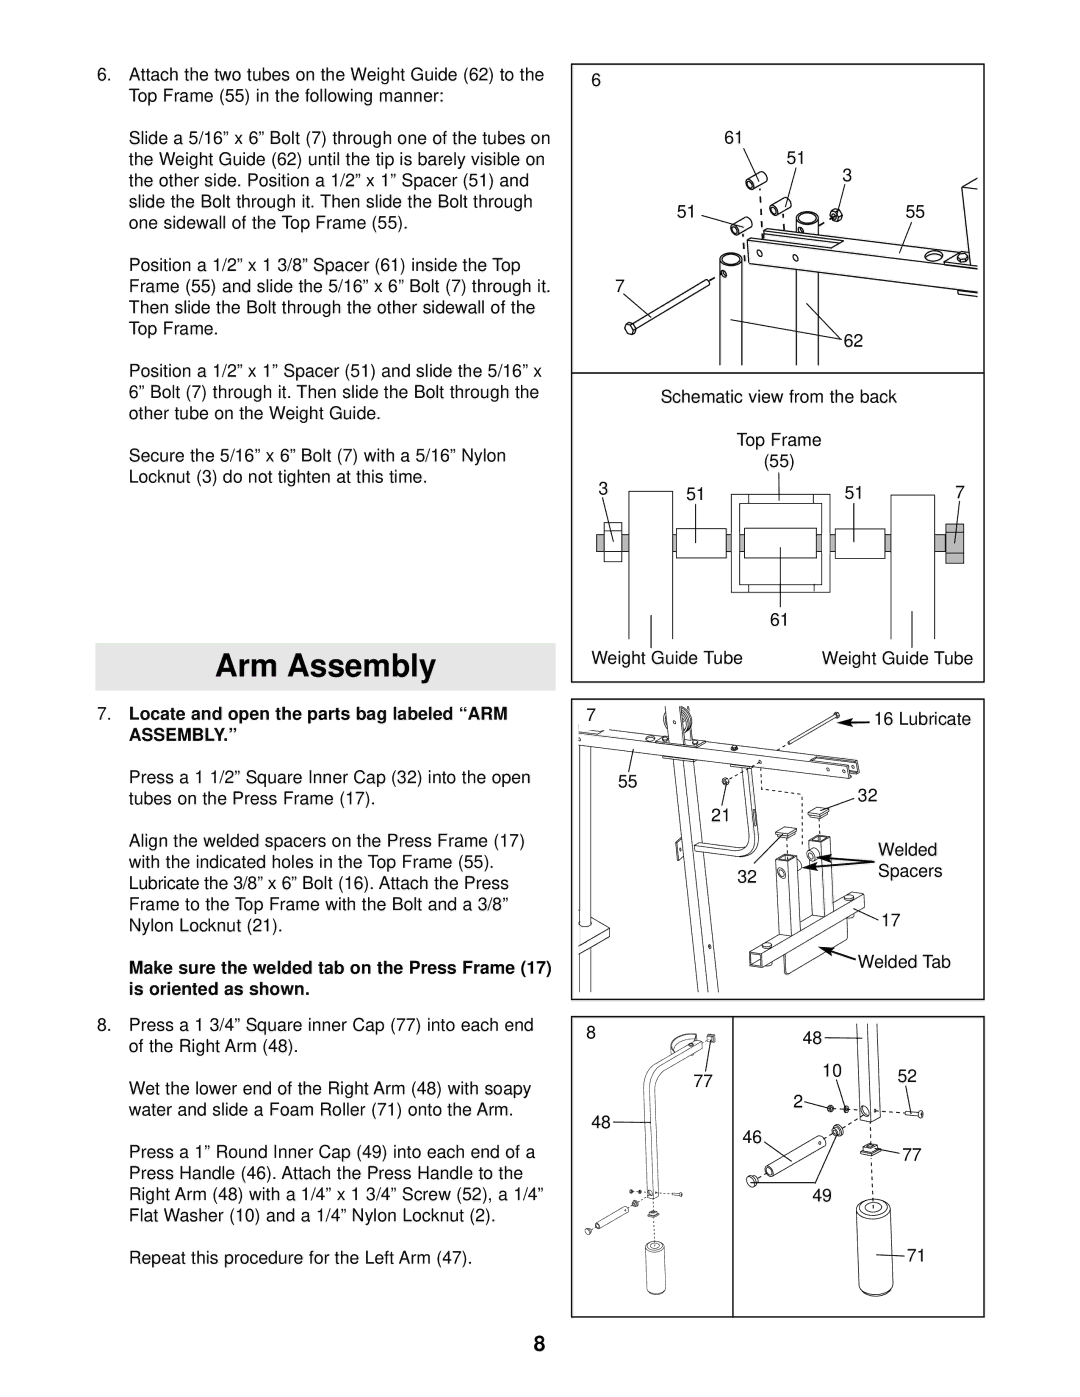
6. | Attach the two tubes on the Weight Guide (62) to the | 6 |
|
|
|
|
|
| Top Frame (55) in the following manner: |
|
|
|
|
| |
|
|
|
|
|
|
| |
| Slide a 5/16” x 6” Bolt (7) through one of the tubes on |
|
| 61 |
|
|
|
| the Weight Guide (62) until the tip is barely visible on |
|
| 51 |
| 3 |
|
| the other side. Position a 1/2” x 1” Spacer (51) and |
|
|
|
|
| |
| slide the Bolt through it. Then slide the Bolt through |
| 51 |
|
| 55 |
|
| one sidewall of the Top Frame (55). |
|
|
|
| ||
|
|
|
|
|
|
| |
| Position a 1/2” x 1 3/8” Spacer (61) inside the Top |
|
|
|
|
|
|
| Frame (55) and slide the 5/16” x 6” Bolt (7) through it. |
| 7 |
|
|
|
|
| Then slide the Bolt through the other sidewall of the |
|
|
|
|
|
|
| Top Frame. |
|
|
|
| 62 |
|
|
|
|
|
|
|
| |
| Position a 1/2” x 1” Spacer (51) and slide the 5/16” x |
|
|
|
|
|
|
| 6” Bolt (7) through it. Then slide the Bolt through the |
| Schematic view from the back |
|
|
| |
| other tube on the Weight Guide. |
|
|
|
|
|
|
| Secure the 5/16” x 6” Bolt (7) with a 5/16” Nylon |
|
| Top Frame |
|
|
|
|
|
| (55) |
|
|
| |
| Locknut (3) do not tighten at this time. |
|
|
|
|
| |
| 3 | 51 |
|
| 51 | 7 | |
|
|
|
| ||||
|
|
|
| 61 |
|
|
|
| Arm Assembly | Weight Guide Tube |
| Weight Guide Tube |
| ||
|
|
|
|
|
|
| |
7. Locate and open the parts bag labeled “ARM | 7 |
|
|
| 16 Lubricate |
| |
| ASSEMBLY.” |
|
|
|
|
|
|
| Press a 1 1/2” Square Inner Cap (32) into the open |
| 55 |
|
| 32 |
|
| tubes on the Press Frame (17). |
|
| 21 |
|
| |
|
|
|
|
|
|
| |
| Align the welded spacers on the Press Frame (17) |
|
|
|
| Welded |
|
| with the indicated holes in the Top Frame (55). |
|
|
|
|
| |
|
|
| 32 |
| Spacers |
| |
| Lubricate the 3/8” x 6” Bolt (16). Attach the Press |
|
|
|
| ||
|
|
|
|
|
| ||
|
|
|
|
|
|
| |
| Frame to the Top Frame with the Bolt and a 3/8” |
|
|
|
| 17 |
|
| Nylon Locknut (21). |
|
|
|
|
| |
| Make sure the welded tab on the Press Frame (17) |
|
|
|
| Welded Tab |
|
|
|
|
|
|
|
| |
| is oriented as shown. |
|
|
|
|
|
|
8. | Press a 1 3/4” Square inner Cap (77) into each end | 8 |
| 48 |
|
| |
| of the Right Arm (48). |
|
|
| |||
|
|
|
|
| |||
|
|
|
|
|
|
| |
| Wet the lower end of the Right Arm (48) with soapy |
| 77 |
| 10 | 52 |
|
|
|
|
|
| |||
|
|
| 2 |
|
|
| |
| water and slide a Foam Roller (71) onto the Arm. |
|
|
|
|
| |
| 48 |
|
|
|
|
| |
|
|
| 46 |
|
|
| |
| Press a 1” Round Inner Cap (49) into each end of a |
|
|
| 77 |
| |
|
|
|
|
|
| ||
| Press Handle (46). Attach the Press Handle to the |
|
|
|
|
|
|
| Right Arm (48) with a 1/4” x 1 3/4” Screw (52), a 1/4” |
|
|
| 49 |
|
|
| Flat Washer (10) and a 1/4” Nylon Locknut (2). |
|
|
|
|
|
|
| Repeat this procedure for the Left Arm (47). |
|
|
|
| 71 |
|
8