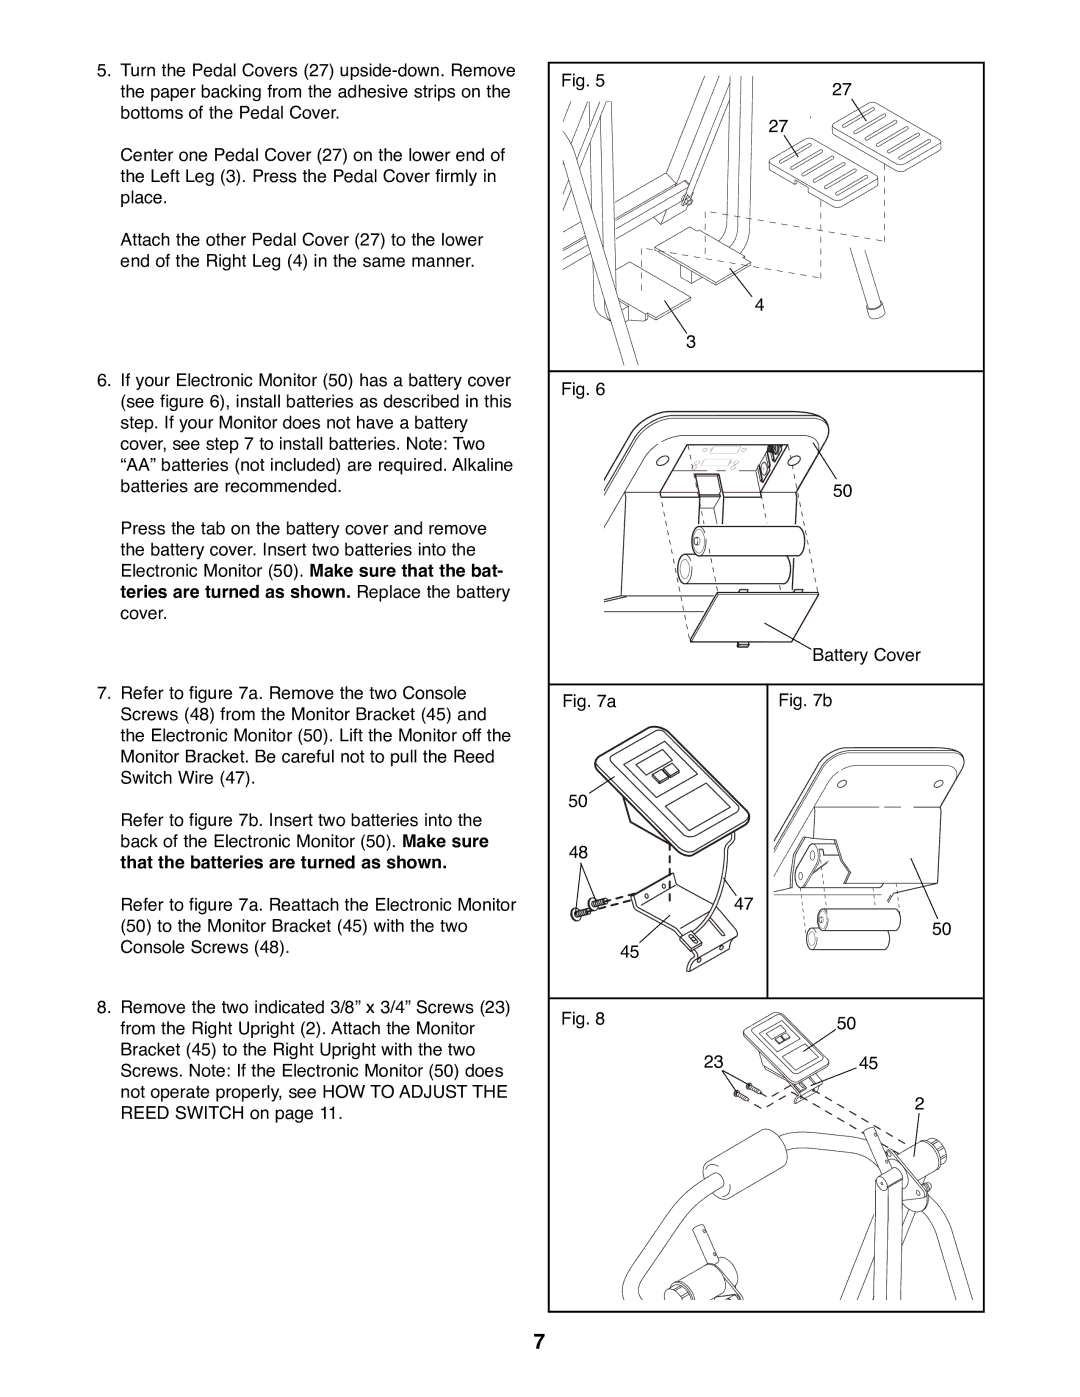
5. Turn the Pedal Covers (27) | Fig. 5 | 27 | |
the paper backing from the adhesive strips on the | |||
| |||
bottoms of the Pedal Cover. |
| 27 | |
|
| ||
Center one Pedal Cover (27) on the lower end of |
|
| |
the Left Leg (3). Press the Pedal Cover firmly in |
|
| |
place. |
|
| |
Attach the other Pedal Cover (27) to the lower |
|
| |
end of the Right Leg (4) in the same manner. |
|
| |
|
| 4 | |
| 3 |
| |
6. If your Electronic Monitor (50) has a battery cover | Fig. 6 |
| |
(see figure 6), install batteries as described in this |
| ||
|
| ||
step. If your Monitor does not have a battery |
|
| |
cover, see step 7 to install batteries. Note: Two |
|
| |
ÒAAÓ batteries (not included) are required. Alkaline |
|
| |
batteries are recommended. |
| 50 | |
Press the tab on the battery cover and remove |
|
| |
the battery cover. Insert two batteries into the |
|
| |
Electronic Monitor (50). Make sure that the bat- |
|
| |
teries are turned as shown. Replace the battery |
|
| |
cover. |
|
| |
|
| Battery Cover | |
7. Refer to figure 7a. Remove the two Console | Fig. 7a | Fig. 7b | |
Screws (48) from the Monitor Bracket (45) and | |||
|
| ||
the Electronic Monitor (50). Lift the Monitor off the |
|
| |
Monitor Bracket. Be careful not to pull the Reed |
|
| |
Switch Wire (47). |
|
| |
Refer to figure 7b. Insert two batteries into the | 50 |
| |
|
| ||
back of the Electronic Monitor (50). Make sure | 48 |
| |
that the batteries are turned as shown. |
| ||
|
| ||
Refer to figure 7a. Reattach the Electronic Monitor |
| 47 | |
(50) to the Monitor Bracket (45) with the two |
| 50 | |
Console Screws (48). | 45 |
| |
8. Remove the two indicated 3/8Ó x 3/4Ó Screws (23) | Fig. 8 | 50 | |
from the Right Upright (2). Attach the Monitor | |||
|
| ||
Bracket (45) to the Right Upright with the two | 23 | 45 | |
Screws. Note: If the Electronic Monitor (50) does | |||
|
| ||
not operate properly, see HOW TO ADJUST THE |
| 2 | |
REED SWITCH on page 11. |
| ||
|
| ||
| 7 |
|