Manuals
/
West Bend
/
Kitchen Appliance
/
Blender
West Bend
L5700
instruction manual
Assembling Your Blender, Using Your Blender
Models:
L5700
1
5
24
24
Download
24 pages
18.78 Kb
1
2
3
4
5
6
7
8
Warranty
Cleaning Your Blender
Operating Precautions
Using Your Blender
Page 5
Image 5
Page 4
Page 6
Page 5
Image 5
Page 4
Page 6
Contents
SAVE THIS INSTRUCTION MANUAL FOR FUTURE REFERENCE
STUDIO BLENDER
Instruction Manual
•For household use only
IMPORTANT SAFEGUARDS
OPERATING PRECAUTIONS
ELECTRICITY PRECAUTIONS
SAVE THESE INSTRUCTIONS
PRECAUTIONS FOR USE AROUND CHILDREN
BLENDING JAR PRECAUTIONS
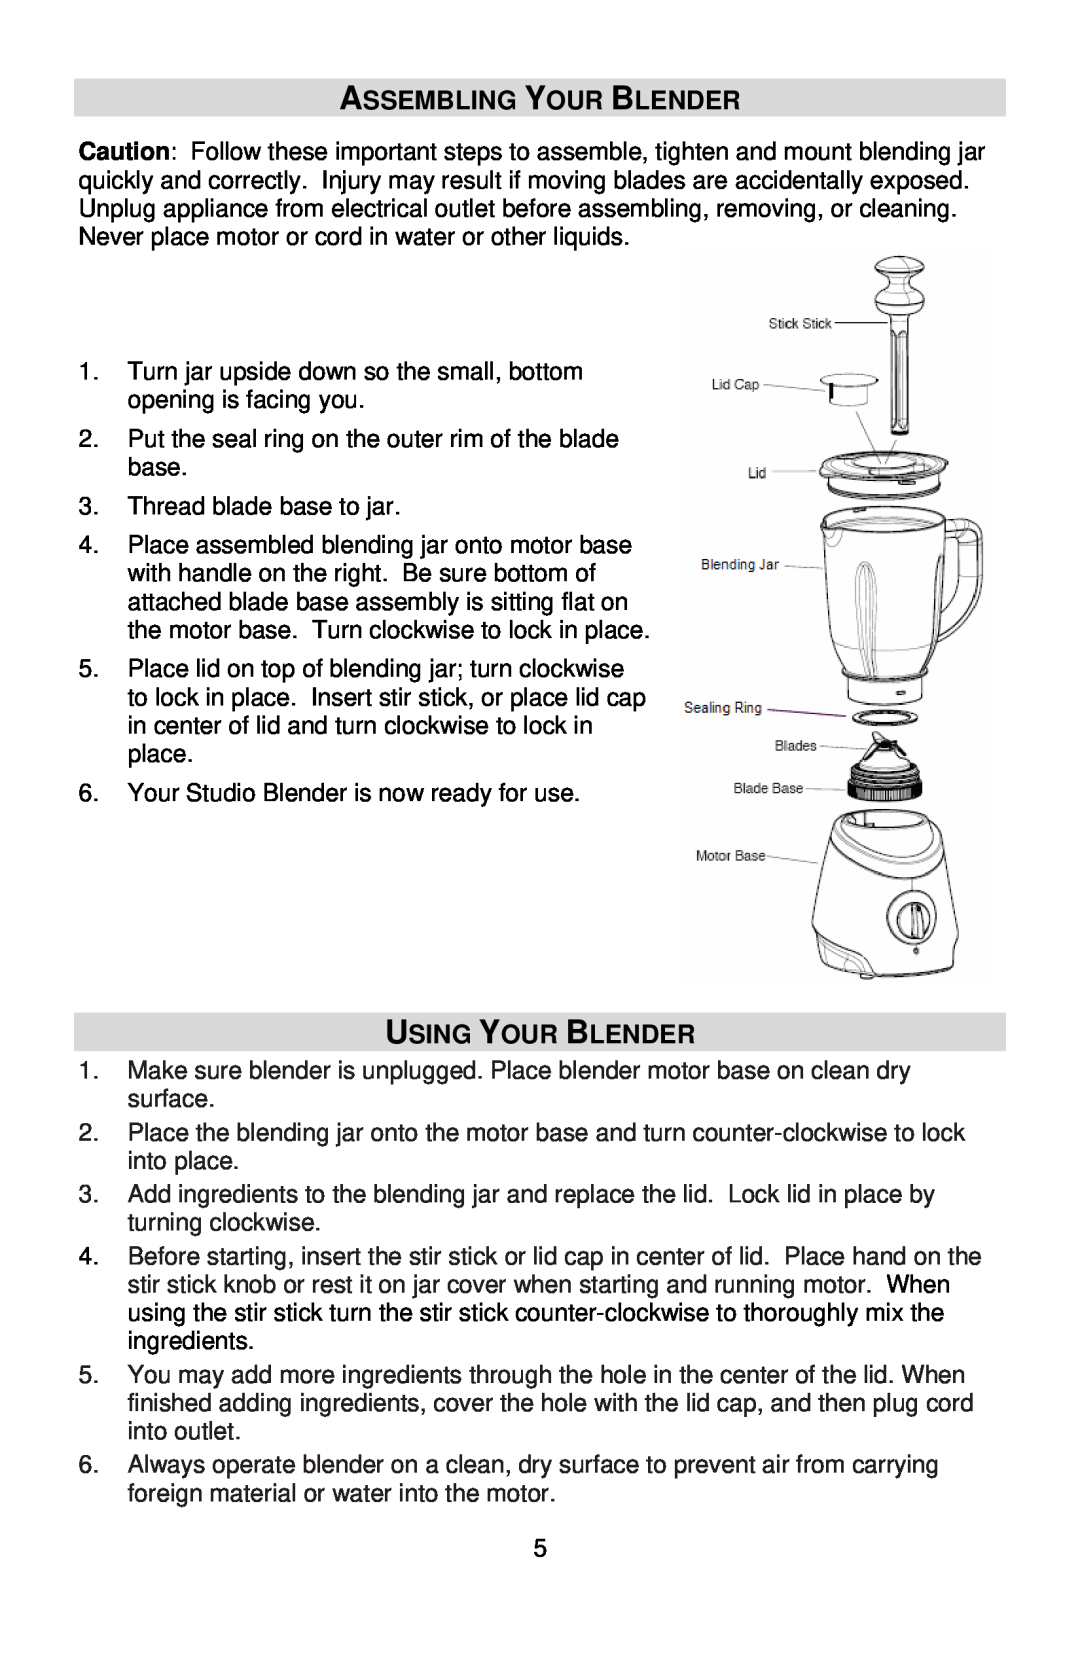
ASSEMBLING YOUR BLENDER
USING YOUR BLENDER
TIPS FOR GENERAL USE
CLEANING YOUR BLENDER
Appliance 1 Year Limited Warranty
PRODUCT WARRANTY
REPLACEMENT PARTS
Valid only in USA and Canada
w w w . f o c u s e l e c t r i c s . c o m
MIXEUR STUDIO
Manuel d’instructions
•Pour usage domestique uniquement
MISES EN GARDE IMPORTANTES
PRÉCAUTIONS D’UTILISATION
PRÉCAUTIONS LIÉES À L’ÉLECTRICITÉ
PRÉCAUTIONS RELATIVES AU PICHET À MIXER
CONSERVEZ CES INSTRUCTIONS
LUTILISATION DE VOTRE MIXEUR
ASSEMBLAGE DE VOTRE MIXEUR
ASTUCES GÉNÉRALES
NETTOYAGE DU MIXEUR
Garantie limitée d’1 an de l’appareil
GARANTIE DU PRODUIT
PIECES DE RECHANGE
Valide uniquement aux USA et au Canada
EL FUTURO
LICUADORA STUDIO
Manual de instrucciones
•Para uso doméstico solamente
PRECAUCIONES IMPORTANTES
PRECAUCIONES DE FUNCIONAMIENTO
PRECAUCIONES ELÉCTRICAS
PRECAUCIONES CON LA JARRA DE LA LICUADORA
CONSERVE ESTAS INSTRUCCIONES
PRECAUCIONES DE USO CERCA DE NIÑOS
USO DE LA LICUADORA
ENSAMBLE DE LA LICUADORA
SUGERENCIAS DE USO GENERAL
LIMPIEZA DE LA LICUADORA
REPUESTOS
GARANTÍA DEL PRODUCTO
Top
Page
Image
Contents