RS-10 SUBWOOFER USER INSTRUCTIONS
The subwoofer has to blend with the main speakers: if you place the subwoofer where it amplifies the irregularities of the room or the main speakers the result will be bloated, coloured bass. If acoustic guitar and male voice sounds coloured when the subwoofer is operating and less coloured when in standby, you need to address the positioning first before adjusting any controls
The optimal position for the subwoofer is 50mm from a rear wall, i.e. with the amplifier heatsink 10mm from the wall. On no account should the heatsink touch the wall.
Loudspeaker Phasing
It is absolutely essential for all speakers to be connected correctly with the RED + and BLACK - terminals of the speakers connected to the corresponding RED + and BLACK - terminals of the AV amplifier (‘in phase’). This is particularly important if speakers are
may limit the subwoofer’s ability to respond to large bass transients. Set a sensible level going into the subwoofer from the processor. The volume display should be around 50 at normal listening levels.
LFE
This channel was originally an additional bass channel with its own dedicated subwoofer. In practice however, if any speakers are set to ‘Small’, the LFE channel is combined with the bass from those channels and fed into the subwoofer. When you set the LFE level from your AV processor, use care as the LFE channel contains powerful low frequencies which, although normal in a cinema, may overload a domestic subwoofer. If, during a programme, you hear popping or thumping noises from the subwoofer, turn the AV Processor volume level down and back off the LFE level. If this does not cure the problem, lower the subwoofer volume level.
Note: If any channels are set to ‘Small’ the subwoofer must be on when the system is playing otherwise there will be reduced bass , and no LFE.
Subwoofer Settings for
! Set all channels to ‘small’ |
PRELIMINARIES
Open the carton and remove all the top packing pieces. Lift the subwoofer out taking care not to damage the cabinet. When lifting the unit from the carton support it from the bottom. DO NOT attempt to lift the subwoofer out of the carton using the polythene bag. The unit is heavy; if you cannot manage it easily, get someone to assist you.
After removing the subwoofer from the carton, remove the plastic bag.
Retain the packing materials for future use or return them to your dealer. If you decide not to keep the packing, please dispose of it having regard to any recycling regulations in your area.
Please retain the user manual and the purchase receipt for future reference. If you transfer this equipment to a third party, please ensure all the instructions are passed on with the product.
CHANGING THE SUBWOOFER FEET
The subwoofer is fitted with rubber feet. A set of spikes is also provided.
Fitting Spikes
Invert the subwoofer. Protect the top by placing it on a soft surface such as a towel. Loosen each threaded washer and unscrew the rubber feet.
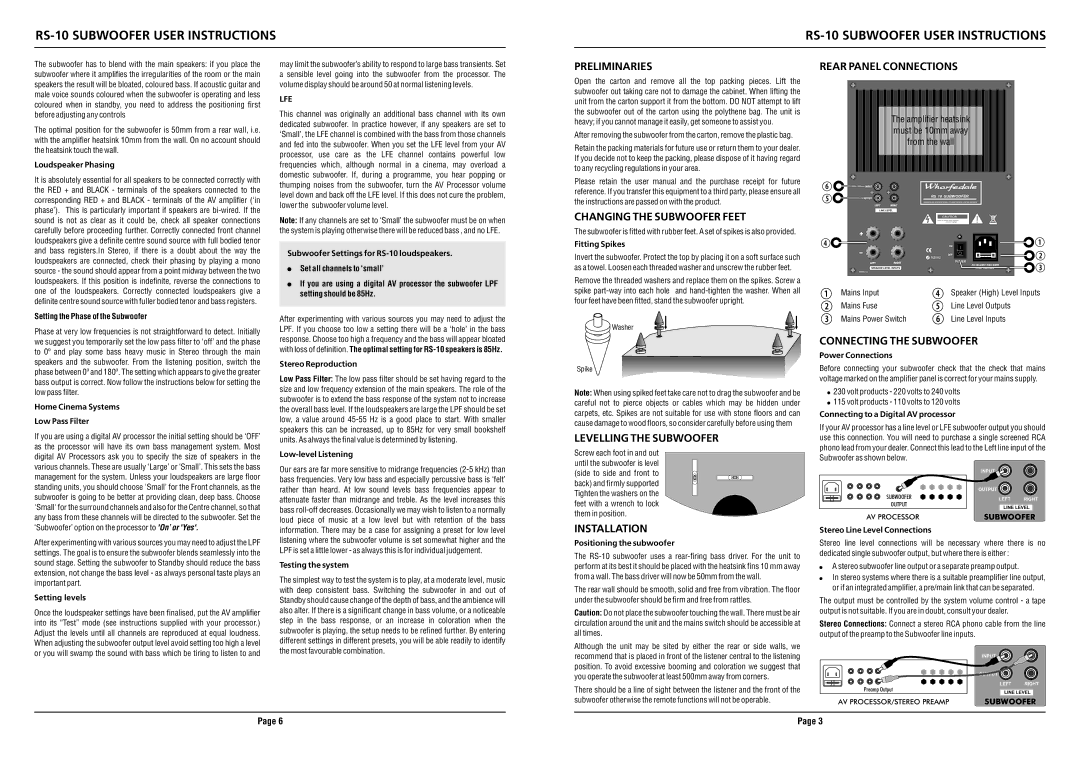
REAR PANEL CONNECTIONS
| The amplifier heatsink |
|
| must be 10mm away |
|
| from the wall |
|
INPUT |
|
|
OUTPUT | RS 10 SUBWOOFER |
|
|
| |
| WHARFEDALE INTERNA TIONAL LTD,HUNTINGDON, UNITED KINGDOM | |
LEFT | RIGHT |
|
LINE LEVEL |
| |
| CAUTION | ! |
| RISK OF ELECTRIC SHOCK | |
| DO NOT OPEN | |
| ON |
|
| OFF |
|
| N2082 |
|
LEFT | PO ER |
|
RIGHT | AC | |
SPEAKER LEVEL INPUTS | FUSE T4AL250V | |
SERIAL No: |
|
|
loudspeakers. If this position is indefinite, reverse the connections to one of the loudspeakers. Correctly connected loudspeakers give a definite centre sound source with fuller bodied tenor and bass registers.
Setting the Phase of the Subwoofer
Phase at very low frequencies is not straightforward to detect. Initially
! If you are using a digital AV processor the subwoofer LPF |
setting should be 85Hz. |
After experimenting with various sources you may need to adjust the LPF. If you choose too low a setting there will be a ‘hole’ in the bass
Remove the threaded washers and replace them on the spikes. Screw a |
|
|
spike | Mains Input | Speaker (High) Level Inputs |
four feet have been fitted, stand the subwoofer upright. | Mains Fuse | Line Level Outputs |
| ||
Washer | Mains Power Switch | Line Level Inputs |
|
|
we suggest you temporarily set the low pass filter to ‘off’ and the phase to 0º and play some bass heavy music in Stereo through the main speakers and the subwoofer. From the listening position, switch the phase between 0º and 180º. The setting which appears to give the greater bass output is correct. Now follow the instructions below for setting the low pass filter.
Home Cinema Systems
Low Pass Filter
If you are using a digital AV processor the initial setting should be ‘OFF’ as the processor will have its own bass management system. Most digital AV Processors ask you to specify the size of speakers in the various channels. These are usually ‘Large’ or ‘Small’. This sets the bass management for the system. Unless your loudspeakers are large floor standing units, you should choose 'Small' for the Front channels, as the subwoofer is going to be better at providing clean, deep bass. Choose 'Small' for the surround channels and also for the Centre channel, so that any bass from these channels will be directed to the subwoofer. Set the ‘Subwoofer’ option on the processor to 'On’ or 'Yes'.
After experimenting with various sources you may need to adjust the LPF settings. The goal is to ensure the subwoofer blends seamlessly into the sound stage. Setting the subwoofer to Standby should reduce the bass extension, not change the bass level - as always personal taste plays an important part.
Setting levels
Once the loudspeaker settings have been finalised, put the AV amplifier into its “Test” mode (see instructions supplied with your processor.) Adjust the levels until all channels are reproduced at equal loudness. When adjusting the subwoofer output level avoid setting too high a level or you will swamp the sound with bass which be tiring to listen to and
response. Choose too high a frequency and the bass will appear bloated with loss of definition. The optimal setting for
Stereo Reproduction
Low Pass Filter: The low pass filter should be set having regard to the size and low frequency extension of the main speakers. The role of the subwoofer is to extend the bass response of the system not to increase the overall bass level. If the loudspeakers are large the LPF should be set low, a value around
Low-level Listening
Our ears are far more sensitive to midrange frequencies
Testing the system
The simplest way to test the system is to play, at a moderate level, music with deep consistent bass. Switching the subwoofer in and out of Standby should cause change of the depth of bass, and the ambience will also alter. If there is a significant change in bass volume, or a noticeable step in the bass response, or an increase in coloration when the subwoofer is playing, the setup needs to be refined further. By entering different settings in different presets, you will be able readily to identify the most favourable combination.
Spike
Note: When using spiked feet take care not to drag the subwoofer and be careful not to pierce objects or cables which may be hidden under carpets, etc. Spikes are not suitable for use with stone floors and can cause damage to wood floors, so consider carefully before using them
LEVELLING THE SUBWOOFER
Screw each foot in and out until the subwoofer is level (side to side and front to back) and firmly supported Tighten the washers on the feet with a wrench to lock them in position.
INSTALLATION
Positioning the subwoofer
The
The rear wall should be smooth, solid and free from vibration. The floor under the subwoofer should be firm and free from rattles.
Caution: Do not place the subwoofer touching the wall. There must be air circulation around the unit and the mains switch should be accessible at all times.
Although the unit may be sited by either the rear or side walls, we recommend that is placed in front of the listener central to the listening position. To avoid excessive booming and coloration we suggest that you operate the subwoofer at least 500mm away from corners.
There should be a line of sight between the listener and the front of the subwoofer otherwise the remote functions will not be operable.
CONNECTING THE SUBWOOFER
Power Connections
Before connecting your subwoofer check that the check that mains voltage marked on the amplifier panel is correct for your mains supply.
!230 volt products - 220 volts to 240 volts
!115 volt products - 110 volts to 120 volts
Connecting to a Digital AV processor
If your AV processor has a line level or LFE subwoofer output you should use this connection. You will need to purchase a single screened RCA phono lead from your dealer. Connect this lead to the Left line input of the Subwoofer as shown below.
| INPUT |
| |
| OUTPUT |
| |
SUBWOOFER | LEFT | RIGHT | |
OUTPUT | |||
LINE LEVEL | |||
| |||
AV PROCESSOR | SUBWOOFER | ||
Stereo Line Level Connections
Stereo line level connections will be necessary where there is no dedicated single subwoofer output, but where there is either :
!A stereo subwoofer line output or a separate preamp output.
!In stereo systems where there is a suitable preamplifier line output, or if an integrated amplifier, a pre/main link that can be separated.
The output must be controlled by the system volume control - a tape output is not suitable. If you are in doubt, consult your dealer.
Stereo Connections: Connect a stereo RCA phono cable from the line output of the preamp to the Subwoofer line inputs.
| INPUT |
| |
| OUTPUT |
| |
Preamp Output | LEFT | RIGHT | |
LINE LEVEL | |||
| |||
AV PROCESSOR/STEREO PREAMP | SUBWOOFER | ||
Page 6 | Page 3 |