2.Run flexible, armored or non- metallic sheathed, copper cable (with grounding wire) from the fused disconnect, circuit breaker or junction box through the l/2” or larger cabinet hole to the dishwasher location. The cable must etiend 24” from the back wall.
The hole cut through a wood cabinet should be sanded until smooth.
The hole cut through a metal cabi- net must be covered with a grom- met (Part No. 3027971, available from your authorized dealer.
A
3.Remove the dishwasher terminal box cover. Connect the white and black wires of the power supply cable to the white and black leads in the terminal box with
4.Connect the power supply grounding wire to the green, ground- ing wire inside the terminal box with a
(See Figure 3.)
5.Replace terminal box cover.
Temporary grounding method
THIS,HOWEVERIS NOT RECOMMENDED.
If the recommended grounding method is impossible - connect a separate, grounding wire (No. 16 minimum> to the green, grounding screw inside the terminal box. Con- nect the other end of the separate grounding wire to a grounded, metal cold water pipe. (See Figure 5.)
Do not connect to electrical supply until dishwasher is permanently grounded.
Do Not ground to a gas supply pipe or hot water pipe.
. Grounded, cold water pipe must have metal continuity to electrical ground and not be interrupted by plastic, rubber or other insulating connectors such as hoses, fiwings. washers or gaskets (including water meter or pump). Any insulating electrical connector should be jumped, as shown. with a len th of
B.Power supply cord method (connecting dishwasher to outlet)
Local codes may permit the use of a
It is recommended that cord kit, Part No. 4317824, available from your Whirlpool dealer or parts supplier, be used. If the cord kit is not available locally, the flexible cord used must be a
grounded in accordance with the National Electrical Code ANSI/NFPA
Dishwashers equipped with a power supply cord have a
Recommended
Irounding method
Electrical Shock Hazard
l Electrical ground is required on this appliance.
l Improper connection of the
conductor can result in a risk of electrical shock.
l Check with a qualified electrician if you are in doubt as to whether the appliance is properly grounded. Do Not modify or remove the power supply cord plug. If plug does not fit the outlet, have a proper outlet installed by a qualified electrician.
l Do Not use an extension cord with this appliance.
l Do Not have a fuse in the neutral.
Failure to follow these instructions could result ina fire, electrical shock or other personal injury.
L
Figure 4
power supply cord
1.Have a
Panel A.) | Pipe | must be |
| tree | of paint, |
| dirt. | grease. |
‘Metal cold \ waler pipe /
Figure 5 ZCreW
2.For added personal safety, use a separate grounding wire. Remove terminal box cover. Feed grounding wire through the hole in the terminal box where the power cord enters. Connect the separate grounding wire to the green, grounding screw inside the terminal box. Connect the other end of the separate grounding wire to a grounded, metal cold water pipe’. (See Figure 5.)
3.Replace terminal box cover.
Do Not connect to electrical supply until appliance is permanently grounded.
Do Not ground to a gas supply pipe or hot water pipe.
‘Grounded, cold water pipe must have metal continuliy to electrical ground and not be interrupted by plastic, rubber or other electrical insulating connectors such as hoses, fittings, washers or gaskets (including water meter or pump). Any electrical insulating connector should be jumped, as shown, with a length of
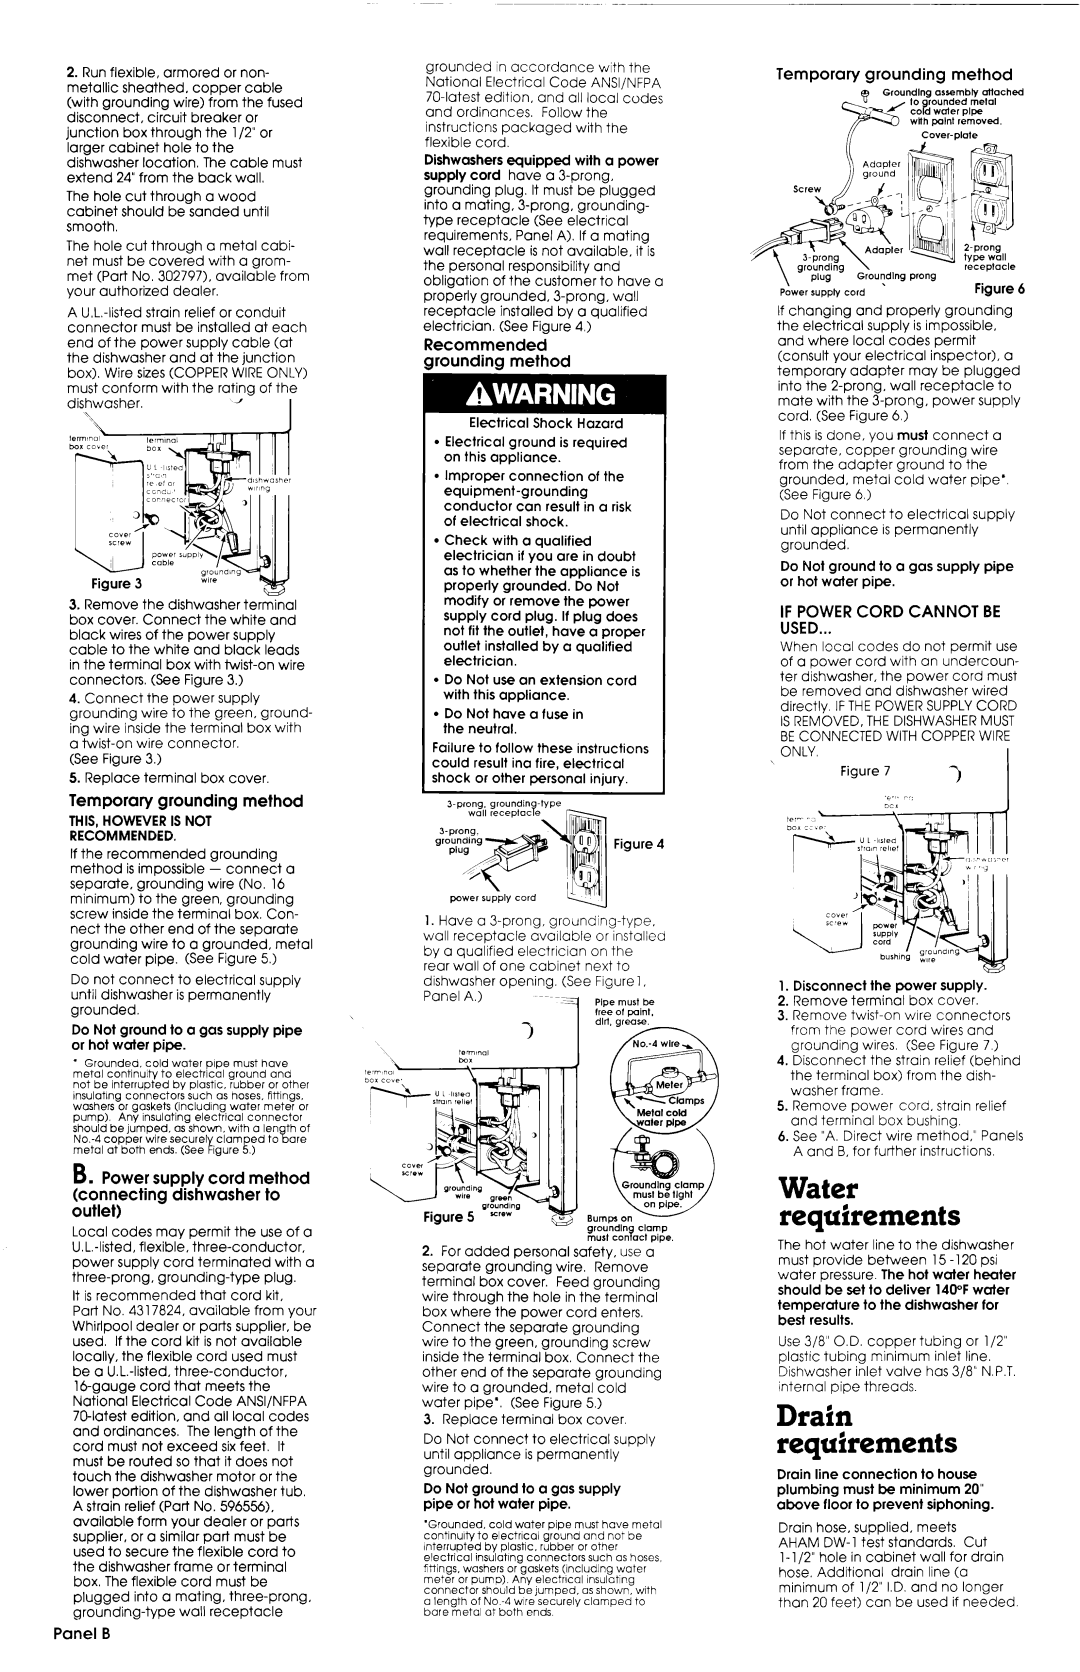
Temporary grounding method
with paint removed.
Figure 6
If changing and properly grounding the electrical supply is impossible, and where local codes permit (consult your electrical inspector), a temporary adapter may be plugged into the
If this is done, you must connect a separate, copper grounding wire from the adapter ground to the grounded, metal cold water pipe’ (See Figure 6.)
Do Not connect to electrical supply until appliance is permanently grounded.
Do Not ground to a gas supply pipe or hot water pipe.
IF POWER CORD CANNOT BE
USED...
When local codes do not permit use of a power cord with an undercoun- ter dishwasher, the power cord must be removed and dishwasher wired directly. IFTHEPOWERSUPPLYCORD ISREMOVED, THEDISHWASHERMUST BECONNECTED WITH COPPER WIRE
\ ONLY.
1.Disconnect the power supply.
2.Remove terminal box cover.
3.Remove
4.Disconnect the strain relief (behind the terminal box) from the dish- washer frame.
5.Remove power cord, strain relief and terminal box bushing.
6.See “A.Direct wire method,” Panels A and B, for further instructions.
Water requirements
The hot water line to the dishwasher must provide between 15 - 120 psi water pressure. The hot water heater
should be set to deliver 140°F water temperature to the dishwasher for best results.
Use 3/8” O.D. copper tubing or l/2” plastic tubing minimum inlet line. Dishwasher inlet valve has 3/8” N.P.T. internal pipe threads.
Drain requirements
Drain line connection to house plumbing must be minimum 20”
above floor to prevent siphoning.
Drain hose, supplied, meets AHAM
Panel B