Installation | Steps |
|
|
|
|
|
| ||||||
These | instruclions | cover | models | wilh | and | without | a | condenser |
| coil |
|
| |
on the | back | of | the cabinet. | See | illustrations | below | and |
|
|
|
| ||
follow | instructions | thal apply to | your | model |
|
|
|
|
|
|
| ||
Tools and Other Items You Will Need |
|
|
|
|
|
| |||||||
TOOIS |
|
|
| Waler Hook | Up |
|
|
|
|
|
| ||
| head | screwdriver | (Malerials | needed, | not | included | in | Ice | Maker | Kit.) | |||
1 |
|
|
| j/4” | O.D. | Copper | step | 2 | (back | page) | |||
nut | driver |
| for | length. |
|
|
|
|
|
|
| ||
| Or |
|
|
|
| outlet |
|
|
|
| |||
6” | flat blade | screwdriver | x | l/4” |
|
|
|
| |||||
I\
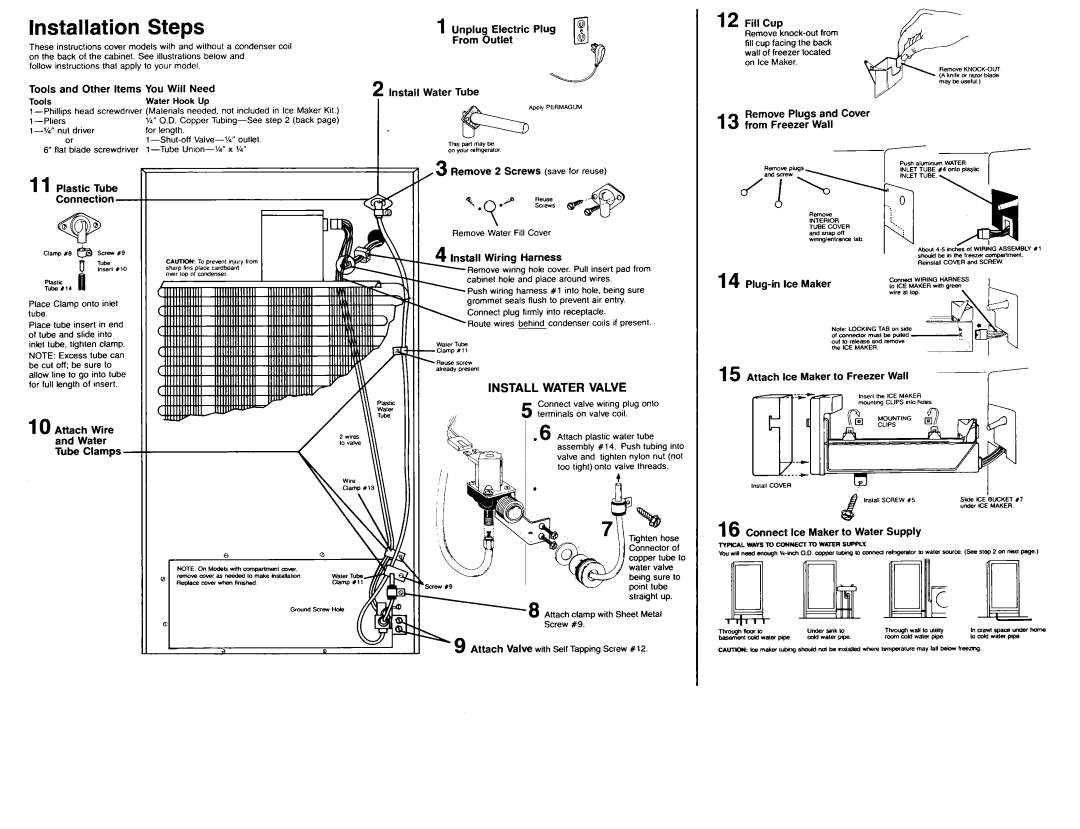
11 Plastic Tube II
Connection -
Place Clamp onto inlet tube.
Place tuba insert in end of tube and slide into inlet tuba, tighten clamp.
1 Unplug Electric Plug
From Outlet
2 Install Water Tube
I
IThS par! may De on your reehgmta
,3 Remove 2 Screws (save for reuse)
Remove Water Fill Cover
4 Install Wiring Harness
wring | hole cover. Pull | insert pad from | |
cabinet | hole | and place around | wires. |
1Push wiring harness #l into hole, being sure grommet seals flush to prevent air entry
Connect plug firmly into receptacle.
Route wires behind condenser MIIS if present
’ 2 | from | |||
| fill cup facing the back | |||
| wall | of | freezer | localed |
| on | Ice | Maker. |
|
Remove Plugs and Cover
13 from Freezer Wall
NOTE: Excess tube can be cut off; ba sure to allow line to go into tube for full length of Insert.
10 Attach Wire and Water
15 Attach Ice Maker to Freezer Wall
INSTALL WATER VALVE
5 Connect valve wiring plug onto terminals on valve coil.
Attach plastic water tube
assembly #14. Push tubing into valve and tighten nylon nut (not too tight) onto valve threads.
16 Connect Ice Maker to Water Supply
|
|
| p&i | tube |
|
| straight | up | |
Attach | clamo | with Sheet Metal | ||
| Screw | #9 |
|
|
+9 | Attach valve with Self | Tapping | Screw #12. |
|
