6.Fasten the shutoff valve to the cold water pipe with the pipe clamp. Be sure the outlet end is solidly in the ¹⁄₄" (6.35 mm) drilled hole in the water pipe and that the washer is under the pipe clamp. Tighten the packing nut. Tighten the pipe clamp screws slowly and evenly so washer makes a watertight seal. Do not overtighten or you may crush the copper tubing.

7.Slip the compression sleeve and compression nut onto the copper tubing as shown. Insert the end of the tubing into the outlet end squarely as far as it will go. Screw compression nut onto outlet end with adjustable wrench. Do not overtighten.

8.Place the free end of the tubing in a container or sink, and turn ON the main water supply. Flush the tubing until water is clear. Turn OFF the shutoff valve on the water pipe. Coil the copper tubing.

Connect to Refrigerator

Style 1

1.Unplug refrigerator or disconnect power.

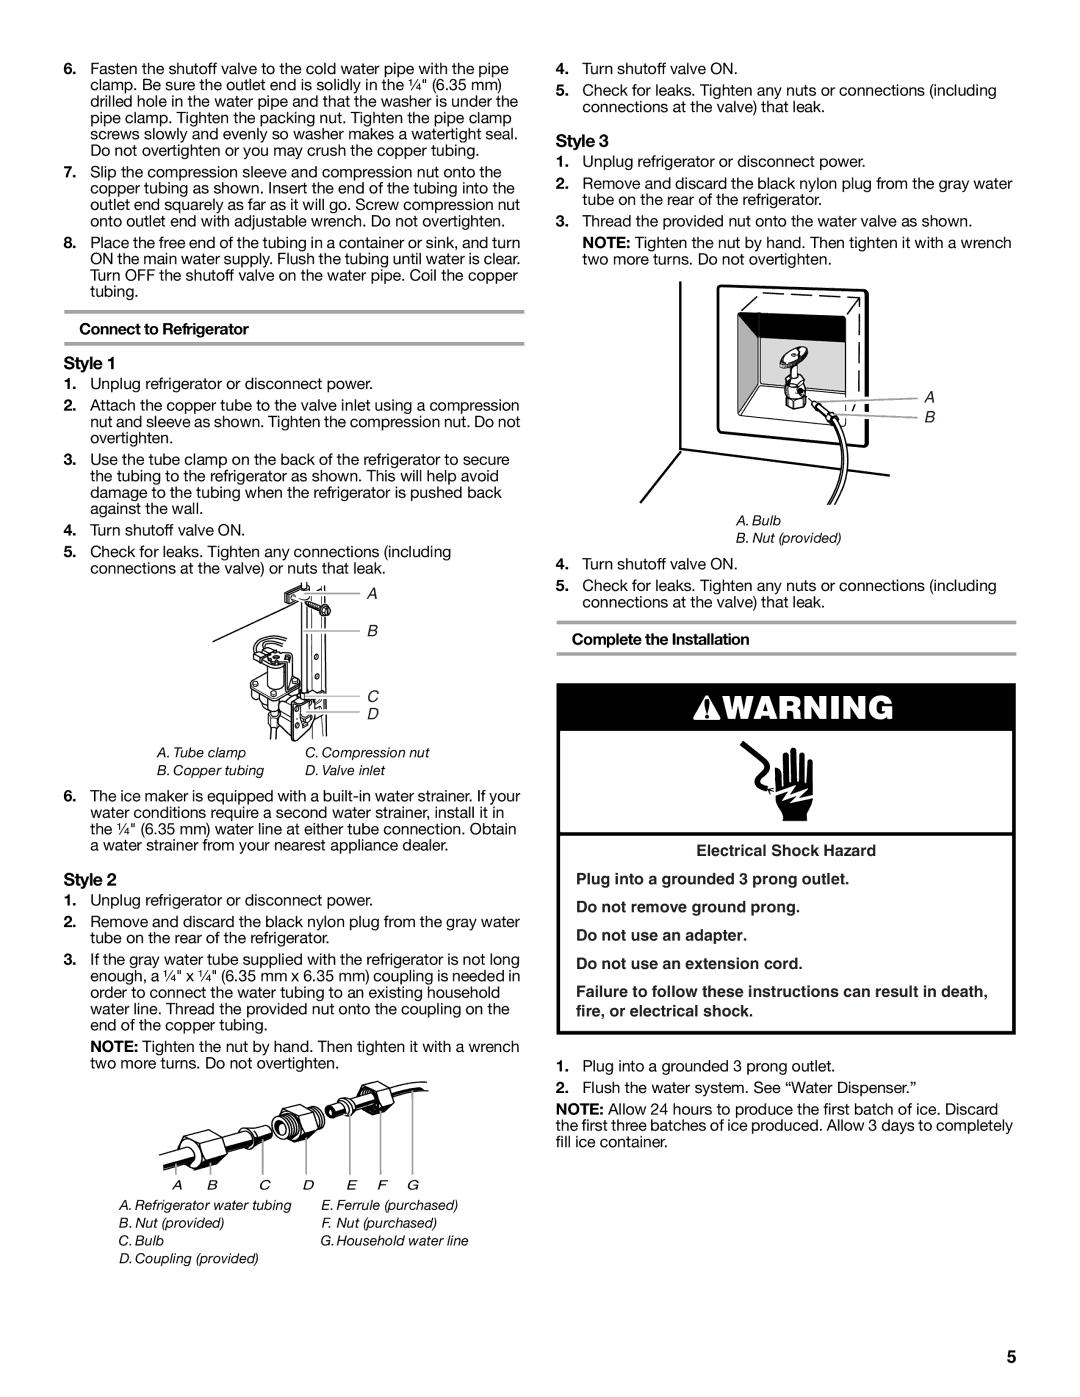
2.Attach the copper tube to the valve inlet using a compression nut and sleeve as shown. Tighten the compression nut. Do not overtighten.

3.Use the tube clamp on the back of the refrigerator to secure the tubing to the refrigerator as shown. This will help avoid damage to the tubing when the refrigerator is pushed back against the wall.

4.Turn shutoff valve ON.

5.Check for leaks. Tighten any connections (including connections at the valve) or nuts that leak.

A

B

C

D

A. Tube clamp

C. Compression nut

B. Copper tubing

D. Valve inlet

6.The ice maker is equipped with a built-in water strainer. If your water conditions require a second water strainer, install it in the ¹⁄₄" (6.35 mm) water line at either tube connection. Obtain a water strainer from your nearest appliance dealer.

Style 2

1.Unplug refrigerator or disconnect power.

2.Remove and discard the black nylon plug from the gray water tube on the rear of the refrigerator.

3.If the gray water tube supplied with the refrigerator is not long enough, a ¹⁄₄" x ¹⁄₄" (6.35 mm x 6.35 mm) coupling is needed in order to connect the water tubing to an existing household water line. Thread the provided nut onto the coupling on the end of the copper tubing.

NOTE: Tighten the nut by hand. Then tighten it with a wrench two more turns. Do not overtighten.

A

B

C

D

E F G

A. Refrigerator water tubing


E. Ferrule (purchased)

B. Nut (provided)


F. Nut (purchased)

C. Bulb


G.Household water line

D. Coupling (provided)


4.Turn shutoff valve ON.

5.Check for leaks. Tighten any nuts or connections (including connections at the valve) that leak.

Style 3

1.Unplug refrigerator or disconnect power.

2.Remove and discard the black nylon plug from the gray water tube on the rear of the refrigerator.

3.Thread the provided nut onto the water valve as shown.

NOTE: Tighten the nut by hand. Then tighten it with a wrench two more turns. Do not overtighten.

A

B

A.Bulb

B.Nut (provided)

4.Turn shutoff valve ON.

5.Check for leaks. Tighten any nuts or connections (including connections at the valve) that leak.

Complete the Installation

WARNING

Electrical Shock Hazard

Plug into a grounded 3 prong outlet.

Do not remove ground prong.

Do not use an adapter.

Do not use an extension cord.

Failure to follow these instructions can result in death, fire, or electrical shock.

1.Plug into a grounded 3 prong outlet.

2.Flush the water system. See “Water Dispenser.”

NOTE: Allow 24 hours to produce the first batch of ice. Discard the first three batches of ice produced. Allow 3 days to completely fill ice container.

5

Page 5
Image 5
Whirlpool ET1FHTXMB04 warranty Style, Connect to Refrigerator

ET1FHTXMB04 specifications

The Whirlpool ET1FHTXMB04 refrigerator stands out in the realm of home appliances, delivering a blend of efficiency, design, and functionality to meet the diverse needs of modern households. A key feature of this refrigerator is its spacious interior, designed to accommodate a wide range of food items, from everyday groceries to larger items. With a total capacity of approximately 18 cubic feet, it provides ample storage space while maintaining a compact footprint suitable for various kitchen layouts.

One notable feature of the ET1FHTXMB04 is its adjustable shelves. These customizable shelves allow users to configure the interior layout according to their storage needs, accommodating taller items or facilitating a more organized arrangement for smaller goods. The easy-to-clean glass shelves also help prevent spills from spreading, ensuring a hygienic environment for food storage.

In terms of refrigeration technology, the ET1FHTXMB04 is equipped with a mechanical temperature control system that ensures consistent cooling. This system allows users to easily adjust the temperature settings to their preference, ensuring food items remain fresh for extended periods. The refrigerator's energy efficiency is also commendable, as it is designed to operate at optimal levels while consuming minimal energy, contributing to lower utility bills and a smaller carbon footprint.

The Whirlpool ET1FHTXMB04 refrigerator features a fresh food compartment that includes crisper drawers, ideal for storing fruits and vegetables while preserving their texture and flavor. These bins are designed to regulate humidity, creating an optimal environment for produce storage. Additionally, the separate freezer compartment, with its dedicated space for frozen items, employs a good seal to help maintain freezing temperatures.

Aesthetically, the Whirlpool ET1FHTXMB04 boasts a sleek design with a fingerprint-resistant finish that enhances its modern look while minimizing the visibility of smudges. The integrated handle offers convenience without compromising on style, making it a seamless fit for any kitchen decor.

Moreover, this refrigerator incorporates Whirlpool’s commitment to quality and durability, ensuring that customers receive a reliable product backed by a respected brand. Overall, the Whirlpool ET1FHTXMB04 refrigerator combines thoughtful features, practical technologies, and stylish design, making it an excellent choice for those seeking a dependable appliance for their kitchen needs.